2020年8月31日星期一
My table saw blade won't tilt far enough! (How to cut acute bevels)
from Stumpy Nubs https://www.youtube.com/watch?v=wngAoA7Cek0
Drawing on a tablet
It's not the same as pencil and paper—yet. But as Vic Tesolin says, sketching on a tablet is pretty fun and it saves the trees for woodworking
from FineWoodworking https://ift.tt/31LOrUq
from FineWoodworking https://ift.tt/31LOrUq
Sharpening A Table Saw Blade on the Table Saw
from John Heisz - I Build It https://www.youtube.com/watch?v=zHtVT-phN5I
2020年8月30日星期日
Chunky Console Table Desk with Flip Down Keyboard Tray
This plan has been updated, the original plans are still available here.
from Recent Project Plans https://ift.tt/3gFekt3
8 Foot Picnic Table
Why We Love This Picnic Table
- 8 foot long size perfect for large gatherings
- Efficient plans minimize cutting and scrap wood
- Easy build requires minimal tools and woodworking knowledge
- Can be customized to suit your needs and space
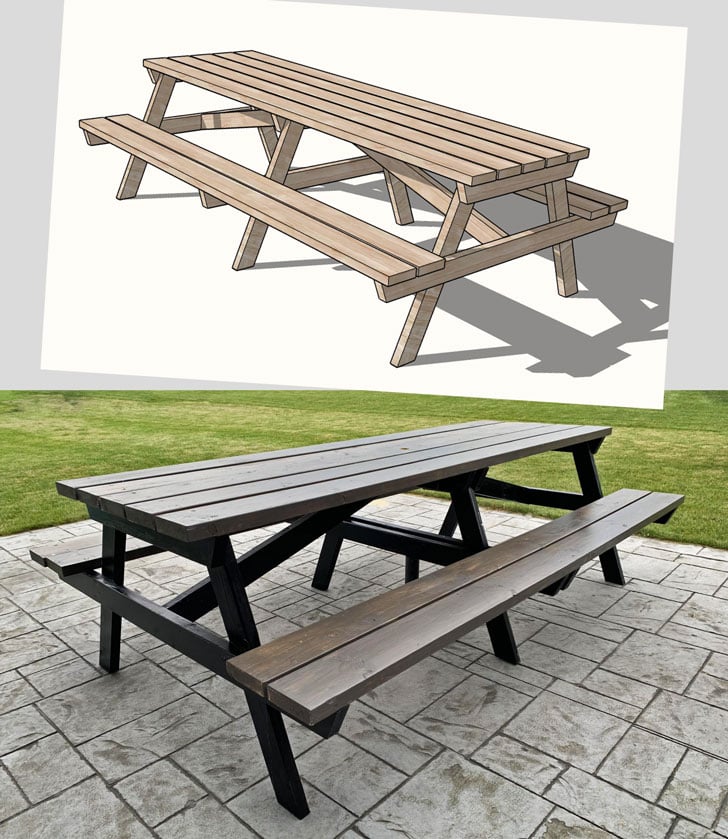
from Recent Project Plans https://ift.tt/31I11nG
Building a functional Record Player Cabinet
from Laura Kampf https://www.youtube.com/watch?v=Zhfn9LWoI2w
2020年8月29日星期六
Dough Trays
The Southern tradition of handmade wooden bowls
from FineWoodworking https://ift.tt/34JRr5j
from FineWoodworking https://ift.tt/34JRr5j
2020年8月28日星期五
Space Balls Prevent Stuck Router Bits
In the past I’ve resorted to a dead blow hammer to tap router bits free when they get stuck in my router’s collet. Then a better solution came to me: I inserted one of Rockler’s rubber “Space Balls” for cabinet doors into the collet to prevent the bit’s shank from bottoming out.
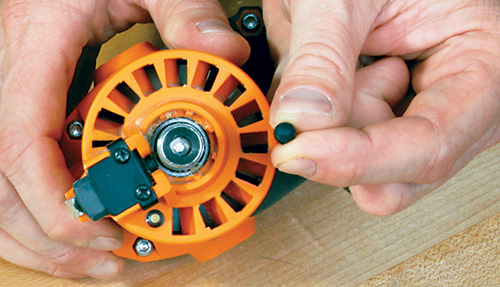
I first applied a small dab of multipurpose adhesive inside the collet (inset photo) to hold the ball in place. I’ve been using the original Space Ball for more than a year now. It hasn’t fallen out, and I haven’t had a stuck router bit since.
– Gary Storme
Anacortes, Washington
The post Space Balls Prevent Stuck Router Bits appeared first on Woodworking | Blog | Videos | Plans | How To.
from Woodworking | Blog | Videos | Plans | How To https://ift.tt/3julDWx
Make A Hot Wire Foam Cutter || DIY Foam Cutting Machine
from Mistry MakeTool https://www.youtube.com/watch?v=PDUGLNdQD6I
Thickness Tapers, Shelves, & Assembly | Nicole’s Desk Pt. 2
The desk has two shelves that span the distance between the front and rear legs and they are held in place with a dado. We’ll make that dado using a miter gauge and a dado stack at the table saw. From there we’ll thin the legs with a nice taper using a shop-made sled and the planer.
Assembly starts with a sub-assembly of the inner drawer compartment structure. Once that’s complete, we can attach the legs. You really need to be careful with this glueup and as you’ll see, even though I thought I was fully prepared, I still screwed something up. Glueups always keep you on your toes.
The shelves are going to be made from white oak and will serve as a nice complementary color and grain with the walnut. The white oak panels are carefully cut to size so they fit between the walnut legs when resting in the dadoes.
Links & Stuff
- MLCS 1/8″ Router Bit (#6084)
- Titebond Extend
- Lee Valley Drawing Bow
- TWW Card Scraper
- Preppin’ Weapon Sanding Block
- TWW BBQ YouTube
- TWWBBQ Instagram
The post Thickness Tapers, Shelves, & Assembly | Nicole’s Desk Pt. 2 appeared first on The Wood Whisperer.
from The Wood Whisperer https://ift.tt/3ls0qy3
Perfectly Flat CNC Spoilbaord & Spindle Tramming with a Simple Jig
from Marius Hornberger https://www.youtube.com/watch?v=-5djjuWSExI
2020年8月27日星期四
Quick Release Vise Idea - Made from Scrap Wood
from John Heisz - I Build It https://www.youtube.com/watch?v=wGAR7ztqphw
How long for floor boards to acclimatize -- experiments
from Matthias random stuff https://www.youtube.com/watch?v=UzNhHCTlBsA
Barnboard Quilt Photo Contest
The post Barnboard Quilt Photo Contest appeared first on WoodWorkers Guild of America.
from Blog – WoodWorkers Guild of America https://ift.tt/2EESZmo
The Industrial Desk – New Video Series!

We’re About to Get Started With A New Project.
In our latest video build we’re working step-by-step and building a desk in solid oak. (Watch the intro above).
The series can be purchased by Clicking Here
If you’re already a Member then you may need to Login first
The Desk Design
The inspiration for this desk was industrial furniture. The sort you see that combines tubular bent metal with man made boards.
Continue reading at The English Woodworker.


2020年8月26日星期三
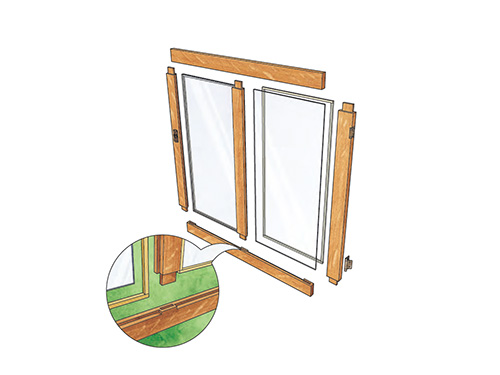
Making Frame-and-Panel Doors
As the saying goes, there are three unavoidable things in life: death, taxes and wood movement. And the irresistible force of wood movement is exactly why the frame-and-panel technique for solid wood construction was invented hundreds of years ago.
Raised Panel Doors
|
Before that, large panels of wood were mostly edge glued (but not always) and likely had long strips of metal across their face to try to keep them together and from distorting. If a frame was attached around a panel, that panel was always more powerful than its constraints.
Then some brainy person figured out the predictability of wood’s expansion and contraction, especially of wooden panels, and came up with a way to accommodate it.
A Combination of Factors
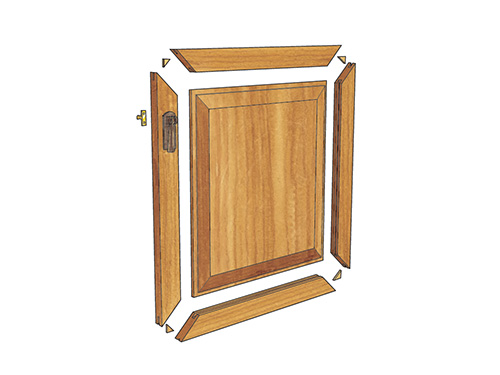
Raised Panel Doors – Corner Joint Variation
|
Wood moves in a couple of different directions, particularly across its grain. The wider the panel, the more it expands and contracts and the more problematic it can become when housed inside a frame. By comparison, wood expands and contracts much less across the grain of a narrow piece of wood. That’s why what we now know as rails and stiles of cabinet doors are made from narrower strips. Neither panels, rails nor stiles move to any significant degree along their grain, or end-to-end as you might describe it.
Joining Stiles and Rails
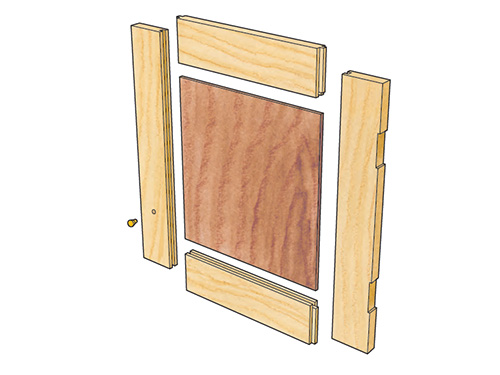
Flat Panel Doors
|
The key to making a solid door frame is to create durable corner joints. This is done most commonly with a mortise-and-tenon joint, which has a geometry that is hard to beat for this task. The mortise is a socket that captures a protruding tenon. If made properly, tenons will have a gentle friction fit in their mortises, and their shoulders will engage tightly against the mortised stock. The joint becomes even more durable when glue and pins are added to it.
Because humans are incredibly creative, there are many variations of frame joinery, including bridle joints, loose tenons, dowels and more. They all get the job done in their own way.
In recent years, pocket hole joinery has become another method of making frames quickly and practically, but their angled screws likely won’t have the long-term durability of a classic mortise-and-tenon. Even so, pocket screw joints sure are handy!
Panels
Glass Panel Doors
|
Panels are the largest and most dominant component in a frame-and-panel door, but they receive no joinery. Instead, the frame-and-panel system enables the wood panel to pretty much do what it does — expand and contract across its width. For that reason, the panel is typically captured in grooves plowed along the inside edges of the stiles and rails so it can “float” and move.
Wooden door panels usually are flat or have raised center fields, possibly with carvings. Other panel options include glass, mirror, metal or even ceramic.
Frame-and-panel construction was one of the biggest advancements in the craft of woodworking. It is so successful that when we think of a cabinet door, it comes to mind almost immediately.
The post Making Frame-and-Panel Doors appeared first on Woodworking | Blog | Videos | Plans | How To.
from Woodworking | Blog | Videos | Plans | How To https://ift.tt/2ElHNvf
Production in the time of Covid
Making a magazine from home, with all the pitfalls, cat hair, and communication issues you can possibly imagine.
from FineWoodworking https://ift.tt/2EFC1o0
from FineWoodworking https://ift.tt/2EFC1o0
Workshop Tip: Square up a tracksaw with an add-on fence
Fence helps when aligning large pieces for square cuts
from FineWoodworking https://ift.tt/3lmndvi
from FineWoodworking https://ift.tt/3lmndvi
Webinar: Evolution of a chair with Brian Boggs
Sign up now! Join Brian Boggs, Thursday, Sept. 3, at 7 PM EST for our webinar on Brian's evolving chair designs.
from FineWoodworking https://ift.tt/3aYHSkn
from FineWoodworking https://ift.tt/3aYHSkn
2020年8月25日星期二
Moving Some Shipping Stuff - Warehouse Vlog 2
from Matthew Cremona https://www.youtube.com/watch?v=rZWodHdy_S4
30×40 Shop Part 8: Mini Split Air Filter Update
Video Notes: – Build video and article for the filters: https://ift.tt/2EjruPw – The filters are working as intended. I have no way of measuring any performance change but the units are maintaining a comfortable temperature in the shop during all seasons. The units remain quiet and the fans never reach full speed even on the […]
I See the Light!
 There is a verse in the Book of Ecclesiastes that goes “the grinders cease because they are few, and those looking through the windows grow dim.” It is referring to the inevitable changes people experience as we grow older, our teeth and eyes failing. While my choppers are just fine, thank you, I am definitely adding light fixtures to my working area. Clearly, I would have benefitted from this even in my youth, but now it is a necessity.
Recently, I added a few 10,000 lumen LED lights to my shop. I don’t really know what “lumen” is — but it has got to be powerful, because I felt like I could get a suntan in the shop when I switched them on. It is so much easier to see pencil lines, sanding marks and other details that I can recommend them without hesitation.
Getting older has its benefits and its challenges — but I am glad that there is technology to solve some of the problems.
Rob Johnstone, Woodworker’s Journal
![]()
Get the Most From Your Thickness Planer
Benchtop planers are an extremely useful tool for any workshop. The perform one of the most important tasks in woodworking — smoothing lumber and machining stock to a specific thickness.
Making an Epoxy Resin Pond Table
Resins come in different formulas. I wanted a version that would allow me to pour thick layers, so I used MAS Deep Pour Epoxy (available March 2020) consisting of three parts resin to one part catalyst. Two aspects of this product are its relatively thin consistency and its long cure time. Those combine to make a deeper pour more successful by allowing air bubbles the time and ability to escape.
I’ve been very interested in trying a unique looking set of metal legs called a Straw Bundle “Light” Table Base. Made of steel tubes cut and welded at dramatic angles, they struck my fancy.
![]()
From Our Sponsor

| Epoxy and wood coasters? Now that’s a groovy project! Check out our step-by-step Skill Builder to see the clever construction of these coasters from start to finish. Have fun choosing your own wood species and epoxy color combinations for your own set! |


FREE SHIPPING: $39+ Orders. Additional shipping charges will apply for select oversized items, express orders, international orders, and orders to Alaska, Hawaii, Guam, Puerto Rico, and the Virgin Islands. Rockler reserves the right to limit quantities, correct errors or omissions and modify or end this promotion at any time. Neither 15% off nor FREE SHIPPING can be combined with any other offer or applied to previous orders. Not valid with Rockler’s Professional Catalog and independent resellers. Offer ends 8/27/20.
The post I See the Light! appeared first on Woodworking | Blog | Videos | Plans | How To.
from Woodworking | Blog | Videos | Plans | How To https://ift.tt/2YvQCJq
DO NOT THROW AWAY OLD WOOD AND CHIPBOARDS SCRAPS! MAKE A COOL IDEA!
from UWOODWORKER https://www.youtube.com/watch?v=MrKaWmBA5GQ
More about making bent chair back rungs
from Matthias random stuff https://www.youtube.com/watch?v=b37KP0LoLZI
Pining for Old Pine
Several readers respond to Rob’s question last week about having experience with or access to heart pine lumber. — Editor
“I have not used it, but a lot of people in south Florida have. One of my friends bought an old ‘conch’ house in Key West. He salvaged all of the heart pine and reused it to rebuild. He would have bought more of it if he could. The wood gets darker and harder as it gets older. He could not drive a nail or screw into it without pre-drilling. As far as I know, there are no sources of new old-growth heart pine. All of the old-growth was harvested. Maybe one day we will see ‘new’ old growth! You get this lumber now from houses, buildings and warehouses getting torn down. Very prized and valuable. Several companies claim they have it, but it comes and goes pretty fast. The companies that I know of carry it when they can get it. You might be able to search the specialty lumber recyclers in the southeast. I think it would be well worth it for you to get some and play with it. Hearne Hardwoods (hearnehardwoods.com) lists it for sale.” – Jon Johnson
“I lived in a 1924 Bungalow here in Raleigh, NC, and it had interesting floors: heart pine in the private areas and oak in the public areas. I can’t tell you which I liked better! They were both beautiful and durable!” – Chris Tully
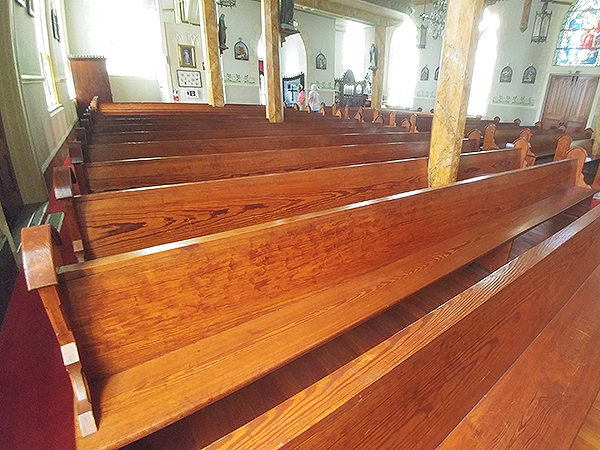
“I truly love the old pine that we see show up in various pieces of furniture and in buildings. Many homes were built and furnished with it here in (Austin) Texas. It grew in abundance in the eastern part of the state, which was quite heavily forested. The truly big ones are gone, sad to say. But they live on in wonderful ways. Take a look at the attached photo (above). I took this recently at one of our ‘painted churches’, which is another story in itself. The benches in this photo are 16-ft. long, bottom boards 16 in. wide and backs are 20 in. wide. All are continuous pieces of old-growth pine. The church is well over 100 years old.” – Dan Miller
“Years back I helped demo an old Cracker house here in Florida. Sadly, there wasn’t much left of it — the guy who bought the property got a little history from last family owner who claimed it was built roughly around 1860. Another house was built around the 1930’s on the property, so the original house first was like a guest house for family, then turned into storage, then sort of a barn for chickens and cows. In one room still standing we counted no less than six wooden floors that had been laid over the top of each other with many, many patches, sometimes no more than large gallon-size cans cut and nailed in place. It was now overrun with various types of critters, bugs and snakes. We only found termite damage in a few places, surprisingly. Over the years and due to settling, several additions had been made. The main supports for the house were solid 6×6 of rough-cut oak, walls were rough-cut 1-in. red pine that use to be plentiful in this area. Some walls were all rough-cut 1-in. cypress. Both wood types being bug-resistant and weathered well for the Florida environment. The sap had seeped out of the red pine and hardened, and some was still sticky after all these years. Some of it was so hard that a chainsaw would throw sparks like you were cutting metal. There were two interior walls that had the yellow pine heartwood that at some point had been painted – once I figured out what it was, I asked the guy if I could keep those boards. He laughed and said, take whatever you want. I took home two pickup truck loads and sanded them down and refinished them. Man, that was pretty wood! The old house had a tin roof on it an where the tin had touched the trusses. They were burned black from the heat of the sun over the decades. Who knows how many storms and hurricanes this now old, dilapidated shack had stood up to…I made a dining room table from the yellow pine and used some for a flooring project in the living room. You would not believe how the lights at night would dance across that floor, especially during Christmas.” – James Russo
“Where can you find yellow pine? I have not seen it in years.” – John Stephens
“I live in New Orleans, and in my opinion, Southern yellow pine (SYP) is readily available in the salvaged/reclaimed wood market. My primary experience with it is as a building/architectural material (often for flooring, where it was a traditional 19th-century choice in this region). From my singular experience (I don’t claim it to be more than that), the bulk comes from dismantled industrial structures in the upper and coastal south. From what I’ve seen at suppliers of salvaged wood, almost any furniture component (with the possible exception of single-board very wide panels) could be constructed. I believe that there may be some limited ‘sinker’ source of SYP, but unlike the local bald cypress that was often felled in the swamps and floated to a mill or other gathering point, SYP tended to be transported overland. My most recent need for the material (earlier this year) was to replace 150-year-old original weatherboards on a farmhouse renovation that my wife and I are undertaking. We found a source in New Orleans that had large beams that could be bandsawn to the correct dimensions. Over the years I have made limited use of the material for little benches, stools, etc. My experience shows that it is a very dense wood when quartersawn, and upon working it with hand or power tools, it smells as if you were in a turpentine factory.” – John H. Lawrence
“I am from South Carolina. Up until about 20 years ago, you could find a lot of good wood if you knew someone with property (like a farm) or if a building such as an old mill or an older home was being demolished. Today people are more savvy about the quality of this material, and it is often bought up by someone who is in the reclaimed lumber business. I think the finest longleaf (pine) came from the sandhill areas, since it was so slow-growing. Some of these trees might increase only an inch in diameter over a 20-year period, and many even less than that. To get a large quantity, you would have to find a structure built probably no later than the 1930’s. I am not sure where you live, but if you are in the east, even as far north as New York, you could find good longleaf lumber in a large old manufacturing building such as a textile mill. The walls were usually brick, but the floors were supported by enormous joist-like beams, often 12×16 or even larger, overlaid with 3×10 or wider decking and topped off with maple strip flooring. The pine available in the area I don’t think was strong enough or large enough, so it was often longleaf pine. As I understand it, even though the construction was wood, and a resinous type at that, a fire would cause steel beams to soften and collapse before the large size beams would ignite. And wood was certainly cheaper at that time. If you live west of the Mississippi, or in the central part of the country, I would guess that any building of this type would have timbers made of Douglas fir — beautiful also but not quite the same as longleaf and not as easy to work. Even as late as the 40’s around here, you could buy siding and quartersawn flooring from any lumberyard, and a lot of it was longleaf. A man across the street from where I grew up had a wooden house with quartersawn pine flooring and 12-in.-wide German siding. I guess we were just born too late! If you ever pass through Columbia, South Carolina, and have your truck, look me up. I would be glad to share some of my old stuff with you. (I’m 70 years old and still haven’t done anything with a lot of it.)” – Gene Lucius
The post Pining for Old Pine appeared first on Woodworking | Blog | Videos | Plans | How To.
from Woodworking | Blog | Videos | Plans | How To https://ift.tt/34u0ibm
2020年8月24日星期一
Festool’s new Edge Sanding Guide attaches to Festool’s corded and cordless sanders
The new sanding attachment adapts to virtually any edge, angle or curvature.
from FineWoodworking https://ift.tt/3jbWiAl
from FineWoodworking https://ift.tt/3jbWiAl
Festool USA introduces all new CT 48 E AC dust extractor with AutoClean functionality
The CT 48 E AC is equipped with a 12.7-gallon capacity and HEPA filtration that helps to remove silica dust.
from FineWoodworking https://ift.tt/34vApHZ
from FineWoodworking https://ift.tt/34vApHZ
Old-timey meets new-fangled: How to DIGITALLY set up a hand plane!
from Stumpy Nubs https://www.youtube.com/watch?v=3KWqudJhg5E
Giant Maple Log with Integrated Bird Feeder
from Matthew Cremona https://www.youtube.com/watch?v=WL963aeQS0c
Time-tested finishes that just work
Megan Fitzpatrick prefers finishes that are easy, fast, and foolproof. In her experience, these six check all three boxes.
from FineWoodworking https://ift.tt/3jaeRF7
from FineWoodworking https://ift.tt/3jaeRF7
2020年8月23日星期日
2020年8月22日星期六
Wow! Cool Idea for Workshop! From Sandpaper Double-sided Tape Plywood!
from UWOODWORKER https://www.youtube.com/watch?v=GBu9m0Fxuzc
2020年8月21日星期五
Setting up the Warehouse vlog 1 - Intro
from Matthew Cremona https://www.youtube.com/watch?v=ePrU6WlSLSo
Telltale Plane Shaving
When you pick up a hand plane, you probably check the blade setting before using it. I don’t. Instead, when I’m finished using a plane, I put it away with one shaving left in the throat. The next time I grab the plane, the shaving tells me exactly how the blade is set for cutting.
– Chris Wong
Pitt Meadows, British Columbia
The post Telltale Plane Shaving appeared first on Woodworking | Blog | Videos | Plans | How To.
from Woodworking | Blog | Videos | Plans | How To https://ift.tt/31hamCm
Fake Accents & Weiners
Woodworking Q&A
The post Fake Accents & Weiners appeared first on The Wood Whisperer.
from The Wood Whisperer https://ift.tt/3hnVaZW
Design, Legs, & Joinery | Nicole’s Desk Pt. 1
Nicole needed a new desk and her only requests were a large top, a shelf, and a drawer. Beyond that, I had complete creative freedom. When I set pencil to paper, I came up with a design that definitely shows some Mid-Century Modern influence, but is largely influenced by Star Trek. This wasn’t an intentional influence so much as something I realized after the design was complete. I’ve been binge-watching old episodes for the last year and the Roddenberry design aesthetic has apparently seeped into my brain.
The theme of this project is developed around the 56 degree angle of the legs. You’ll find that angle carried through to the apron and the drawer. This presented a number of challenges that were fun to tackle.
This is the first video of a 4-part series and it covers the following topics:
- 0:00 – Design Influence
- 1:31 – The Legs
- 3:04 – Leg Tapers
- 4:44 – Leg Miters
- 6:53 – Design Change?
- 8:17 – Apron and Drawer Parts
- 10:27 – Bevel Cuts
- 12:47 – Domino Joinery
Links & Stuff
The post Design, Legs, & Joinery | Nicole’s Desk Pt. 1 appeared first on The Wood Whisperer.
from The Wood Whisperer https://ift.tt/3l7mxK4
Michael Pekovich named editor and creative director of Fine Woodworking
Tom McKenna advances to group editorial director for Taunton Press.
from FineWoodworking https://ift.tt/3hlYEvS
from FineWoodworking https://ift.tt/3hlYEvS
Unnecessary Wrench-Knife | Cocktail Tool
from Black Beard Projects https://www.youtube.com/watch?v=9GpAawjbaFo
How to Turn a Round Frame
Barrie Lynn Bryan turns round frames in medium density fiberboard, before covering the frame in gold leaf and paint.
from FineWoodworking https://ift.tt/32h3HHX
from FineWoodworking https://ift.tt/32h3HHX
Gilding 101: Finishing with Real Gold
One way to add value and panache to your woodturning projects is to use real gold as an accent or as your entire finish. Several years into my career as…
from FineWoodworking https://ift.tt/2EcRlII
from FineWoodworking https://ift.tt/2EcRlII
HOW To Flatten Boards Without A Jointer - Woodworking Tips
from John Heisz - I Build It https://www.youtube.com/watch?v=POYuc6jhXQM
Bandsaw Update, Awesome Gift from a Viewer and CNC Worksurface Update (Random Shop Stuff 23)
from Marius Hornberger https://www.youtube.com/watch?v=MkILcdCutWI
2020年8月20日星期四
Cool Idea! Do It Yourself and Don't Waste Money!
from UWOODWORKER https://www.youtube.com/watch?v=Bns4E4fSq5s
Bandsaw jigs for every shop
From smarter push sticks to auxiliary fences to specialty sleds, these tips will help you get even more from your bandsaw.
from FineWoodworking https://ift.tt/327TltL
from FineWoodworking https://ift.tt/327TltL
Every woodworker need three table saw blades.
from Stumpy Nubs https://www.youtube.com/watch?v=OSQJ0247ifY
2020年8月19日星期三
Grow Against Poverty
Last March, the Woodworker’s Journal Weekly asked for project submissions to share what we’ve been working on during the pandemic stay-at-home. I submitted photos of a few of the hundreds of items that I’ve been building to be sold at our annual holiday “Crafts for a Cause” sale for education and community development projects in Kenya.
Fifteen years ago, my wife Jean and I read an article about education becoming free in Africa. Schools became overcrowded, often with more than 100 students in a class. We contacted Michael Kremer, a Harvard economics professor and subsequently a Nobel Prize recipient, about how we could help. He said that donating money to sponsor a teacher would be beneficial, which, as teachers, we were very happy to do.

Our Kenyan contact person, Helen Mukanda, told us of the many needs of the Nambale community in Busia County. In 2010 we decided to start a 501(c) (3) nonprofit called Grow Against Poverty and to raise money through the sale of my woodcrafts. Since then we’ve raised over $71,000 selling salad bowls, cutting boards, toys, tea boxes, candleholders and other works in wood.

Ideas for the programs and projects come from community residents, school staff, Helen and other volunteers, who see education as an important way out of poverty. Using Grow Against Poverty proceeds, we’ve implemented school projects and programs. Classrooms have been built, and we’ve outfitted a 12-station computer room. We started a meal program, which is now community-funded, and we’ve planted school organic gardens as well as tree seedling nurseries. These will soon become self-sustaining.
Pedal Power Program

A particularly effective program that was started two years ago is a school bicycle transportation program called “Pedal Power for Kenyan Education.” Many students walk over 5 miles each way to and from high school, often needing to wake up at 4 a.m. to make their morning classes. Grow Against Poverty has provided St. Mary’s School with 50 bicycles, helmets, safety vests and tool kits to loan to students, most from subsistence farming families living on less than a dollar a day.

With a reduced commuting time, students have more time for studying, caring for siblings and working on family farms. Attendance, promptness and academic performance have all improved through this bicycle program. Seven recent graduates have gone on to university, compared to four the previous year. This success has brought requests from five other schools for similar programs. We are starting to raise money to furnish each school with 50 bicycles and accessories.

The immediate focus of Grow Against Poverty is the predicted famine that could affect this region because of the current COVID-19 pandemic. We’ve sent funds to purchase hoes called jembes and other tools and supplies for 100 farm families so that students who are home from school can provide extra help with food production.

Charitable donations of wood and other supplies for my woodcrafts make our fundraising for these Kenyan projects possible. Local businesses have given me woods such as oak, cherry, walnut, mahogany, teak and Brazilian ebony for this endeavor. A local hardware store has supplied glue and finishes. Online businesses have donated finishes, veneer and inlays, too. I supply whatever else is needed as well as pleasurable time in the shop with a hobby that has the extra benefit of helping others.
– John Roccanova
To find out more about Grow Against Poverty’s programs, visit: www.globalgiving.org/projects/pedal-power-for-kenyan-education and www.growagainstpoverty.wixsite.com/kenya.
The post Grow Against Poverty appeared first on Woodworking | Blog | Videos | Plans | How To.
from Woodworking | Blog | Videos | Plans | How To https://ift.tt/34eQAcL
A Couple of Follow Me Tricks for SketchUp
Dave Richards demonstrates some functions of the follow-me tool that many SketchUp users might not be aware of.
from FineWoodworking https://ift.tt/2EeoPpU
from FineWoodworking https://ift.tt/2EeoPpU
2020年8月18日星期二
DIY Kids School Desk – Quick, Easy, Inexpensive!
Are your kids doing remote learning this year thanks to COVID? If so, you could probably use a DIY Kids School Desk to help provide them with a more school-like environment. Will that help? Probably not, but we have to try something! The desks are made with just 1/4 sheet of 1/2″ plywood and a single 2×4. Quick, easy, and inexpensive!
I show you how to make two versions: a Basic model held together with glue and screws and a special Joinery version that makes use of half-laps and notches for a slicker aesthetic. Both versions are laid out in our free plans which you can download now.
Free Plans
Stuff Used in the Video
If you’re in search of a simple chair design, we have one here: Kids Table & Chair Set
The post DIY Kids School Desk – Quick, Easy, Inexpensive! appeared first on The Wood Whisperer.
from The Wood Whisperer https://ift.tt/3iSibo7
Woodshop First Aid, PPE, & Safety – A necessary discussion
Let’s talk shop safety! It’s an exciting topic, right? Not really. But it is a necessary topic to discuss. Before we begin know that I’m not an expert at any of this. I’m just someone who has been active almost daily in a woodshop of some kind for the past decade and I regularly have […]
Make a portable bench-top workstation for woodworking joinery
from Stumpy Nubs https://www.youtube.com/watch?v=ADcwKiPD6QQ
Workshop Tip: Speed Square is the perfect guide for mitering small parts
Setup works for tiny trimming cuts, back bevels, and mitering stringing
from FineWoodworking https://ift.tt/2EcBKbJ
from FineWoodworking https://ift.tt/2EcBKbJ
Modern cabinet hardware: Good, bad or fine?
Soft close and other features of modern hardware are really convenient. But do they belong on 'fine' furniture?
from FineWoodworking https://ift.tt/3aF1Lga
from FineWoodworking https://ift.tt/3aF1Lga
Heart Pine
Many years ago I went down to Alabama at the invitation of Tim Knight, a US Government Forester, and learned about Long Leaf Pine. Between Tim and Rhett Johnson from the Solon Dixon Center, I was given a master class in this amazing American wood and their attempts to bring it back as the primary coastal pine. And beyond that, they explained to this Yankee boy about heart pine — the heartwood of several species of southern yellow pine, including Long Leaf, with its rich color and beautiful grain. (Especially in its quarter-saw form.) It was a revelation to me as northern pine, like yours truly, is pale and nondescript.
So for my southern readers, is heart pine readily available in your area? Can you get it in quantities to do some serious woodworking with? If so, this northern boy is jealous.
Rob Johnstone, Woodworker’s Journal
![]()
Apron-maker Shifts to PPE Amid COVID Crisis

Responding to national shortages, Calavera Tool Works makes masks. Hear from founder Michael Williams on making this change during difficult times.
![]()
Should I Buy a Shop Vac or Dust Collector?
Which would be better and more useful in a shop a good shop vac or dust collector? Our experts give their thoughts.
![]()
From Our Sponsor
| We’ve all been there, right in the middle of a project when suddenly you realize you’re out of glue, or sandpaper, or something else basic but vital. You can avoid this woodworking travesty by planning ahead and stocking up! Chris Marshall takes us through his approach to keeping consumables in good supply. |


FREE SHIPPING: $39+ Orders. Additional shipping charges will apply for select oversized items, express orders, international orders, and orders to Alaska, Hawaii, Guam, Puerto Rico, and the Virgin Islands. Rockler reserves the right to limit quantities, correct errors or omissions and modify or end this promotion at any time. Neither 15% off nor FREE SHIPPING can be combined with any other offer or applied to previous orders. Not valid with Rockler’s Professional Catalog and independent resellers. Offer ends 8/27/20.
The post Heart Pine appeared first on Woodworking | Blog | Videos | Plans | How To.
from Woodworking | Blog | Videos | Plans | How To https://ift.tt/315haTK
Off His (Wing) Nut
Last week, Rob came to the defense of the lowly wing nut, and so have several of you. – Editor
“One definition that I can attest to is the friendly description of an aircraft mechanic in the US Air Force. Most of the job titles on base had nicknames, and I as an aircraft mechanic was frequently called a ‘wing nut!'” – Chuck Jones Msgt USAF, retired
“There is also a national organization of fans and riders of the Honda Gold Wing motorcycle who call themselves ‘wing nuts.'” – Ralph Lombardo
“Having lived for many years in Colorado Springs adjacent to the United States Air Force Academy, ‘wing nut’ has a totally different meaning to me. ‘Wing nut’ (along with ‘zoomie’ and other less flattering names) is local slang for the USAFA cadets, since 95 percent+ of them intend to be pilots after graduation.” – David Hood
“That (editorial) was really great bit of writing! Really brightened my day. Keep up the good work.” – J. Eric Pennestri
“Being a long-time wing nut myself, I totally concur.” – Jeff Blavat
“When I started to read this, I had to laugh to myself. Why you ask? Because I’m retired Air Force (1966-86), and I can’t tell you the number of times I was referred to as a ‘wing nut.’ I guess it comes with the territory. BTW, love your comments in each and every issue. Now let me get back to my wood shop.” – Gary Mast
“What can I do to help in your quest?” – Doyle Moeller
“Rob, seriously, you need to take two aspirins and call again in the morning. Geez, wing nuts — sounds like you’re nuts.” – R. L. Hoyle
The post Off His (Wing) Nut appeared first on Woodworking | Blog | Videos | Plans | How To.
from Woodworking | Blog | Videos | Plans | How To https://ift.tt/3g71qUo
My Simple Jig for Dead Straight Cuts - Woodworking Tips
from John Heisz - I Build It https://www.youtube.com/watch?v=J08ZQjOBbmQ
2020年8月16日星期日
Brookstone Desk
This plan has been updated. The original plans are still available here.
from Recent Project Plans https://ift.tt/313KKsS
Brookstone Desk Hutch
This plan has been updated. The original plans are still available here.
from Recent Project Plans https://ift.tt/311Ptez
Making a (very cool looking) Modern Console Stereo - Woodworking
from John Heisz - I Build It https://www.youtube.com/watch?v=nckgGjz_O7k
2020年8月14日星期五
Registration & Wrap Up - Urban Logging Trailer Build Pt 11
from Matthew Cremona https://www.youtube.com/watch?v=l6BnMa0U0fQ
STL222: The call of the solid-wood chessboard
Mike, Anissa, and Ben discuss more tablesaw safety, solid-wood chessboards, hotel woodworking for a heath care worker on covid assignment, and sawing a wooden blimp in half. Plus, a new jingle and a new boss!
from FineWoodworking https://ift.tt/3iHsonn
from FineWoodworking https://ift.tt/3iHsonn
You Get What You Get!
Show notes coming soon.
The post You Get What You Get! appeared first on The Wood Whisperer.
from The Wood Whisperer https://ift.tt/2Fhu4p4
THANK YOU FOR OUR 100K SUBSCRIBERS - Unboxing My 1st YouTube Award Silver Play Button | UWOODWORKER
from UWOODWORKER https://www.youtube.com/watch?v=HKXwnWftDuM
Turning a Poly-V belt Pulley for the Homemade Bandsaw
from Marius Hornberger https://www.youtube.com/watch?v=YMrCWJDaImU
Make Raspberry Pi blink it's IP address
from Matthias random stuff https://www.youtube.com/watch?v=XbJ5vT8FvXU
2020年8月13日星期四
I need to tell you about some big changes and some new projects.
from Stumpy Nubs https://www.youtube.com/watch?v=MnewaWikpB0
What is “fine woodworking”, anyway?
The job was challenging, the client is happy, and Nancy Hiller learned a few things along the way. That's "fine" enough for us.
from FineWoodworking https://ift.tt/2DGqN2r
from FineWoodworking https://ift.tt/2DGqN2r
PROJECT: Turn a Birdcage Awl
This article, “Turn a Birdcage Awl,” by Mike Peace, is from the pages of American Woodturner and is brought to you by the America Association of Woodturners (AAW) in partnership with Woodworker’s Journal.
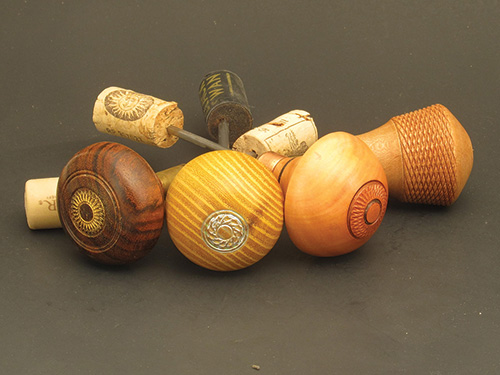
Here is an easy and fun project suitable for beginning turners as well as anyone who needs an awl. Awls make a great gift for anyone with a toolbox! Why are they useful? Woodworkers use scratch awls for scribing lines and making starting holes for screws or drill bits. Leather workers use awls for punching holes in leather for stitching.
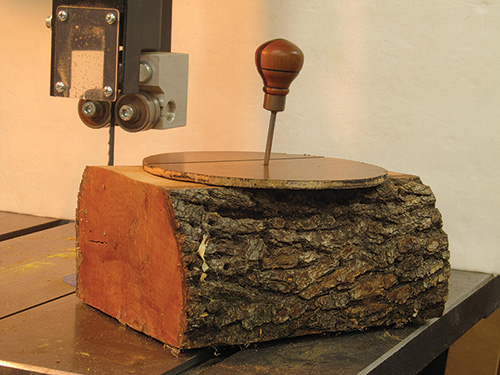
As a woodturner, I use an awl to mark the center of a spindle-turning blank, and I use a small dedicated awl to hold my bowl templates in place instead of a nail or screw. And, with a longer shaft and a longer, straight handle, you have an ice pick instead.
Design
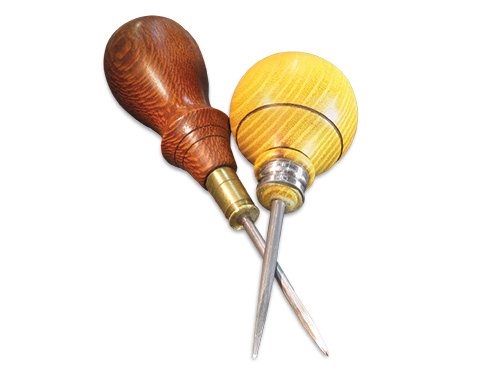
See what fits your hand best for the awl’s intended use. If you are a relatively new turner, I would suggest using some branch or scrap wood and experiment with the handle design by practice-turning some shapes. This will reduce your anxiety when turning that expensive exotic or special scrap of spalted or figured wood you plan to use for the handle. I prefer a large round handle that fits in the palm of my hand for a general-purpose awl. I tend to make mine about 5-1/4″ (13cm) long overall, with the handle about 2″ (5cm) in diameter and 2-1/2″ (6cm) long and the metal shaft about 23/4″ (7cm) long. Scratch awls and ice picks tend to be a bit longer than a general-purpose awl, maybe 7″ (18cm) with a smaller diameter handle.
Project Wood
Almost any dry hardwood blank approximately 2″ square and 4″ (10cm) long will do, depending on your design preference. I have used cedar elm, cherry and maple laminated together, Osage orange, dogwood, mesquite, and pear, as well as a variety of exotics such as bocote, zapote, zebrawood, Yucatan rosewood, jatoba, and many more. Figured wood and wood with prominent grain look nice, but plainer woods like maple, dogwood, and pear lend themselves to embellishing with burn rings and texturing.
The Shaft
You should use a piece of high-carbon steel for the awl shaft, as it is strong and hard; do not use an ordinary nail. If you plan to make only one awl, you could use an old drill bit by burying the fluted end into the handle, but it would need to be longer than an ordinary bit. However, making these is addictive, so I recommend buying some rods of music wire, also known as piano wire or spring steel. Music wire is made of high-carbon steel that is pulled through a die at room temperature to form a thin wire, then heat-tempered. The end product is a wire that can endure high amounts of tension and stress repeatedly without losing its strength or elasticity.
Music wire, often used for landing gear on radio-controlled model tairplanes, is available from hobby shops, some hardware stores, and on the Internet (at sites like Amazon or eBay). I buy K&S Music Wire 5/32″ (4mm) diameter by 36″ (91cm) long. It typically comes in a pack of seven rods for about $18, including shipping. If you prefer a sturdier shaft, you can get 3/16″- (5mm-) diameter rod, also in 36″ lengths.
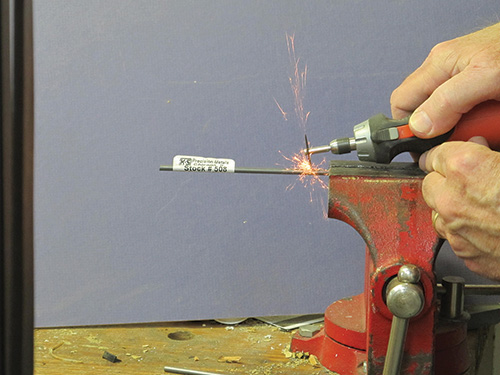
For a general-purpose awl, I cut the shaft about 4″ long. I place the wire in a vise and cut it using a rotary tool with a cutoff wheel, but you could also cut it with an angle grinder with a metal cutting wheel or a jigsaw with a metal cutting blade. Cutting music wire with a hacksaw is a challenge—the wire’s hardness tends to cause the blade to skate over the surface. You should be able to get at least eight shafts from one 36″ rod. So for about 32 cents per shaft, music wire is very cost-effective. The low-carbon, cold-rolled steel you might find at the larger home-supply stores is just too soft to use for an edged tool.
Ferrules

You can make your ferrule from a wide variety of materials, such as a piece of copper pipe, a brass shell casing, or a brass plumbing fitting like a 3/16″ (4.8mm) flare or compression nut. I have also used the inner ball-bearing race from a worn-out bearing from my bandsaw.
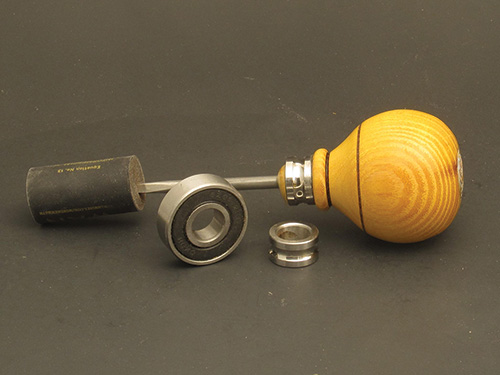
If your brass fitting has exterior threads or flats you want to reduce or eliminate, you can easily file these off by hand with the work held on the lathe. Alternatively, you can use a sharp HSS scraper or parting tool to shape the brass.

Safety Note: Keep the lathe speed about 600 to 700 rpm and take light cuts. After finalshaping, progressively sand the ferrule up to 600 grit to remove the scratches. Be careful not to transfer the dark metallic oxides from the sandpaper onto the wood.
Turn the Handle
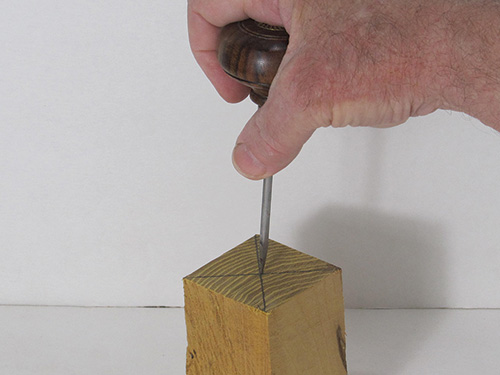
The turning tools you will need for this project are a small spindle gouge, a spindle-roughing gouge, a parting tool, and perhaps a skew or point tool to cut V-grooves. Use a ruler to draw lines diagonally from corner to corner to identify the center. Use an awl to mark the center on each end where the lines cross. (If you don’t yet have an awl, a nail set or even a nail will do to punch a center hole.)
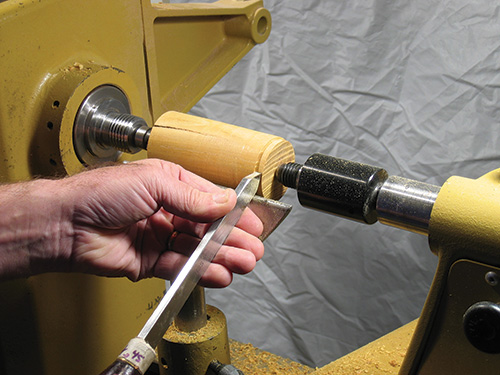
Mount the blank between the drive and live center. Use your spindle-roughing gouge or skew to turn the handle blank round. Use a parting tool to turn a tenon on one end to fit your scroll chuck.
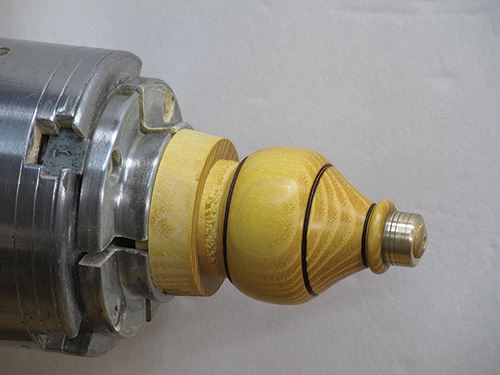
Reverse-mount the blank in the chuck using the tenon you just cut. Now cut a new tenon on the tailstock end with your parting tool, this time as a surface to accept the ferrule. Use the ferrule you are going to use as a guide for marking the length. Add an extra 1/16″ (1.6mm) so the tenon will just sit proud of the ferrule even after any sanding. A ferrule prevents the handle from splitting and provides a smooth transition from the shaft to the handle. Put a slight chamfer on the end of the tenon to make it easier to slide on the ferrule and for a refined final appearance.
Fit the ferrule to the handle tenon. “Sneak up” on sizing the tenon so you will have a snug fit. When you achieve a good fit, use epoxy to glue on the ferrule. I usually leave the blank mounted in the chuck and simply unscrew the chuck from the lathe for this operation. This will ensure the blank will run true when you put the chuck back on the lathe. After the glue has cured, you can finish shaping the handle. Moreover, you can shape and polish the ferrule as necessary.

Next, put a drill bit 1/64″ (0.4mm) larger than the wire shaft size in a drill chuck. (Tip: To center the drill bit in the chuck, insert and tighten it off the lathe.) Now mount the drill chuck in the tailstock and with the lathe turning at about 1000 to 1500 rpm, drill the hole 1-1/4″ (3cm) deep. Clear the chips often and keep your left hand on the drill chuck when retracting. This will ensure you can shut off the lathe in time to prevent injury if you notice the drill chuck being pulled out of the tailstock. You will glue in the wire shaft later, after completing the handle and removing it from the lathe.
Shape the handle as you see fit with a spindle gouge. Remember, on a spindle project, cutting “downhill” from large diameter to smaller diameter yields the cleanest cut. Carefully shape the handle to the edge of the ferrule so there will be a smooth transition. A bead here is an attractive feature. It also helps with reverse-chucking, as we will see shortly. Finish sanding through the different grits up to about 320 for domestic woods. You may want to go up to 600 grit for exotics that do not take a finish but will polish nicely. When sanding, do not press too hard or turn too fast, or you can overheat the wood and get heat checks, especially with dense-grain exotics.
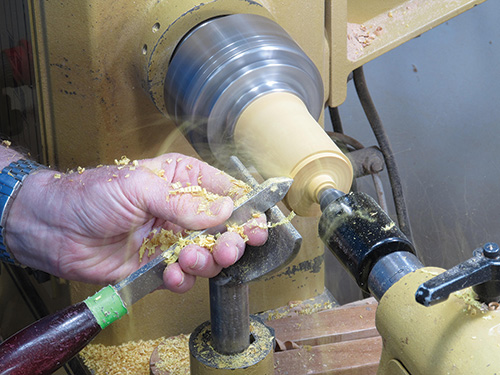
If you like, you can embellish the handle with beads, V-grooves, burn rings, or texturing. Sand the ferrule up to 600 grit to polish it, as well. Do not reuse the sandpaper after sanding the ferrule or the black oxides from the metal can stain your wood. Now part off the handle, or part down most of the way and make the last cut with a fine-toothed saw with the lathe off. I wrap a piece of tape around the ferrule and reverse-chuck the handle by clamping it on the inside of my chuck jaws with a bead snugly pressed up against the inside of the jaw faces.

With this chucking method, a bead or some other shoulder feature is needed to get a strong enough hold on the blank. This allows me to easily finish-sand the butt of the handle and add an optional textured feature with a texturing tool like a knurling tool, Sorby micro-spiraling tool, or even a chatter tool.
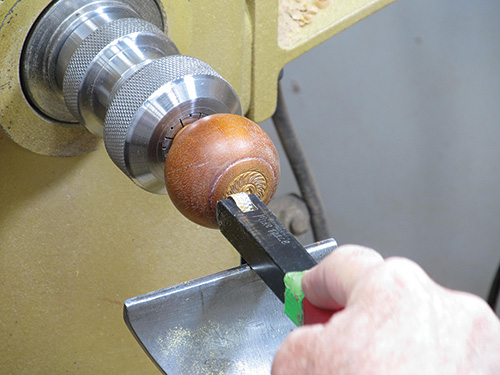
Use a knurling or spiraling tool at a speed no higher than 400 rpm. Start texturing about 3/32″ (2.4mm) to the left of center. Notice that I was able to use a collet chuck as an alternative, secure holding method. A knurling tool with 16 tpi works better in very hard woods than 12 tpi. A non-woven abrasive pad like a green Scotch Brite pad is a great way to clean off any frizzies left by the texturing tool.
I like to frame the textured area with a small bead or V-groove cut with a point tool or the tip of a skew on its side. It is a good idea to practice your texturing technique on an endgrain scrap before using it on a project. Adding a bit of metallic wax to the texturing as a final touch really makes it pop.
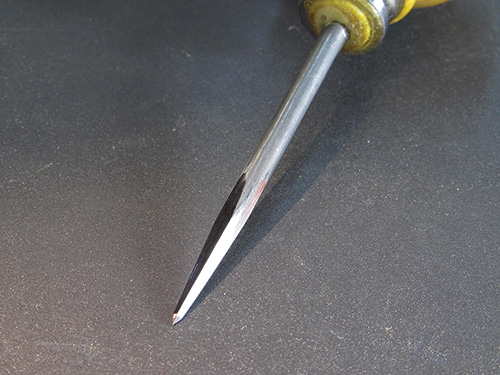
Birdcage Awl Grind
The term birdcage awl refers to the tool’s original use for boring various-sized holes in the construction of birdcages, back when woodworkers commonly made all types and sizes of birdcages for holding and transporting exotic birds and poultry. The birdcage awl is capable of producing a tapered, round hole in wood by actually shearing the wood fibers with its reaming action.
To make a birdcage awl, simply grind the point with a long, square pyramid shape from the point back 1″ to 1-1/4″. The four sharp sides all act as cutting edges when you twist the awl into wood.
Make a Steel Shaft

Cut the music wire for the shaft with a rotary tool equipped with a cut-off wheel. The length depends on your awl design. I prefer to cut mine 4″ long, which allows me to bury the shaft in a 1-1/4″- deep hole, leaving a 2-3/4″-long exposed shaft. To ensure a good glue bond of the metal to wood, rough up the inch of metal that will be glued by rotating it while drawing it quickly along the edge of your grinder. Mix the epoxy with the end of the wire shaft that will go into the hole, and push it in or tap it in with a mallet. I use the five-minute set epoxy, but almost any variety will do. The glue will tend to push out the shaft while curing, so I clamp it to prevent that from happening.
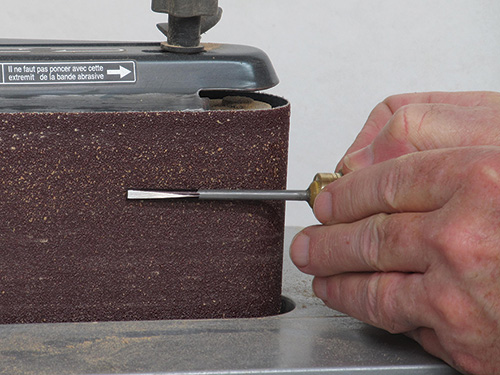
Let the glue cure fully before sharpening. I use a felt-tip pen to mark 1″ (25mm) to 1-1/4″ at the tip. I find it easiest to use a belt sander for shaping the tapered point on the end of the shaft. I do this without a jig by grinding opposing sides and continually checking to ensure each side is flat and of equal length. You can also shape the tip on a grinding wheel, but if you do, I recommend using a scrap of wood with a hole in it to support the awl shaft on the grinding platform.
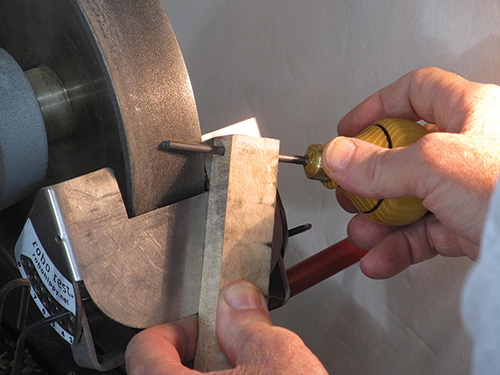
Unless you are shaping a tip from a high-speed-steel (HSS) blank, be careful not to overheat the tip and ruin its temper. Grinding with a CBN (cubic boron nitride) wheel will generate less heat than an aluminum oxide wheel, and the high-carbon music wire will not damage a CBN wheel. Whether using a belt sander or a grinder, use a light touch and quench the metal in water often to prevent bluing.
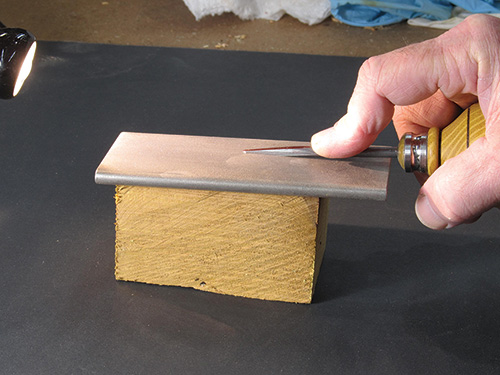
Because of the fragility of the tip, I use a sharpening stone or diamond or CBN hone to fine-tune it by adding a tiny micro-bevel at the very tip. Polish the shaft with sandpaper up to 600 grit. I prefer to use a “birdcage awl” grind with a four-sided taper. This grind is much better than the standard, round-tapered tip for creating starter screw holes.
Finish
Use the finish of your choice on the handle. I typically use a couple of coats of Minwax Antique Oil, applying it off the lathe and letting it dry twenty-four hours between coats. An oil-and-beeswax finish is a good option, too. For exotic woods that do not take a finish very well, such as African blackwood or lignum vitae, you might just sand to finer grits to bring up a shine. I always put a wine cork on the tip as a safety measure if I am giving one away or storing it in a toolbox.
Mike Peace is active in three woodturning chapters in the Atlanta area. He is a frequent demonstrator and regularly uploads woodturning educational videos to his YouTube channel, Mike Peace Woodturning. Before retirement, Mike worked as a software project manager. After serving on active duty in the U.S. Army, he continued service in the reserves, retiring with the rank of Lieutenant Colonel.
The post PROJECT: Turn a Birdcage Awl appeared first on Woodworking | Blog | Videos | Plans | How To.
from Woodworking | Blog | Videos | Plans | How To https://ift.tt/31RWkX9
订阅:
博文 (Atom)