2020年9月30日星期三
Tips and tricks for choosing and using woodworking drill bits
from Stumpy Nubs https://www.youtube.com/watch?v=ey7crpai5ng
PROJECT: Five-spindle Inlaid Bench
Here’s a hybrid that combines basic woodworking, spindle turning, CNC carving and even an epoxy “inlay” pour in the same build.
The post PROJECT: Five-spindle Inlaid Bench appeared first on Woodworking | Blog | Videos | Plans | How To.
from Woodworking | Blog | Videos | Plans | How To https://ift.tt/33hGirj
Moorish design
Bob Miller looks to Andalusia for inspiration when designing a set of three tables
from FineWoodworking https://ift.tt/33fVCor
from FineWoodworking https://ift.tt/33fVCor
2020年9月29日星期二
Project Building in Full Swing
 With hints of fall now in the air, holiday gift-building has begun. It is perhaps the best time of year for many of us woodworkers. There are few things more satisfying than making something for someone you care for. But doing it for a bunch of people that you love is even better.
The question always comes down to what to make this year. So many ideas, so little time. You may even be wondering where you can get project inspiration and maybe even plans? Please allow me to offer some advice that might benefit both of us. The Woodworker’s Journal Store page could do both for you. You can find project ideas simply to inspire you. And if you see something that you really like, you can purchase a plan for it. The costs run from just a buck to about eight dollars, so your wallet will not become significantly smaller. But your time in the shop might become significantly more efficient.
So by all means get busy on your gift projects, but please accept a little help from your friends here at Woodworker’s Journal.
Rob Johnstone, Woodworker’s Journal
![]()
Use Biscuits or Mortise and Tenons?
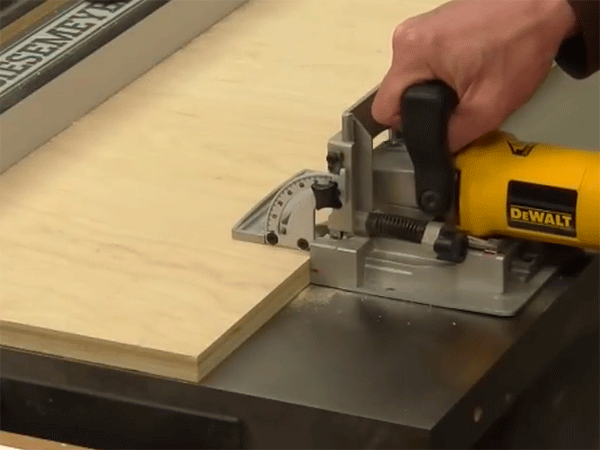
Can you use biscuits instead of mortise and tenon joints? Our experts discuss this reader’s quandary.
![]()
Project: Ginkgo Leaf Table
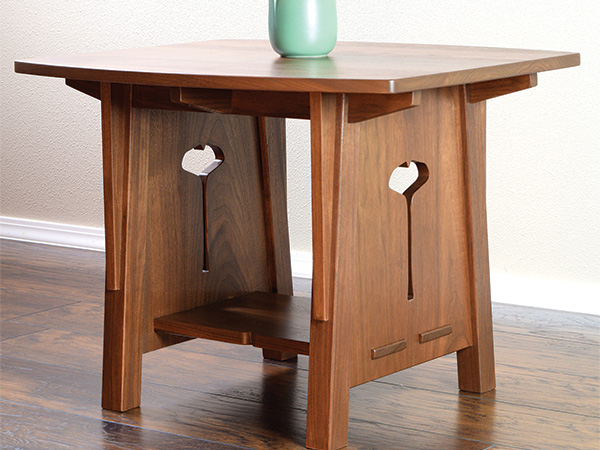
While this table is the author’s original design, he drew inspiration from Japanese furniture and architecture. This plan is FREE for Woodworker’s Journal print subscribers.
From Our Sponsor


FREE SHIPPING: $39+ Orders. Additional shipping charges will apply for select oversized items, express orders, international orders, and orders to Alaska, Hawaii, Guam, Puerto Rico, and the Virgin Islands. Rockler reserves the right to limit quantities, correct errors or omissions and modify or end this promotion at any time. Neither 15% off nor FREE SHIPPING can be combined with any other offer or applied to previous orders. Not valid with Rockler’s Professional Catalog and independent resellers. Offer ends 10/01/20.
The post Project Building in Full Swing appeared first on Woodworking | Blog | Videos | Plans | How To.
from Woodworking | Blog | Videos | Plans | How To https://ift.tt/3ic9jsU
Just use an ad blocker, and thanks!
from Matthias random stuff https://www.youtube.com/watch?v=KEMb4yc3t3M
Biscuits or Mortise and Tenons
This woodworker wants to know if he can use biscuit joints instead of mortise and tenon joints. The short answer is, of course, it depends. But the larger question is when should woodworkers use biscuits and when does a project call for mortise and tenon? Are there guidelines for making this decision?
Rick White: It all comes down to strength. The biscuit joint doesn’t give you the strength you’ll get with a mortise and tenon. One issue to take into consideration is how the piece is designed and where the stress points will be. As a general rule, however, if I’m building furniture, I use the mortise and tenon. Furniture gets a lot of stress and wear and needs to hold together. For cabinetry, I’ll use a biscuit joint. Most cabinets just hang on the wall and don’t see a lot of stress, so biscuits are usually strong enough.
Ian Kirby: The larger question asks about guidelines for making decisions about the strength of joints.
What we do is make our judgment based on empirical values; we rely on experience and observation. The outcome is that we usually make the joint overly strong. We have no idea by how much it’s overbuilt, but as long as it doesn’t break during its useful life, that’s OK. Mortise and tenon type joints are the ones we use to join parts together to make structures that have to withstand stress ? chairs, beds, tables and the like. Maximizing joint strength seems to me to be a good idea – knowing more about it was what caused me to put forward a proposal for a dissertation whilst studying for my Wood Science and Technology degree. It’s now more years ago than I care to think about, but loosely said, it was a comparison of the strength of mortise and tenon joints and dowel joints.
Well, the proposal got nixed because it was determined to be “insufficiently academic.” Instead I did research on some microscopic comparison between two rare species of softwood – a subject of interest to me and two other people in the world. A couple of years later, FIRA (The Furniture Industry Research Association), a British organization, decided to fund research into what amounted to the same study I had proposed for my first dissertation.
The research was funded for one year – no report. Then it was funded for a second year – no report. Then a third year; the result was “there are altogether too many variables for the data to be of any practical value to a woodworker.” Here is a sampling of the variables:
– How rough or smooth are the walls of the tenon, the mortise and the dowel hole?
– How round is the hole?
– How round is the dowel?
– How tight or loose are the interfaces of the parts?
– What glue was used?
– How thoroughly were the parts wetted with the glue?
– What species of wood was used?
– What was its growth rate?
– Were the joint parts tangential or radial tissue?
– What was the moisture content of the wood?
– And so it remains.
In a mortise and tenon type joint, there are two things to take into account with regards to strength: the mechanical strength and the glue line strength. To get a gauge of the mechanical strength, put the pieces together dry and test the sort of stress it would take to cause them to come apart. In other words, how much does the joint rely on the glue in order to stay together?
To illustrate the point, I’ll briefly describe four of the options you generally have with this sort of joint situation: a traditional MandT, a loose tenon, a dowel joint and a biscuit joint.
Of the four, the traditional M and T is the only two-part joint. The others all bring into play a third element. Since the sizes and sections of the parts vary, each mortise and tenon is designed to be as strength-balanced as possible. The tenon part is no stronger than the mortise part. It’s also designed to have the maximum glue area possible.
A loose tenon has much the same strength as a mortise and tenon. What you begin to realize now is that form doesn’t follow function ? form follows economy. You only need one machine to make a loose tenon: a slot mortiser. The question is: can you afford one?
In spite of all the theoretical disadvantages and failings of a dowel joint, it mostly works.
The biscuit joint has quite a bit less mechanical strength than the other three and its glue area isn’t great. But it scores big on the accuracy of its glue line. The walls of the joint are smooth, the plate swells to form a tight interface and, in many cases, it’s possible to double up the biscuits so the gluing area is doubled.
At the end of the day, whatever you decide, you must ask: Is the joint sufficiently strong to outlast the useful life of the piece?

Rob Johnstone: Mortise and tenon joints can be decorative, but the main reason to use them is to join two pieces of wood in a strong efficient manner. My opinion, and I know it is in the minority, is that biscuit joints are handy for accurately aligning joints and nothing else. I don’t believe an edge that is joined for glue-up is any stronger for having biscuits in it, but it is easier to line the edges of the glue joint up in a hurry. And if you are edge gluing five or six boards, biscuits are a real time-saver. So if the mortise and tenon joint is inteded to aid in alignment of a piece rather than creating a strong joint, I say go ahead and biscuit away. If you’re asking if the biscuit joint would be stronger or superior in any other way, I say no.
Ellis Walentine: Yes and no, depending on the type and severity of the stresses you expect. Technically, a biscuit joint is a type of mortise-and-tenon joint ? where one piece of wood penetrates and is glued into another. Both types of joints keep parts aligned and offer resistance to twisting, shearing, levering and pullout forces on the assembly. The strength of every type of mortise-and-tenon joint depends on several things.
1. The type of wood determines the mechanical strength of the joint: harder, stiffer woods are more resistant to breaking.
2. The design of the joint is also important. It involves the proportions of the mortise, the tenon and the “shoulders” where the two parts actually meet.
3. But, for practical purposes, the glue area is what really holds the joint together. Biscuits don’t offer as much glue area as traditional tenons, so you need more biscuits to equal the pullout and levering strength of a tenon. On the other hand, biscuits generally provide enough glue surface to keep the shoulders tight, which makes the joint just as solid. Biscuits are best suited for plywood case construction, for which they were originally designed. They also are fine for long edge joints, some cabinet doors and other types of frames, including those with mitered corners. Properly designed biscuit joints ? often involving multiple, ganged or stacked biscuits – have also been used for demanding tasks such as full-size doors.
Personally, I prefer the security of deep, accurately machined tenons for heavier-duty applications where greater mechanical strength may be needed.
The post Biscuits or Mortise and Tenons appeared first on Woodworking | Blog | Videos | Plans | How To.
from Woodworking | Blog | Videos | Plans | How To https://ift.tt/30gM7Uf
Gallery: Campus trees get new life
See how a group of creative woodworkers helped some old trees live on at SUNY Brockport
from FineWoodworking https://ift.tt/3cGi1hE
from FineWoodworking https://ift.tt/3cGi1hE
Wait... A Push Stick You Can Wear?? Yes!
from John Heisz - I Build It https://www.youtube.com/watch?v=2WVYlaw-hcI
2020年9月28日星期一
Built-In Desk Bases with Shelf Help
Our office area is front and center in our home. I wanted it that way - since someone is always at the computer.
But that means the office area is fully visible from all the main areas of the house.
So it needs to look good. And these days when using a computer is as common as cooking, creating a built in desk that matches my kitchen cabinetry is the right decision.
And if it's built-in cabinetry, it has to be made of plywood.
But I dread working with plywood, because that means I have to ask for help. I have to borrow my husband's truck. I have to ask for help loading the plywood off the shelf on to a cart. Someone has to hold on to the baby while I push the plywood cart. I can slide the plywood into the truck bed, but it is a struggle hauling it into the garage. I can do these things, but it is not easy. Thus the dreading. You know what I'm talking about.
So after a decade of avoiding plywood projects whenever possible, it came to me: There needs to be a service where pre-cut plywood pieces show up on my doorstep and all I have to do is start building.
It's taken many months of planning and working, but today, I'm so thrilled to release the very first project made with our brand new service Shelf Help, my new built in desk:
Are you ready to build your own desk? Head on over to Shelf Help for more details, templates, and of course, the configurator!
from Recent Project Plans https://ift.tt/2GeRFrd
Are you cleaning your paint brushes wrong? (Oil-based woodworking finishes)
from Stumpy Nubs https://www.youtube.com/watch?v=fYjYVwOiibI
Making a Drum Cart (Custom Mobile Bases)
from Matthew Cremona https://www.youtube.com/watch?v=4SsxP9cWt1s
How to Cut Large Pieces on the Table Saw
from John Heisz - I Build It https://www.youtube.com/watch?v=fTRhGuZgsXE
2020年9月27日星期日
Top 3 Circular Saw Projects || 3 Best Circular Saw Ideas
from Mistry MakeTool https://www.youtube.com/watch?v=ts4ciSiaUJ0
DIY PAINT BOOTH (Ceiling mounted spray booth, set up in minutes) | DIY CREATORS
from DIY Creators https://www.youtube.com/watch?v=QkXG7ftTOhE
What is the Best Push Stick?
from John Heisz - I Build It https://www.youtube.com/watch?v=htQ7tXY6mmc
2020年9月26日星期六
I Made a BIG Furnace to Melt Metals
from Black Beard Projects https://www.youtube.com/watch?v=yDBTageZeM0
How I Use My Table Saw - Control and Experience
from John Heisz - I Build It https://www.youtube.com/watch?v=1jDTKhW5gVI
How to Make Modern Perfect House With Mini Wood Logs DIY. You Must See | UWOODWORKER
from UWOODWORKER https://www.youtube.com/watch?v=OJuAQZ1r80w
2020年9月25日星期五
Simple Magnet Separator
Rare-earth magnets can be difficult to separate when they are stuck together, but here’s a simple jig I use that solves the problem. It’s a scrap of plywood with a shallow hole drilled in it that matches the magnet’s diameter.
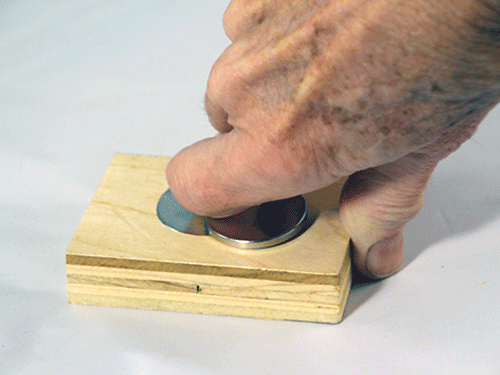
I drilled it just deep enough to recess one magnet. A second smaller hole in the middle of the magnet recess goes all the way through the plywood. To use the jig, I place both magnets on top and swipe the top magnet off of the bottom one with my finger. Then, I poke the recessed one out of the jig with a dowel.
-John Jakobs
Mason, Ohio
The post Simple Magnet Separator appeared first on Woodworking | Blog | Videos | Plans | How To.
from Woodworking | Blog | Videos | Plans | How To https://ift.tt/2EzzYCb
Don’t Hook My Neck Meat
Show notes coming soon.
The post Don’t Hook My Neck Meat appeared first on The Wood Whisperer.
from The Wood Whisperer https://ift.tt/32ZXRMC
Why I Love the Miter Trimmer
Although it’s probably not the first tool on most lists of must-haves, Clark Kellog finds his to be indispensable.
from FineWoodworking https://ift.tt/3mQjG9h
from FineWoodworking https://ift.tt/3mQjG9h
STL 225: Just use the plywood already!
Anissa, Barry, and Ben give a pep talk to a listener worried about stepping up to walnut and another listener who is doing everything he can to avoid using plywood.
from FineWoodworking https://ift.tt/3n1Y8qm
from FineWoodworking https://ift.tt/3n1Y8qm
Fine Woodworking #285 – November/December 2020
Featuring Michael Pekovich, Peter Galbert, Timothy Coleman, Clark Kellogg, Mark Gardner, and more.
from FineWoodworking https://ift.tt/2EyuKqj
from FineWoodworking https://ift.tt/2EyuKqj
Automated CNC Dust Collection for just 20€
from Marius Hornberger https://www.youtube.com/watch?v=2wliIFJapho
2020年9月24日星期四
Online Extras from FWW Issue #285
Online extras from FWW issue #285 Video: A sharp adze doing its job David Fisher demonstrates how to tune up an adze, but now that it’s tuned up, what do…
from FineWoodworking https://ift.tt/363eEjB
from FineWoodworking https://ift.tt/363eEjB
Spokeshave fundamentals
Chairmaker Peter Galbert takes you through the different types of spokeshave, how to tune them, where to use each type, and which ones he likes best.
from FineWoodworking https://ift.tt/2FOlU8x
from FineWoodworking https://ift.tt/2FOlU8x
Shaker candle stand overview
Watch contributing editor, Christian Becksvoort build a Shaker candle stand, start to finish in this 4-minute edit.
from FineWoodworking https://ift.tt/2G1Y5d0
from FineWoodworking https://ift.tt/2G1Y5d0
More about my chairs and chair joinerey
from Matthias random stuff https://www.youtube.com/watch?v=BWITj-9twaM
Workshop Tip: For perfect mortises, upgrade your edge guide
This router mortising jig captures the workpiece between two fences.
from FineWoodworking https://ift.tt/3j1ch4q
from FineWoodworking https://ift.tt/3j1ch4q
2020年9月23日星期三
$10 Roll Outs for Kitchen Cabinets
Could your cabinets be more functional if the shelves slid out? Roll outs - especially custom sized wood ones - can be very expensive and hard to install.
In this video tutorial, I'll show you how to use your EXISTING shelf and convert it to a rolling shelf - all for about ten dollars.
And it is EASY. I promise!
Video Tutorial for Converting Shelves to Roll Outs
Make sure you watch the video for the full tutorial. The below information is supplemental.
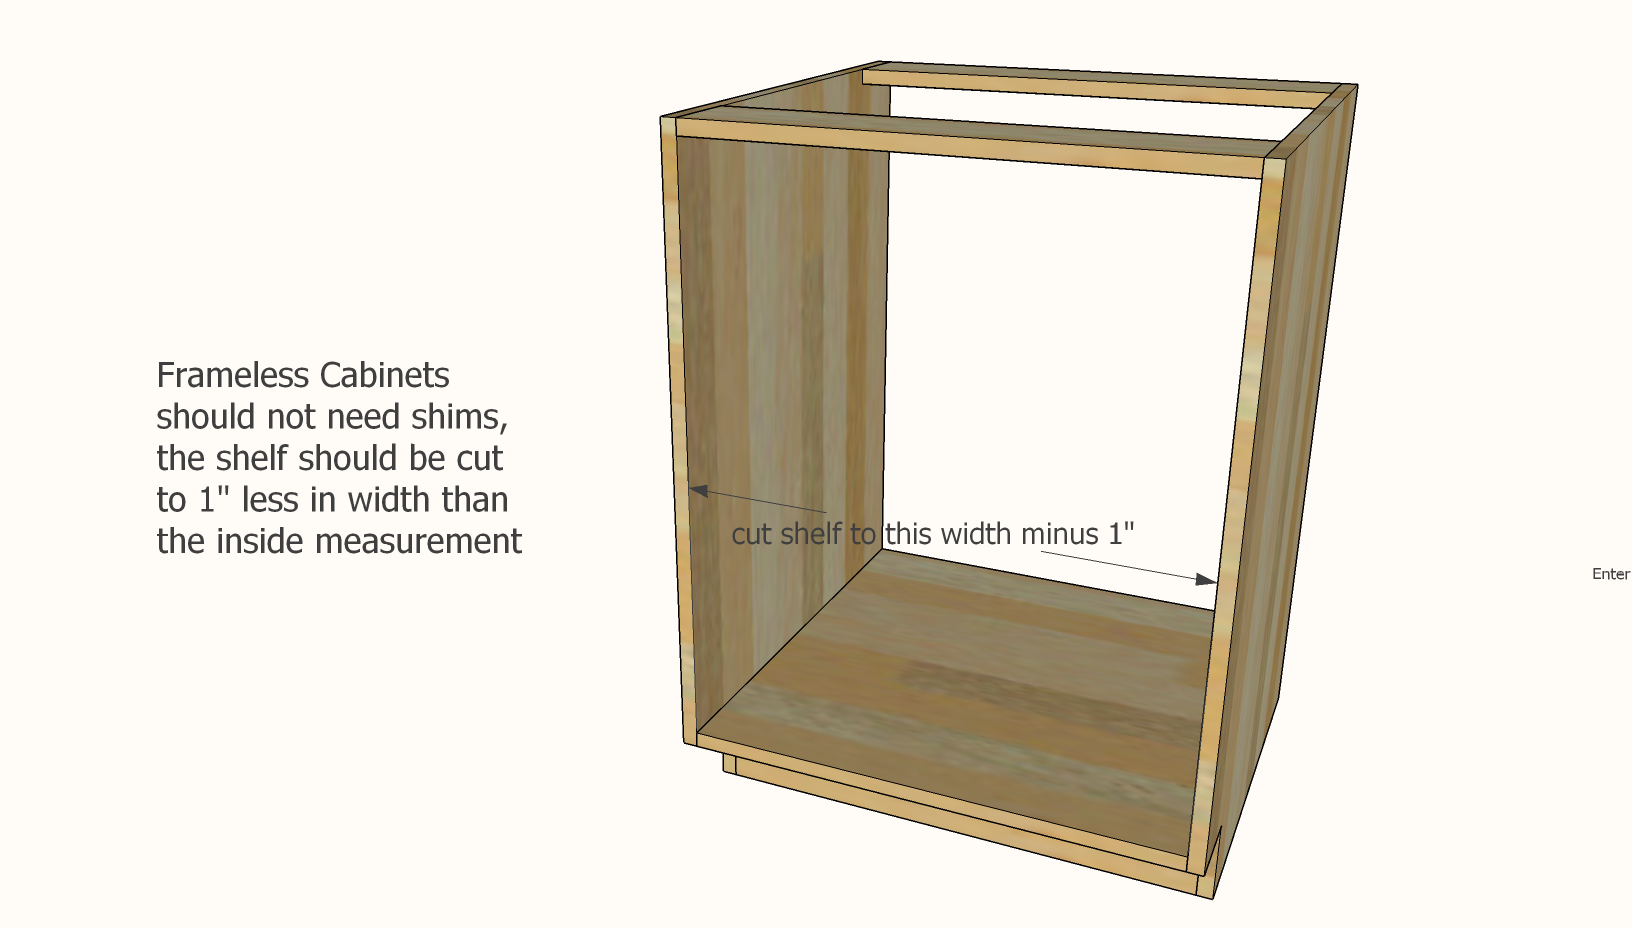
Frameless Cabinets
If you cabinet does not have a face frame, it is called a "frameless cabinet". This is the easiest type of cabinet to work with. Just remove the shelf, and cut it down in width so it is 1" less in overall width than the inside measurement of your cabinet, and then install it on your drawer slides.
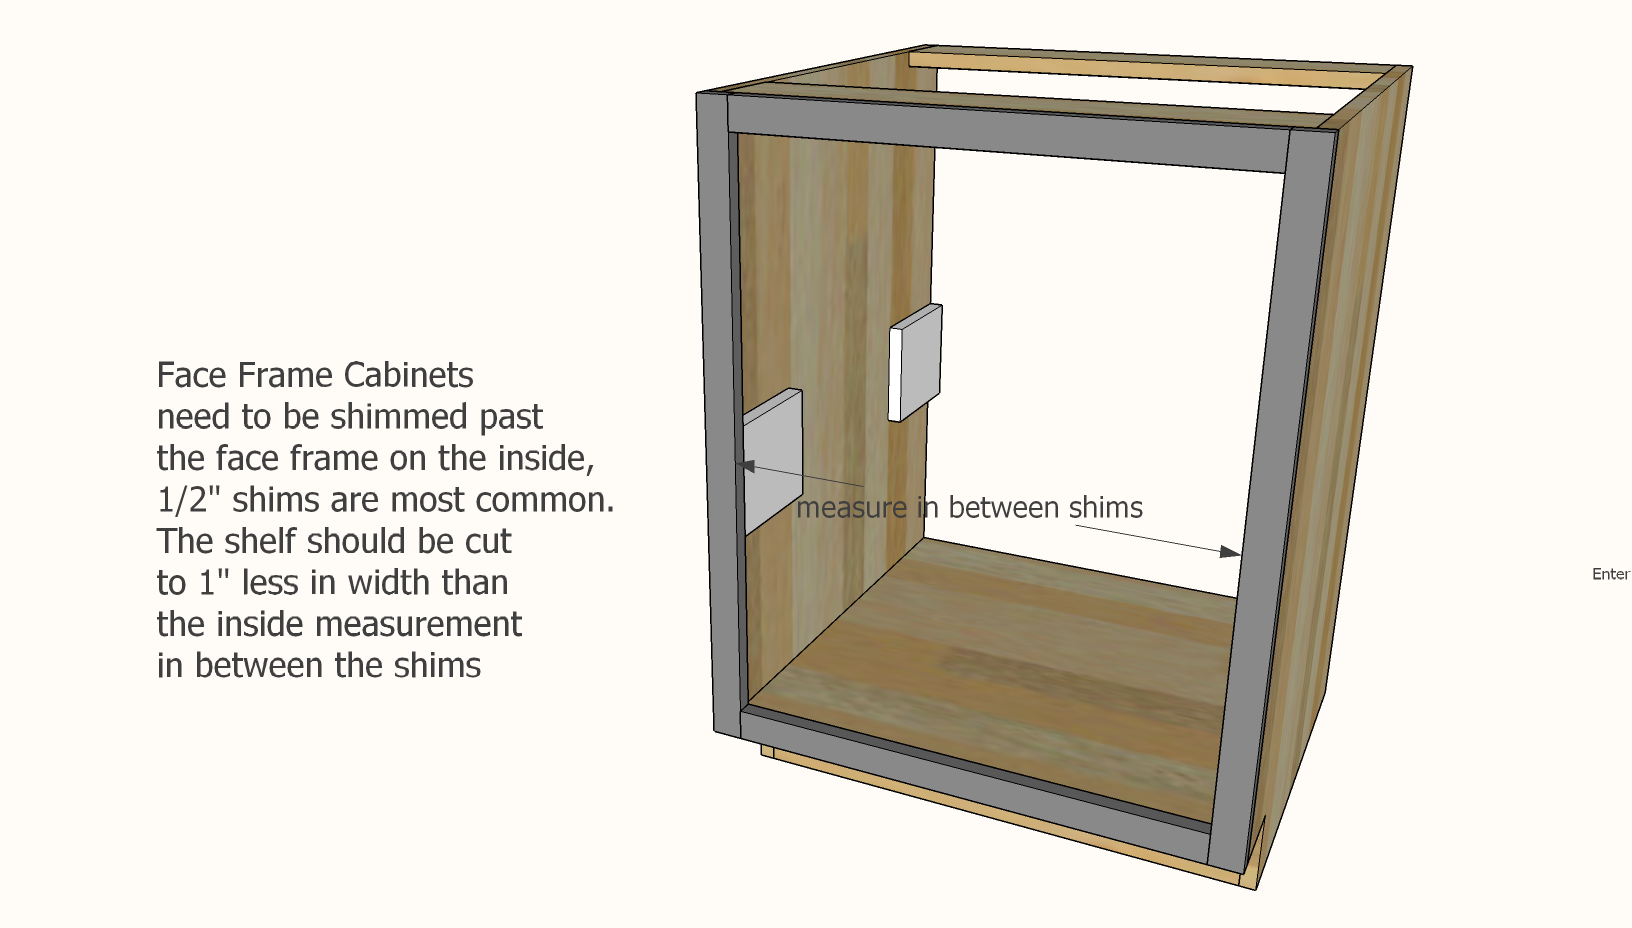
Face Frame Cabinets
If your cabinet has wood trim around the front edges, it has a face frame. You will need to shim the inside of the cabinet so the drawer slides can fully slide out without hitting the back side of your face frame. Cut your shelf to 1" less than the width in between your shims.
Cabinets with Center Divider
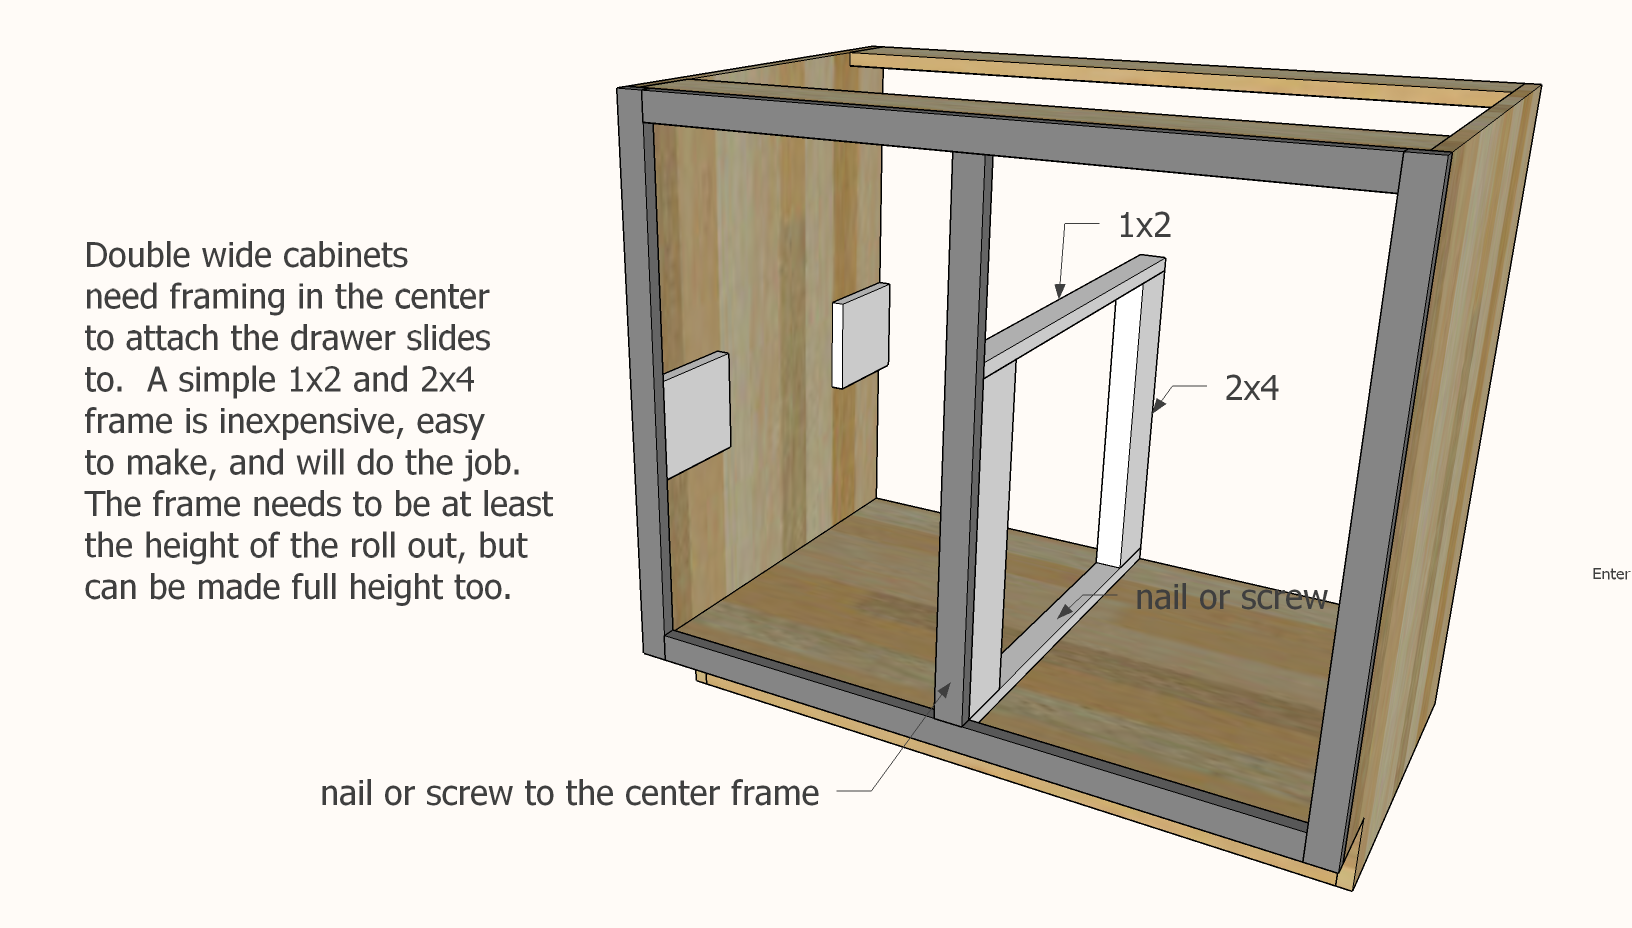
If your cabinet has a center divider, so your roll out shelves can't be made the full width, you will need to create some framing in between. The easiest way to do this is with 1x2s and 2x4s. The drawer slides are mounted on the 2x4s on either side.
We hope this tutorial helps you make your kitchen nicer (and your life easier!) Thanks so much for using our website, we appreciate the trust and support.
Ana
from Recent Project Plans https://ift.tt/2EskwHQ
Use an inner tube to clamp weird glue-ups
In issue #285, Clark Kellogg assembles the sides of his hexagon boxes with some innovative clamps from an unlikely source: a bike shop.
from FineWoodworking https://ift.tt/3hXvpPN
from FineWoodworking https://ift.tt/3hXvpPN
PROJECT: Retro Starburst Clock
This funky, cheerful clock is reminiscent of many 1950s designs. Make one (or even two!) from a small amount of 1/4″ and 3/4″ stock you may already have on hand.
The post PROJECT: Retro Starburst Clock appeared first on Woodworking | Blog | Videos | Plans | How To.
from Woodworking | Blog | Videos | Plans | How To https://ift.tt/3cwmVOj
Modeling an Oval Shaker Box in SketchUp
Dave's model starts out with flat bands for the box and lid, so they could be used to create the patterns for cutting them in the shop.
from FineWoodworking https://ift.tt/35ZHMIH
from FineWoodworking https://ift.tt/35ZHMIH
How To Cut Perfect Long Miters on the Table Saw - Woodworking
from John Heisz - I Build It https://www.youtube.com/watch?v=Fofhv5c1w8o
2020年9月22日星期二
DIY Barn door dog crate and entertainment center
from DIY Creators https://www.youtube.com/watch?v=qz_bi9qnTK4
How I bid a small job
Just because a job is small and affordable, that doesn't mean it can't be beautiful and last a lifetime
from FineWoodworking https://ift.tt/35XxbOh
from FineWoodworking https://ift.tt/35XxbOh
Make a dovetailed desktop organizer
Mike Pekovich's efficient organizer not only packs a bills, receipts, stamps, and pens, but also a lesson in working thin.
from FineWoodworking https://ift.tt/33OzaBX
from FineWoodworking https://ift.tt/33OzaBX
Officially Fall
Today is the day that my favorite season of the year begins. Up here in the North Country there is something wonderful about the quality of the air and the temperature as fall advances. And there is a feeling of urgency to get out and enjoy the great outdoors as winter approaches.
It is also one of the best times for me to be doing woodworking. With the garage door wide open, fresh air coming in and no bugs to speak of — it is about perfection.
And it is also the time of year for me to begin practicing what Professor Harold Hill (from the musical “The Music Man”) described as the “think system” … but this time regarding holiday gift projects rather than learning an instrument. My imagination, unbounded by things like time constraints and budget limits or skill level, comes up with myriad gifts for my loved ones. This meditation adds a level of excitement to my already enjoyable shop time.
Like I said, a perfect time of year.
Rob Johnstone, Woodworker’s Journal
![]()
Wood Glue Basics and Application Tips
In this video Ernie Conover discusses how to choose the right PVA wood glue for your projects and other important factors that impact its use. These include correct glue application, shop temperature, water resistance and glue open time. He also shares a neat trick for edge jointing that yields an absolutely flat panel.
Mini Tabletop Workbench
This strong and versatile Mini Tabletop Workbench provides a great mobile work surface that is sure to enhance your workshop experience.
From Our Sponsor


FREE SHIPPING: $39+ Orders. Additional shipping charges will apply for select oversized items, express orders, international orders, and orders to Alaska, Hawaii, Guam, Puerto Rico, and the Virgin Islands. Rockler reserves the right to limit quantities, correct errors or omissions and modify or end this promotion at any time. Neither 15% off nor FREE SHIPPING can be combined with any other offer or applied to previous orders. Not valid with Rockler’s Professional Catalog and independent resellers. Offer ends 10/01/20.
The post Officially Fall appeared first on Woodworking | Blog | Videos | Plans | How To.
from Woodworking | Blog | Videos | Plans | How To https://ift.tt/33RlfuY
2020年9月21日星期一
Announcing FWW ambassadors
Seven ambassadors will help us mentor woodworkers of any skill level, and on any path in the craft.
from FineWoodworking https://ift.tt/3cmMMrK
from FineWoodworking https://ift.tt/3cmMMrK
Vlog 158: You’re doing what with your workbench??
I’m not sure when the raffle will be but I’ll let you all know. The raffle will be a pickup only situation. I’m not shipping this beast. That’s a headache I don’t want to deal with. By going with a raffle, someone can win the workbench with just $10 + travel expenses to come get […]
2020年9月20日星期日
DiResta The Making of The Rocking Chair
from jimmydiresta https://www.youtube.com/watch?v=LswPa3Z_Szc
Utility Storage Shelves
from Jay Bates - Woodworking Videos https://www.youtube.com/watch?v=kAwIW2SzHlA
Plywood Computer or Laptop Cart
from Jay Bates - Woodworking Videos https://www.youtube.com/watch?v=vjrpWh1t8mA
30×40 Shop Part 8: Mini Split Air Filter Update
from Jay Bates - Woodworking Videos https://www.youtube.com/watch?v=takupOBctjA
2020年9月19日星期六
Utility Storage Shelves
My shop sits on a 40′ x 40′ concrete slab. The perimeter of the shop is 30′ x 40′ which leaves roughly 10′ x 40′ on one side for a full-length lean-to. We’ve been using the front of this space for grilling and entertaining when we have friends and family over. There’s just more elbow […]
Interesting Stuff From Around The Web #276 – September 19, 2020
Occasionally I like to share a few things I find interesting. Mostly video content with an occasional website article. All of the content you will find in these posts is free to you. Remember that liking, subscribing, or sharing free content goes a long way in helping produce more free content. If you like that […]
2020年9月18日星期五
Webinar: Uncommon Arts and Crafts with Jon Binzen
Replay Join deputy editor Jon Binzen, for a fascinating look at less-familiar furniture of the Arts and Crafts era.
from FineWoodworking https://ift.tt/2EjIPYA
from FineWoodworking https://ift.tt/2EjIPYA
Bolt Makes Blade Cleaning More Efficient
When it’s time to clean a saw blade, I insert a 1/2″ threaded bolt through its 5/8″ arbor hole. The bolt’s head keeps the blade from suctioning to the bottom of the bucket I use for the cleaning solution, and the threaded shaft provides a safety handle of sorts for me to pick the blade up when it’s wet. The bolt is just a 2-1/2″-long all thread I happened to have. If I have several blades to clean, I thread a nut onto the bolt, which serves as a spacer to keep the blades from touching. This way, I can soak several blades at once to make the task more efficient.
– Jim Wilson
San Marcos, Texas
The post Bolt Makes Blade Cleaning More Efficient appeared first on Woodworking | Blog | Videos | Plans | How To.
from Woodworking | Blog | Videos | Plans | How To https://ift.tt/35P9Z4E
Old Man Spags | TWW Morning Show
Show notes coming soon.
The post Old Man Spags | TWW Morning Show appeared first on The Wood Whisperer.
from The Wood Whisperer https://ift.tt/3kyC4BF
2020年9月17日星期四
Nicole’s Desk | Short Attention Span Version
After completing the full 4-part series for Nicole’s desk, I asked the community if they preferred the long in-depth videos or the shorter/faster summaries. The most popular answer was “both.” So this is a heavily edited version of the build. If you’re interested in the full series, head on over to Part 1.
Links & Stuff
- White Charcoal Pencil
- Bevel Gauge
- Don’t Have a Domino? Watch this!
- MLCS 1/8″ Router Bit (#6084)
- Titebond Extend
- Lee Valley Drawing Bow
- TWW Card Scraper
- Preppin’ Weapon Sanding Block
- TWW BBQ YouTube
- TWWBBQ Instagram
- Whiteside Flush Trim Bit
- MLCS #7676 Chamfer Bit
- Holdfast Sleeves
- Milwaukee Compact Router
- Amazon Chisels
- Eagle America 1/4″ Flush Trim Bit (this is NOT the one that screwed up my part)
- Amana Countersink Bit
- Hybrid Woodworking
- How to Apply Rubio to Furniture
- Rubio Monocoat
- Plastic Spreaders
- Preppin Weapon Sanding Block
Free Plans
Other Parts in this Series
The post Nicole’s Desk | Short Attention Span Version appeared first on The Wood Whisperer.
from The Wood Whisperer https://ift.tt/33Gv8v9
Plywood Computer or Laptop Cart
The picture below is my first computer cart for the shop. It was designed for a desktop computer and was used to connect to my Shapeoko 2 CNC machine. It’s a basic shelf style cart that my brother continues to use today. This is my second computer cart for the shop. It was designed for […]
2020年9月16日星期三
Project: Ginkgo Leaf Table
Influenced by both Japanese architecture and furniture, our author’s walnut table offers good opportunity to practice template routing and cutting angled joinery
The post Project: Ginkgo Leaf Table appeared first on Woodworking | Blog | Videos | Plans | How To.
from Woodworking | Blog | Videos | Plans | How To https://ift.tt/32yt21g
Router-table jigs for better results
Take this workshop workhorse even further with some select jigs
from FineWoodworking https://ift.tt/3c3EYew
from FineWoodworking https://ift.tt/3c3EYew
Shop Tour: Ben Strano’s dream shop
Ben Strano shows off his 340-sq.-ft standalone shop and explains why he made the choices he did when setting it up.
from FineWoodworking https://ift.tt/2ZGjPC0
from FineWoodworking https://ift.tt/2ZGjPC0
2020年9月15日星期二
DIY Table Saw Fence Caddy Keeps Your Gear Near
from Stumpy Nubs https://www.youtube.com/watch?v=7feRkptvZII
The Thin Wood Line
I am building a project for the December issue of Woodworker’s Journal right now. For some reason, some idiot thought that veneering would add an interesting technique to the project. (That idiot would be me …)
I love what you can do with veneer, especially in terms of controlling the grain and figure patterns. I am using white oak on the exterior of the project, and the quartersawn grain and flake are amazing.
The problem with veneer, of course, is that you have to apply it to the substrate. And there are just no shortcuts to the program…even though I try to find one each time I do a project like this. To be honest, this time around my attempted short cut ended up with glue everywhere, veneer stuck to places it should not have been stuck and a lot more work than if I had just done it the traditional way.
But fear not…even with this messy adventure in the mix I can see that this project is going to look great.
Rob Johnstone, Woodworker’s Journal
![]()
What’s in Store Round-up

Take a closer look at some new tools, including offerings from Rockler, Milwaukee, Wagner and Pony Jorgensen.
![]()
Hand Cutting Mortise and Tenons

Hand cutting mortises and tenons is not difficult, but you must pay special attention to cutting each part in the right order.
From Our Sponsor
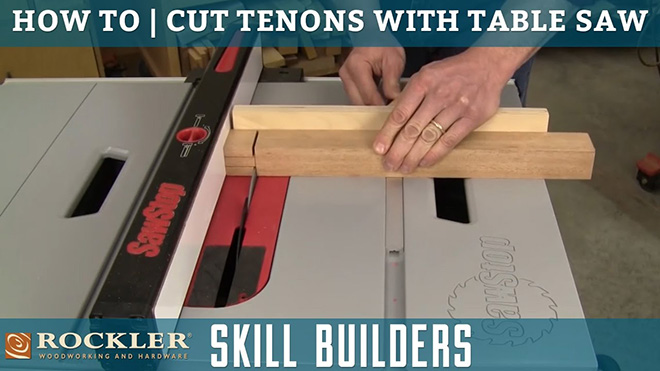
| Creating tenons on your table saw is all about method. There are multiple approaches to consider, including standard blade vs. dado stack as well as manufactured jig vs. homemade jig. Assess the options that may work the best for you in the video below! |
 |


FREE SHIPPING: $39+ Orders. Additional shipping charges will apply for select oversized items, express orders, international orders, and orders to Alaska, Hawaii, Guam, Puerto Rico, and the Virgin Islands. Rockler reserves the right to limit quantities, correct errors or omissions and modify or end this promotion at any time. Neither 15% off nor FREE SHIPPING can be combined with any other offer or applied to previous orders. Not valid with Rockler’s Professional Catalog and independent resellers. Offer ends 10/01/20.
The post The Thin Wood Line appeared first on Woodworking | Blog | Videos | Plans | How To.
from Woodworking | Blog | Videos | Plans | How To https://ift.tt/2RtfD47
2020年9月14日星期一
Jeremy Fielding’s shopmade machines
From CNC controlled tablesaws, to variable speed miter saws, Jeremy Fielding uses woodworking as great excuse to build some incredible machines.
from FineWoodworking https://ift.tt/2ZyGn7G
from FineWoodworking https://ift.tt/2ZyGn7G
2020年9月13日星期日
Farmhouse Desk
Do you need a desk?
Have you considered building your own?
For about $50 and with just a couple tools, you can build this desk!

Farmhouse Desk Features
- Easy to build design uses off the shelf lumber and basic tools
- Solid wood so can be painted or stained any color and can be refinished
- Sturdy - won't fall apart on you!
- Good sized desktop with just one wood joint in center
- Bottom shelf sized for standard computer towers or books can also be used as a footrest
- The elevated bottom shelf helps hide cords
- X styling is on trend and goes with almost any style decor

Video Tutorial
It's easy to build this desk! To help you out, we also put together a video tutorial so you can visualize how the desk is put together.
Farmhouse Desk Plans
The plans for this desk follow. Thanks so much for using my plans!
from Recent Project Plans https://ift.tt/3hwoRHj
Yin Yang Clock + Vector Files
Every now and then I get the opportunity to share the joys of woodworking with someone else. In this case, my wife’s nephew, Kagan, came to spend the weekend with us. He’s 16 years old and a black belt in kung fu. Being a black belt is a great achievement but it also lets me […]
2020年9月11日星期五
The Drawer & Finish | Nicole’s Desk Pt. 4
The mortises for the drawer front were cut in Part 3 and now it’s time to make the drawer side tenons. I use a “hybrid” method making the shoulder with the table saw and using a hand saw and chisels to cut out each tenon. One thing you might notice is that the mortise and tenons joints are not arranged in the way that benefits the drawer. Most times, you want your drawer joinery oriented in such a way that the interlocking components resist the front to back motion of the drawer. But in this case, I wanted to make a strong visual statement and given the kind of use this drawer will see, I have zero concerns about the drawer coming apart in the future. The tight fit and the glue bond means that drawer is going to easily outlive anyone reading these words.
You should also notice that keeping the drawer sides at an angle creates a lot of extra work for us. Installing the drawer bottom and the slides both become trickier than usual but I think the extra work is worth it for such a unique drawer. And the angle is necessary for our parallelogram through tenons so I’m very happy with the design choice.
The finish I’m applying here is Rubio Monocoat, a hardwax oil. It’s an incredibly easy to apply, low-luster finish that provided enough protection for a desk. And perhaps most importantly, makes future finish repairs very easy.
I hope you enjoyed this series and thanks for following along.
Links & Stuff
Topics
- 0:00 – Drawer Side Tenons
- 8:58 – Drawer Back
- 11:47 – Drawer Bottom 1
- 16:56 – Slide Attachment
- 23:30 – Drawer Bottom 2
- 23:53 – Drawer Glueup
- 27:19 – Drawer Test
- 28:26 – Applying Finish
- 29:36 – Pinned Rabbets
Free Plans
Other Parts in this Series
- Part One
- Part Two
- Part Three
- Part Four
- Condensed Version (Coming Soon)
The post The Drawer & Finish | Nicole’s Desk Pt. 4 appeared first on The Wood Whisperer.
from The Wood Whisperer https://ift.tt/33n2jUu
No Mic for Nicole
Show notes coming soon.
The post No Mic for Nicole appeared first on The Wood Whisperer.
from The Wood Whisperer https://ift.tt/32lw4pz
STL224: Is there one true way to sharpen a scraper?
Mike and Barry discuss milk paint, scraper sharpening, shellac finishes, when to sharpen a tablesaw blade and their smooth moves.
from FineWoodworking https://ift.tt/2RenL8J
from FineWoodworking https://ift.tt/2RenL8J
How To Make Spring Clamp || DIY Wooden Spring Clamp
from Mistry MakeTool https://www.youtube.com/watch?v=O99KsSlstA4
Forge / Furnace Venturi Gas Burner
from Black Beard Projects https://www.youtube.com/watch?v=9ACOr0x_Bew
15 MOST AMAZING WOODWORKING PROJECTS AND PRODUCTS. AWESOME FAST EASY TECHNIQUES DIY IDEAS TOOLS
from UWOODWORKER https://www.youtube.com/watch?v=nWF4coEZB5I
2020年9月10日星期四
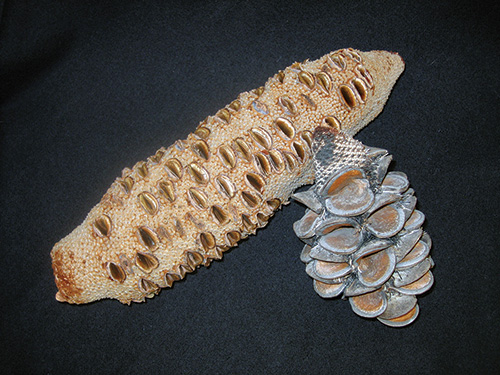
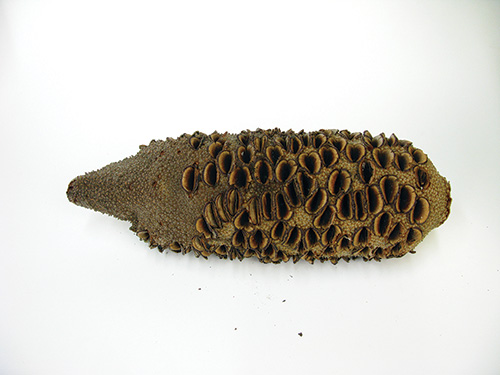
Working with Banksia Pods
This article, “Working with Banksia Pods,” by Cindy Drozda, is from the pages of American Woodturner and is brought to you by the America Association of Woodturners (AAW) in partnership with Woodworker’s Journal.
I like to call the banksia pod a pinecone from down under. It performs the same function as a pinecone, being the seed carrier of the banksia plant, which is not technically a pine, though it is an evergreen. The Banksia genus of plants gets its name from Sir Joseph Banks, the botanist who sailed with Captain Cook’s Endeavour voyage that arrived in Australia in 1770.
Banksia plants range in size from shrubs and larger bushes to trees of around fifty feet in height. They can be found growing outdoors in Australia, Papua New Guinea, and New Zealand. Of the seventy-five named species, sixty-one are found in western Australia, including the Banksia grandis, the species that generates the large seedpods. Although it’s the size of the seedpod that makes it attractive to artists, the name probably refers to the tree’s large leaf size.

The pods, or cones, commonly used for woodturning are the fruit of the plant. These cones can be from 3″ to 16″ (8cm to 41cm) long. Once the stunning, upright, golden yellow or red flowers fall off, the cone matures on the tree and the seeds develop. There can be both mature cones and flowers on the tree at the same time. Often it is the heat of a forest fire that causes the seed case holes, which give these pods their unique appearance, to burst open and release their seeds.
I saw my first banksia pod in the mid-1990s at our local store and was captivated. It was the oddest piece of material I’d ever seen. I knew it could be turned but didn’t have a clue how to begin or what to make out of it. So, for quite a few years the pods were kept on my windowsill as artifacts. When I saw a box made by Bonnie Klein from a banksia pod, I knew what I wanted to make. How to get from rough banksia to box—that was my first adventure. Here are some things I have learned about banksia over the years.
Choose the Right Pod for the Project
How do I choose a “good” banksia seedpod? Not all banksia are created equal. I look for equal distribution of eyes because I like that look better. But really, it depends on what you like and what you’re going to make. Rather than asking, “Is it good?” ask yourself, “What is the best use for this one?” or “Which is the best banksia for my project?”
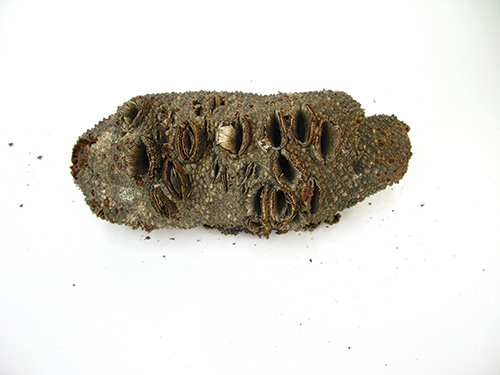
The lighter, browner ones tend to be sounder inside. Whitish or yellowish color on the exterior can indicate a punky interior that will tend to tear out when turned but might have some nice color variation. A greyish exterior and broken or weathered-looking eyes might mean a punky interior, or might not.
After inspecting the exterior, the best way to evaluate a banksia is by cutting the ends off, or cutting it in half, on the bandsaw and looking at the cross section. You might see a bug hole in the very center, which may or may not go all the way through. A punky banksia will have lighter-colored areas and might show tearout from the bandsaw cut. If it is soft enough to dent with your fingernail, it is punky and will most likely tear out more easily when turned.

Cracks at the core might not yield a good finial, knob, or stem (depending on your design) but could make a great-looking mushroom cap. Punky cores usually have a lot of color variation and look nice on a mushroom or weed pot. The ones with random distribution of eyes can make good weed pots or partial natural-edge turnings.
Nicely formed, undamaged eyes and a less-weathered exterior make a better natural-edged piece, but if you are turning the exterior away, the weathered ones work just as well. A sound pod without a punky core will be easier for making a box.
Anatomy of a Banksia Pod
The banksia consists of a darker brown core that looks like the pith of a branch. This core has no grain to it and will break off quite easily at 1/2″ (13mm) diameter. The eyes stop short of the core, so it usually has no voids—unless there is a bug hole. Bug holes typically go up only into that core area and may go all the way through from one end to the other. Or not.

Most visible on the ends, where there are not any eyes, is a pattern in the cross-section of a banksia that looks like a sunflower. A slice of this section could work quite nicely as an inlay piece.
The core is surrounded by a roughly concentric zone that is the nicest cutting and strongest. The eyes get smaller toward the center of the banksia pod, stopping at the core. Surrounding this clean-cutting zone is a more porous area that is still nice to turn. It is in this zone where the eyes are the biggest and attached less firmly. It often looks like there is a small space around them. On a thin-walled piece, the eyes are prone to fly out of the matrix in this zone. Drenching with cyanoacrylate (CA) glue or vacuum-stabilizing with resin takes care of that issue if I don’t want the eyes to be missing. Not that missing eyes is necessarily a problem—a nice, though bigger, void is left when the eyes come out. This might be the look you’re after.
The exterior zone consists of “fur” coated in a thin layer of hard glaze. That fur is what gives banksia such a bad reputation. It makes an awful mess when cut. The fur zone also is the most prone to coming apart. Pieces can fly off and eyes can fly out when cutting in this zone. With a natural-edge turning, I use this exterior furry zone as part of the finished piece. Light cuts and plenty of lathe speed seem to give the best results. Drenching with thin CA, and plenty of it, will keep the edges together, but I don’t like using CA because it may not have the longevity that I want for my work. I prefer thin epoxy or other resin. The fur zone doesn’t take detail well, being, well, furry!
Make sure the banksia are dry. They are usually fairly (or completely) dry by the time they mature, fall off the tree, and get shipped to the U.S. for us to buy. They tend not to move much as they dry, and if they shrink when drying, it tends to be in a symmetrical manner. I have some banksia boxes that still have the same fit after many years. Even so, I still like to dry every banksia I use in my kiln for a few months so I don’t get any surprises.
What to Make from Banksia Pods

Banksia pod sizes range from extra large ones at almost 4″ (10cm) in diameter to the smaller 1″- (25mm-) diameter variety I saw growing wild in Brisbane when I was demonstrating at Turnfest. Those tiny ones were 3″ to 4″ (8cm to 10cm) long. The jumbos can be a foot long or more. The most common size is about 3″ in diameter and 8″ to 10″ (20cm to 25cm) long. After the outer fur is turned away, this diameter pod, or cone, will net a 2-1/4″- to 2-1/2″- (57mm- to 64mm-) diameter piece.
Banksia pods offer a lot of natural texture and surfaces to work with, but there is no worry about grain direction, as with wood. A natural outer surface (like the bark around a branch) and a small diameter but long length make a pod suitable for projects that you would think to make out of a tree branch. Some examples are banana bowls, goblets, mushrooms, boxes, small vessels, and weed pots. Since the core of a pod has no grain structure or grain strength, a thin finial made of it would break off very easily. Thin-walled turnings and thin sections are more apt to break than a comparable shape turned from wood. Using the tailstock helps to lower the failure rate. Natural-edge turnings tend to cut with less eye loss when cutting from the outer edge inward, but other than that, they can be cut in any direction.
You should always wear eye protection when turning, but be aware that when roughing the exterior of a banksia pod, there will be fur and sharp particles flying off. Also, expect to need a bath after turning a banksia pod, as they are very dusty.
Start Turning
So far, all of my banksia projects start with cutting the ends off. This allows me to mount the banksia between centers on the lathe and gives me more information about the material and its suitability for what I’m making (as described above).
Be careful cutting the banksia pod ends off on a bandsaw. Use a V-shaped sled to keep the banksia from rolling out of control.
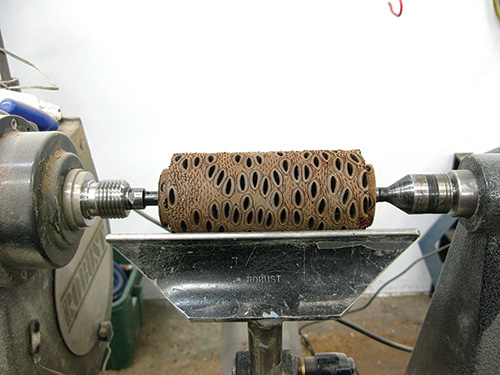
After cutting the ends off, the center core of the banksia can be positioned to engage the live and drive centers when mounting the material on the lathe. This works to center the banksia evenly most of the time. While it’s between centers, a tenon can be formed for mounting into a chuck. I have not had good luck cutting the end off and just gluing it flat onto a wasteblock with wood glue. Banksia pods don’t seem to glue well, with the failure being at the glue line. I have not tried using a faceplate with screws directly into the banksia. Use the tailstock whenever possible for the best success rate. You can also mount a banksia pod between centers with the pod’s core running perpendicular to the lathe bed, depending on the needs of your project.

Banksia scrape, cut, and sand well, but they are abrasive and will dull your tools much faster than when cutting wood. High speed steel, the new “powder metal” tools, carbide-tipped tools and drill bits, and good quality abrasives are really valuable for turning banksia. I like to cut at high lathe speeds but drill and sand at slow speeds.
A banksia jam-fits better onto a wooden wasteblock than onto another piece of banksia. Using a wasteblock of soft maple, alder, poplar, mahogany, or other compressible wood gives a better and more secure holding. Jam-fitting a delicate, thin-walled banksia turning into a recess instead of over a tenon will reduce the risk of cracking the workpiece. Jam-fits with thin-walled banksia pieces are never very strongly gripped. I use tape for insurance when finishing the bottom without the tailstock. It is easy to break the piece or knock it off the jam chuck. Too much tailstock pressure can also break a thin-walled piece.
Use CA glue, or stabilizing resin, to strengthen thin-walled pieces. When hollowing to the maximum diameter of the pod, the eyes tend to fall out. CA soaked over the outside of the piece before hollowing will glue in the eyes and will not stain the finished piece. Be sure to let the CA dry completely before turning on the lathe.
I recently started using vacuum-stabilizing with resin to strengthen the banksia for thin-walled turnings. It does a great job of keeping the eyes in (as an alternative to CA glue). Unfortunately, this method does not harden up the infamous fur around the outside. If you want to do that, CA or a thin-bodied resin is good.
I have seen banksia pods cast in resin, filling the holes, though I have not done that myself (yet).
Finish off of the Lathe

Some finishes that I like include wipe-on polyurethane, diluted polyurethane, thin-bodied penetrating oil (to minimize having to wipe finish from inside the eyes), and spray-on film finishes such as lacquer, polyurethane, and shellac. It is very tedious to scrape wax or French polish out of banksia eyes. That is why I finish off the lathe. To keep the oil finish from accumulating in the voids, I blow it off with an air compressor right after wiping the excess finish off.
As with any turning, the secret to a nice finish is in the sanding. I will sand banksia to 600 grit if I am planning to spray a film finish. For a wipe-on finish I will sand and polish to 4000 grit and just apply one coat of finish. The material is so dense that not much finish will soak in, and additional coats don’t seem to offer any advantage.
Bleaching the banksia piece after turning and sanding gives an interesting effect. I have stained my bleached banksia turnings with dyes and with white pickling stain. The look is otherworldly!
Be sure to sign your work. Metallic gel ink pens write on the sanded surface of a banksia and show up well. Be sure that your chosen finish will not cause the ink to run. I usually use a vibrating engraver to sign my banksia pieces. Filling the engraving gives it more contrast. For best results filling engraving, fill all of the surface voids with epoxy or CA glue and do the engraving after the finish has dried.
Buying Banksia

How can you get some banksia to turn? It sounds like fun to go to Australia and gather your own banksia, but plant products with the bark on can’t be legally brought into the U.S. in your luggage. It’s better to buy them from an importer who has already done all of the import paperwork and gone through the fumigation and quarantine necessary.
You can get banksia from wood suppliers online, but then you will get what they pick for you. I recommend going to a symposium tradeshow and picking out your own. When I do order them online, I buy plenty of them so I will be more likely to get suitable banksia for various projects.
I found the toughest thing was to take the first step. My recommendation is to jump right in. Buy three of them, cut the ends off, mount them between centers, and turn a tenon on one end of each. Then turn some weed pots, natural edge or not. Don’t try for thin walls or fitted parts at first. These first three will teach you how banksia cut and how to use the various textures in the banksia.
Banksia seedpods are a truly renewable resource, since no trees are cut down to harvest them. Buy an extra pod or three and don’t be afraid to lose one on a new idea. Working with banksia pods is an adventure, but the results are well worth the effort.
Cindy Drozda has been turning wood since 1985 and is now a fulltime woodturning artist who shares her knowledge and passion as an international demonstrator and teacher. Her website is cindydrozda.com.
Lead Photo: Karmonic Vibrations, 2013, Bleached and dyed Banksia seedpod, dyed Jerusalem olive wood, 3mm green opal in 14K gold setting, 4-1/2″ × 3-1/4″ (11cm × 8cm). Photo by: Tib Shaw, AAW
The post Working with Banksia Pods appeared first on Woodworking | Blog | Videos | Plans | How To.
from Woodworking | Blog | Videos | Plans | How To https://ift.tt/35BNVL5
订阅:
博文 (Atom)