2023年9月29日星期五

Easy Fence Picket Wood Pumpkin Decor


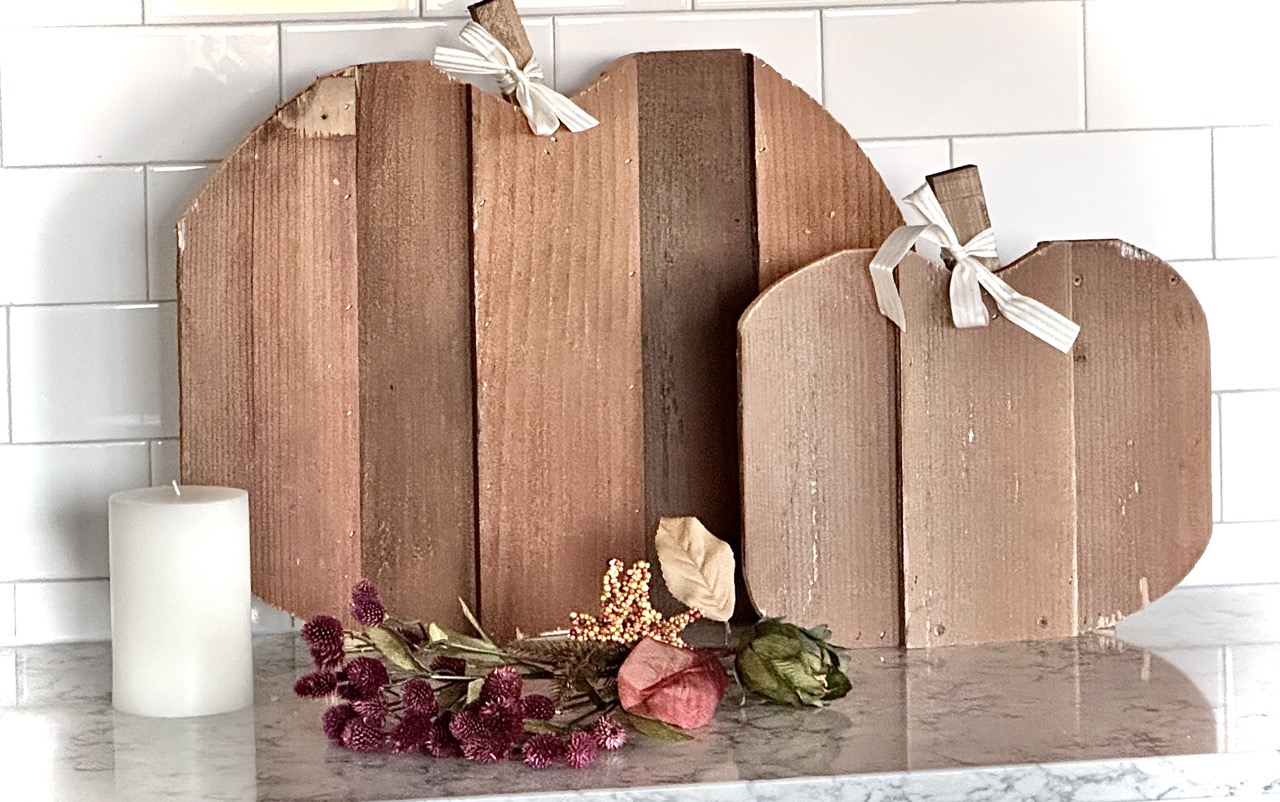
How I Built this Layered Wood Pumpkin Using Fence Pickets

This project was super easy to make.  You'll just need a jigsaw and a brad nailer or stapler and 1" fasteners.

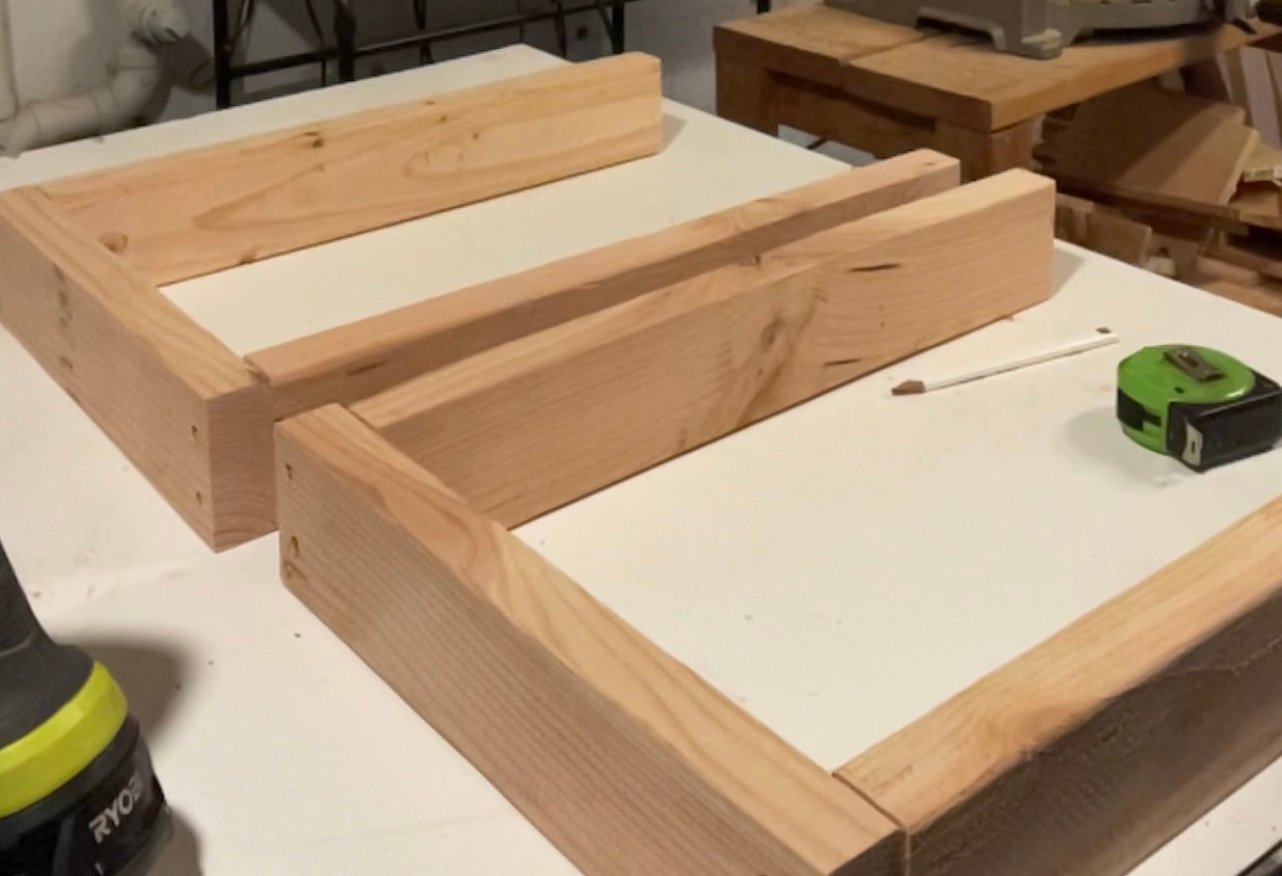
I cut the fence pickets to the lengths needed in the cut list.

pallet pumpkin wood

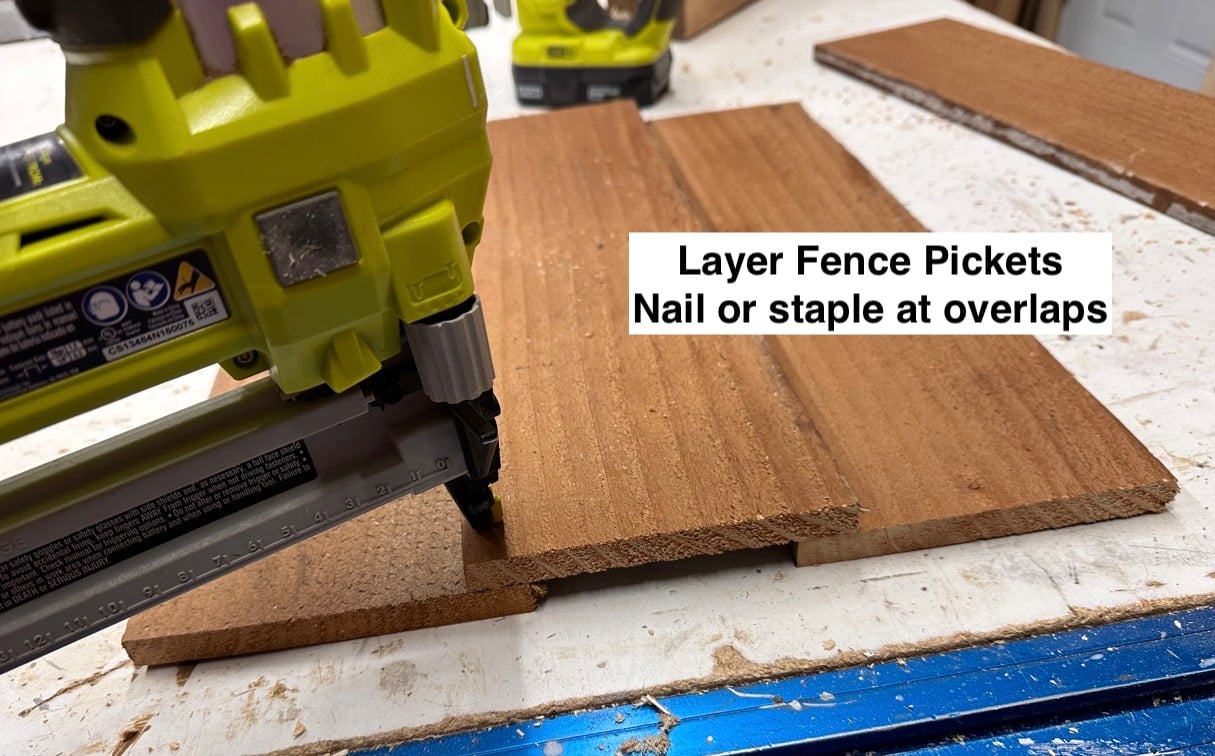
Then I layered the wood pieces, overlapping about 1" (no need to be super accurate here) and attached with 1" fasteners and glue.

pallet pumpkin tutorial

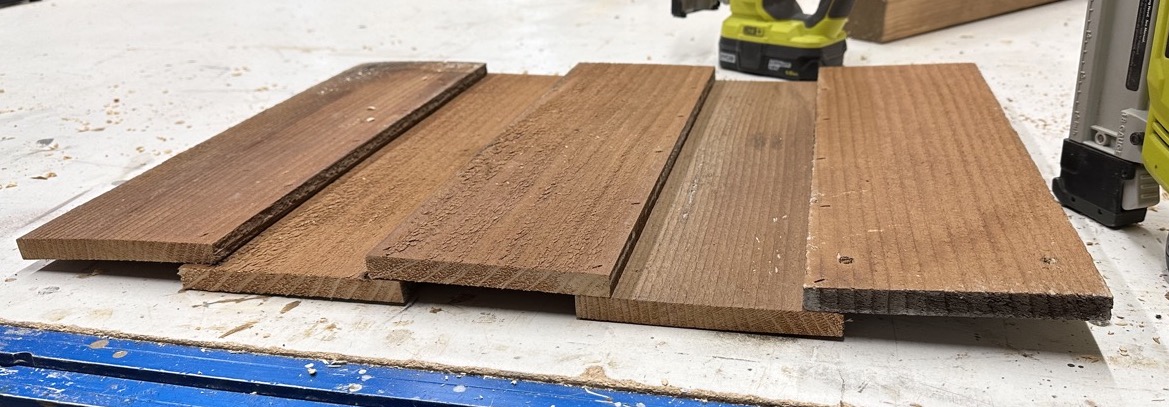
For the larger pumpkin, I layered five pieces.  

diy wood pumpkin

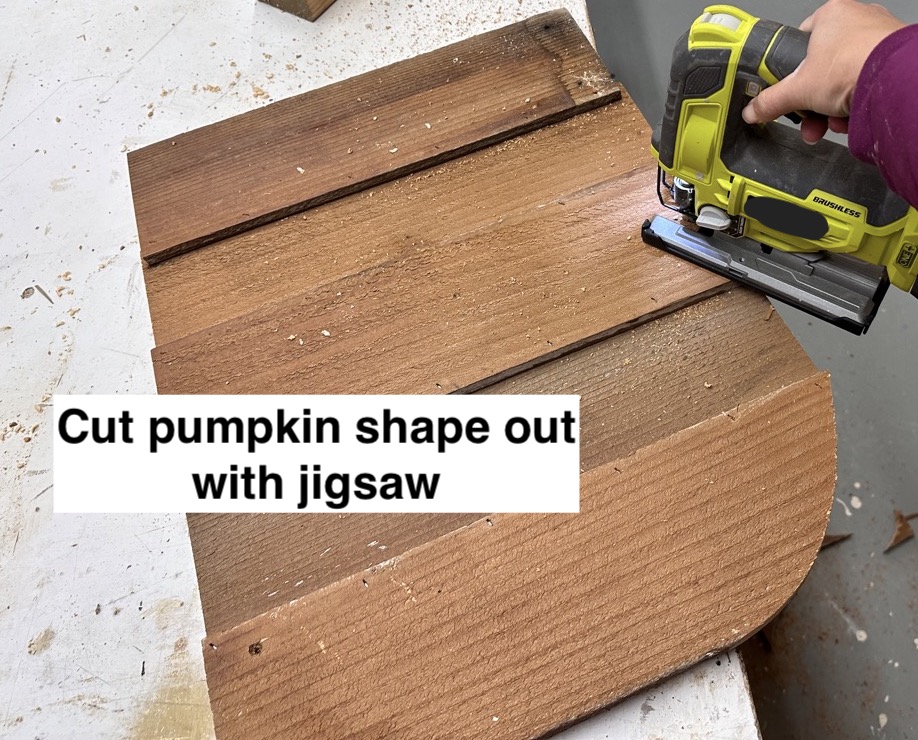
Then I just cut a pumpkin shape out.  No need to stress here - all pumpkins are different shapes and sizes, and you can always cut off more if you don't like the shape.  Just avoid cutting any nails or staples and make sure the jigsaw blade can operate freely and you aren't cutting into your work table.

wood pumpkin

I didn't like this shape, so ended up further rounding the corners and also taking some out at the bottom.

wood pumpkin

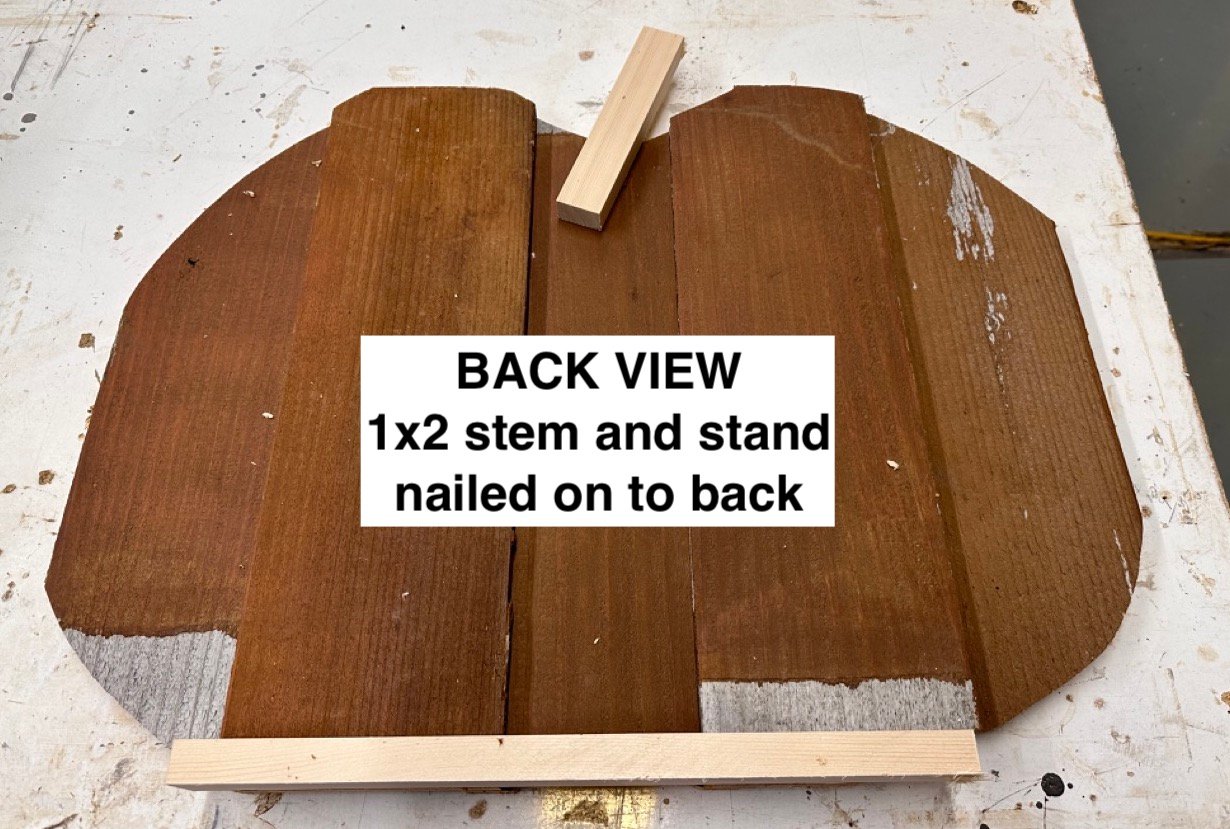
When I was happy with the pumpkin shape, I attached the 1x2s at the bottom to act as a stand and the 1x2 stem.  You'll attach these pieces from the front, through the fence pickets.

wood pumpkin diy

What Type of Wood Did You Use?

I used reclaimed cedar fence pickets in the 5-1/2" width.


Can I Make My Pumpkins out of Pallet Wood?

Yes!  However, pallet wood may be 3-1/2" wide instead of 5-1/2" - so you will need more boards to get the width for a plump pumpkin.  


from Recent Project Plans https://ift.tt/yBDcizO

2023年9月18日星期一

Cedar Propane Tank Cover Table

Why I Built a Propane Tank Cover Table

We are going to add a propane heater to our deck space to allow us to sit out and enjoy it for a longer period of time. We were also lacking a side table that would look nice with our modular seating. To check both projects off the list, I came up with this! Something that conceals the ugly propane tank and adds a tabletop surface to set things on. 

Modular Outdoor Seating 


More Photos of My DIY Propane Tank Cover Table

propane tank cover table


propane tank cover table


propane tank cover table


Photo Steps of Building my Propane Tank Cover Table

Here's some photos I took while building this propane tank cover -

propane tank cover table building steps

The first step is to build these two frames out of 2x4s.

Then you just add the cedar fence pickets to the outsides of the frames to enclose the sides.

propane tank cover table building steps

The propane tank will go in between the two side panels.

propane tank cover table building steps

Then I just added the front and back cedar fence pickets to the side panels.

propane tank cover table building steps

For the top, I set a 1x3 piece on top of the 2x4 frames and attached the top cedar fence pickets to it and added a hinge on the back.

propane tank cover table building steps

This propane tank cover table turned out so great for being such a quick and easy project!

propane tank cover table building steps


Related Plans in this Collection

This plan is based off my original outdoor storage chest plan. 

outdoor storage bench

I have been using this outdoor storage chest for almost five years.  I did have to replace a couple of screws in the hinges, but it is STILL being used to hold my kid's outdoor toys!


Free Plans to Build Your Own Propane Tank Cover Table


from Recent Project Plans https://ift.tt/GIjzigZ

2023年9月12日星期二

Minimalist Modern Tall Dresser

Why I Built This Dresser

A few weeks back, I built my youngest daughter this dresser:

pottery barn dresser modern $250

You wouldn't think a five year old would be excited about a piece of furniture, but this little girl is.  Every visitor must come see her new dresser that mommy built her.  

My older daughter loved the dresser too, and put in a request for a taller version.  So I built this dresser.

Why Didn't I Just Buy A Dresser?

It's an option, and no judgement if you do, but for me, it just makes sense to build my own dresser.

  • Save money - the inspiration dresser cost $1200 - before tax, shipping.  I was able to use up the scrap plywood from the first dresser and spend about $100 building this dresser.  That's quite a savings - especially when you consider two dressers built.
  • Good for the Earth - I use wood that is harvested about 50 miles from my home for the 1x materials.  This is much more earth friendly than shipping a dresser around the globe.
  • Rewarding - It's not just a dresser, it's a project and it's very rewarding to put my time into building something for my family.
  • Good Exercise - Building is a great way to keep moving and be productive - without having to go to a gym!

Matching Plans In This Collection

I have been loving this style furniture and am adding more and more plans to this collection.  Here's what I have so far:

Watch!  Similar Dresser Video Tutorial

In this video tutorial, I build the standard sized dresser.  Both dressers are built using very similar techniques and steps (the tall dresser is actually simpler) so this video should be very helpful in understanding how I built it.


from Recent Project Plans https://ift.tt/lzhOtd5

2023年9月4日星期一

I installed vinyl flooring for the first time, and (WHAT A Difference 😍) | Garage makeover Ep. 01

Installing vinyl flooring for the first time can be an exciting and rewarding experience. It allows you to transform the look and feel of your space with a durable and low-maintenance flooring option. By following the manufacturer’s instructions and using the right tools, you can achieve a professional-looking finish that adds beauty and functionality to your home or office. Check out my WOODWORKING PLANS https://ift.tt/ZcRoWtj Materials use Vinyl Flooring: https://ift.tt/PDzbEce Vinyl Multi-Purpose Reducer Molding: Baseboard and door Tim Tools used: Milwaukee Miter Saw: https://amzn.to/45Np3M6 Nail gun: https://amzn.to/3Z04cTw Pin nailer: https://amzn.to/3Lv71qn Measuring tape: https://amzn.to/3Z3sDQ2 Utility knife: https://amzn.to/3sAjjH7 Speed square: https://amzn.to/45DbCP6 1/4in spacer: https://amzn.to/3qPuBXH Rubber mallet: https://amzn.to/44CYOqK Safety gear Boots: https://ift.tt/FC5YWHA ************ Outline for installing vinyl flooring ************ 1. Measure and plan - Measure the room and calculate the amount of vinyl flooring 2. Prepare the surface - Remove any existing flooring, clean, dry, and level. 3. Acclimate the vinyl - Let the vinyl flooring acclimate for 48 hours. 4. Prepare the vinyl - Cut the vinyl flooring to fit the room using a sharp utility knife. 5. Install the first row - Begin at one corner and lay the first row of vinyl planks or tiles, using spacers for consistent gaps. 6. Continue installation - Lay the subsequent rows, interlocking the edges of the planks. 7. Trim and fit - Measure and cut the vinyl planks 8. Install transition pieces - Install transition strips or moldings. 9. Finishing touches - Clean the floor thoroughly and enjoy. Follow the manufacturer’s instructions for detailed guidance. AFFILIATE DISCLOSURE: This video might include affiliate links. If you click on one of the product links and make a purchase, I may receive a small commission at no extra cost to you. I only recommend products or services I used in this project or have personal experience with. Your support is greatly appreciated, as it helps me create more videos like this. Thank you! #vinylflooring #vinylfloor #diy

from DIY Creators https://www.youtube.com/watch?v=OkKPWV0jgaM

2023年9月3日星期日

I am BACK: Why I Stopped Uploading

“Hey, everyone! Welcome back to my channel! After a brief hiatus, I want to share the reasons behind my absence. Thank you for your support!

from DIY Creators https://www.youtube.com/watch?v=v-dvBbw0IHQ