Check out this quick signage build where I make a cool sign for Blade and Bow using a bit of Brass on the Bandsaw – Enjoy!
from jimmydiresta https://www.youtube.com/watch?v=yJAsbfTGzeE
2023年3月31日星期五
2023年3月30日星期四
To machine a 2.0 Cannon – Edinburgh Castle STYLE!
Check out this cannon build that I made where I use design cues from the cannons of Edinburgh… very cool!
from jimmydiresta https://www.youtube.com/watch?v=ZnIpJSGwQ9w
from jimmydiresta https://www.youtube.com/watch?v=ZnIpJSGwQ9w
2023年3月29日星期三
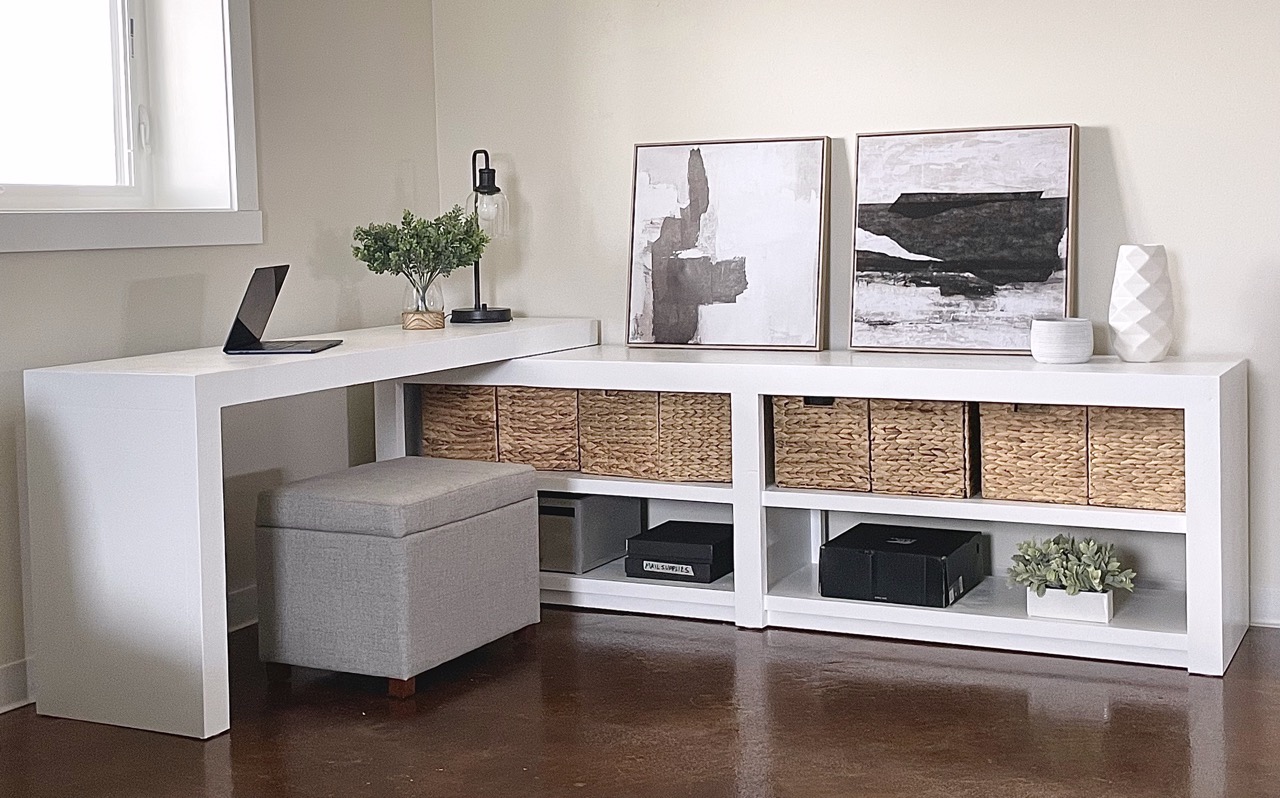
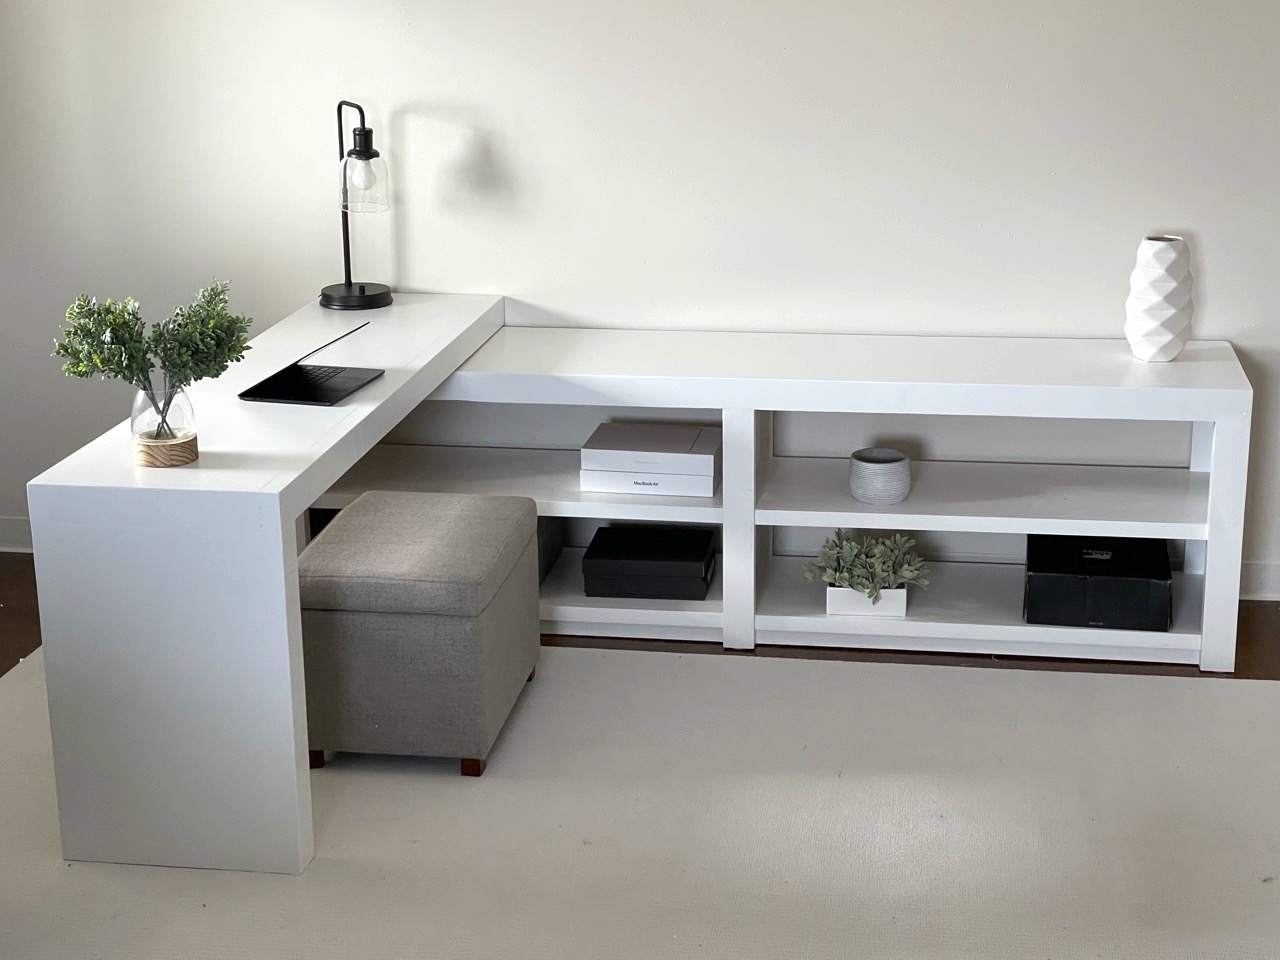
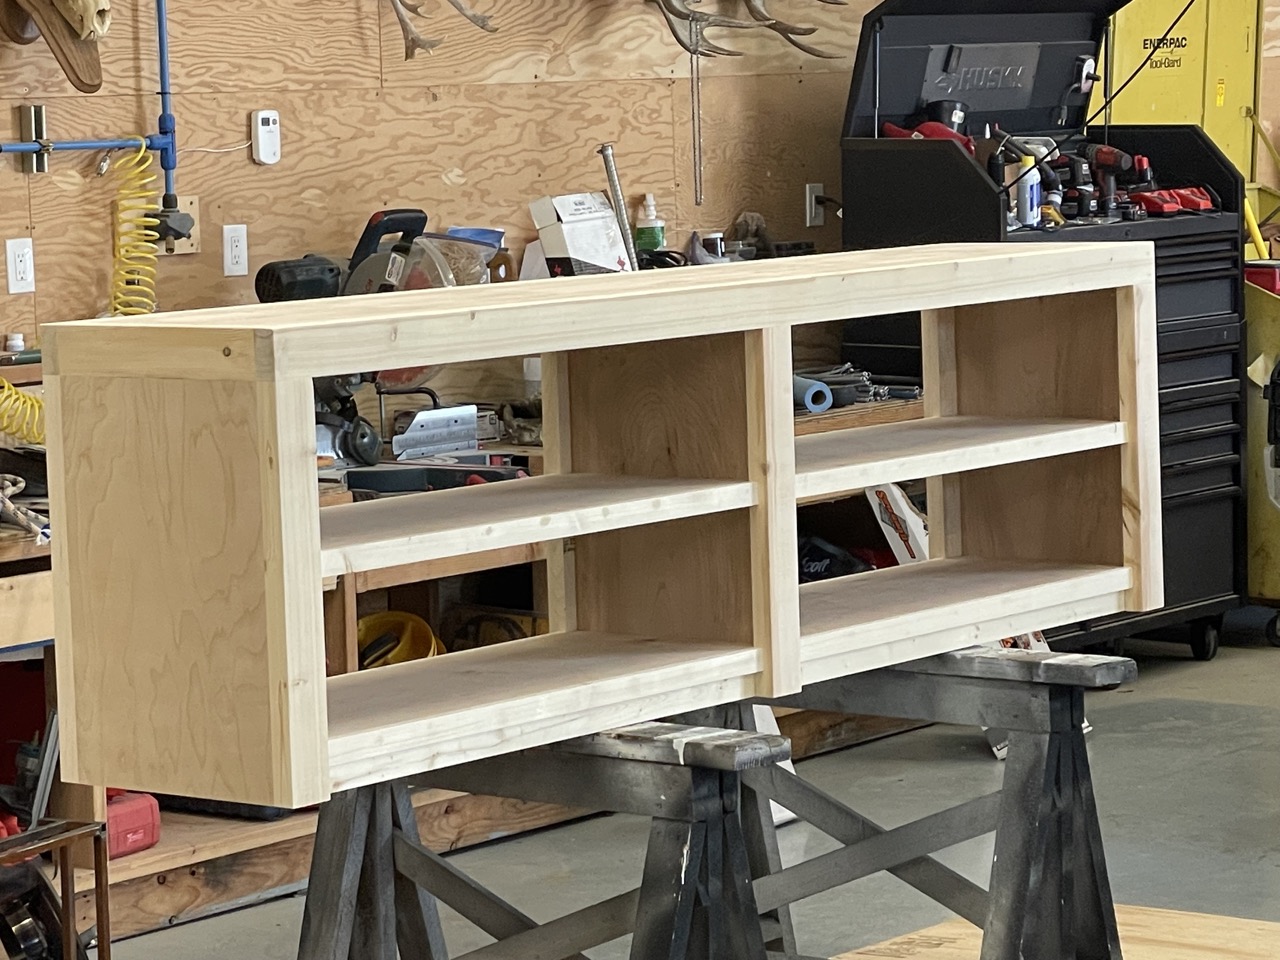
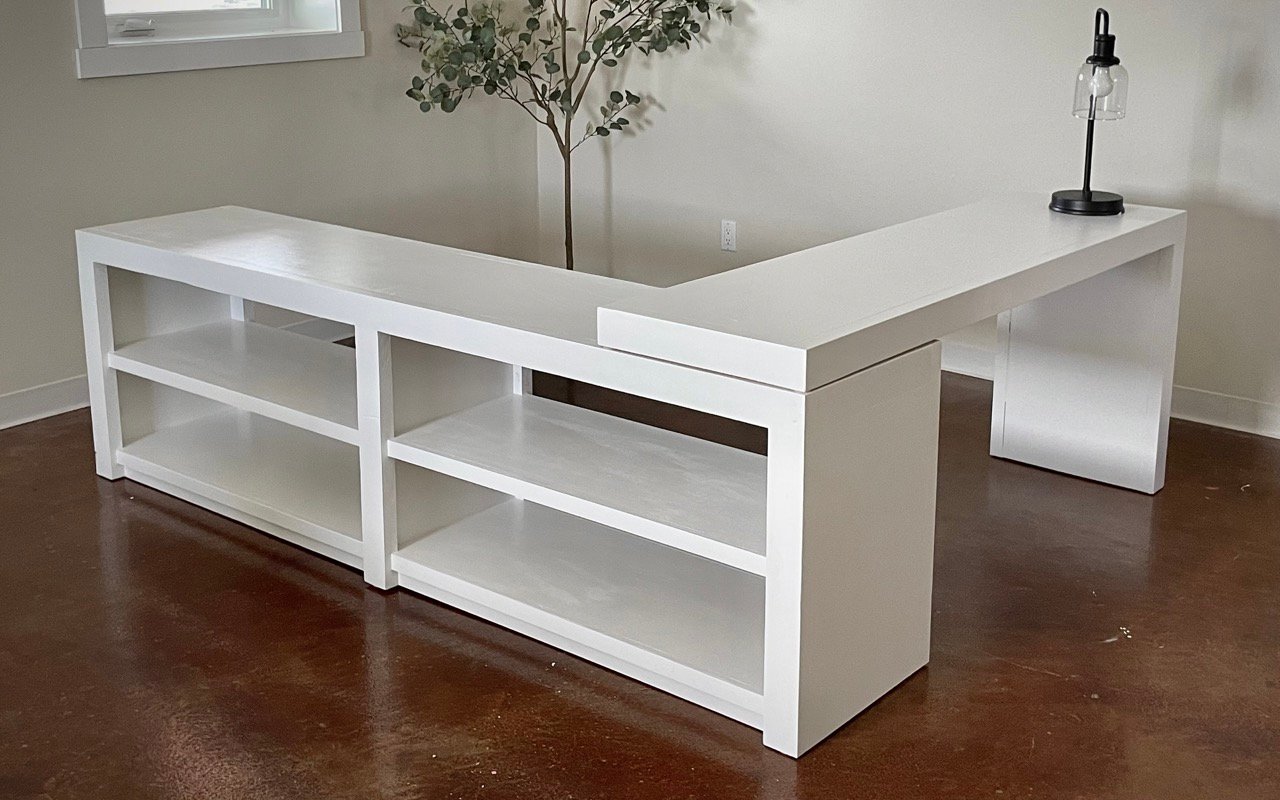
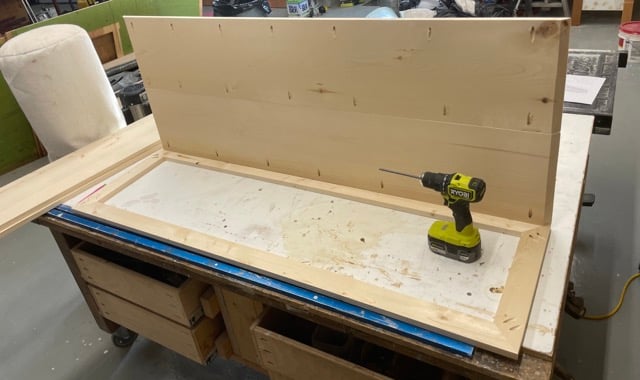
Mountain Modern L-Shape Rotating Desk - ADA
L Shape Rotating Desk Configuration
This desk system can be configured in so many ways. It can be placed against the wall, or freestanding in the center of the room since it's finished on all sides.
Corner Configuration: Desk arranged as a corner desk, against the wall
Peninsula Configuration: All sides of all pieces of the desk are finished, so can be configured as an L shaped desk in the center of a room. Seating can be placed on both sides of the desktop.
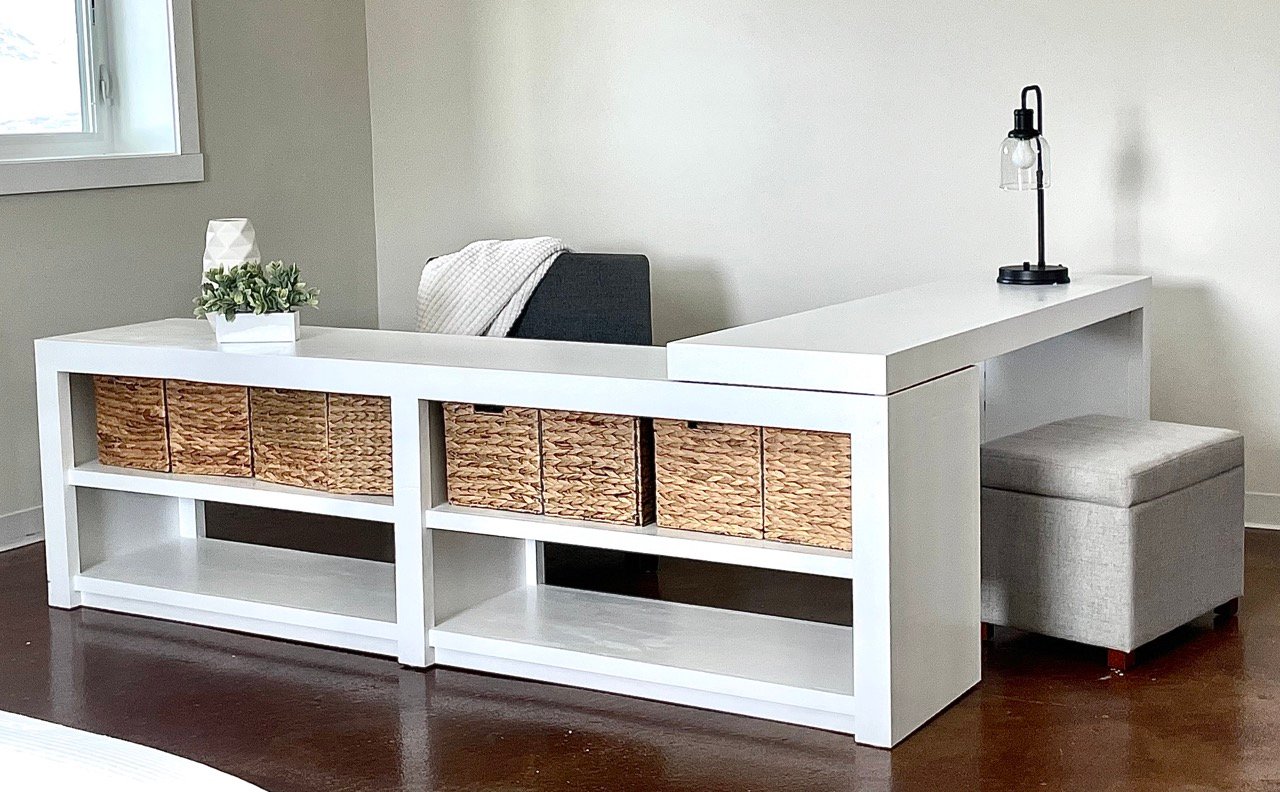
Centered in Room: This desk is finished on all sides, so can be placed in the center of the room - it does not need to be placed against a wall.
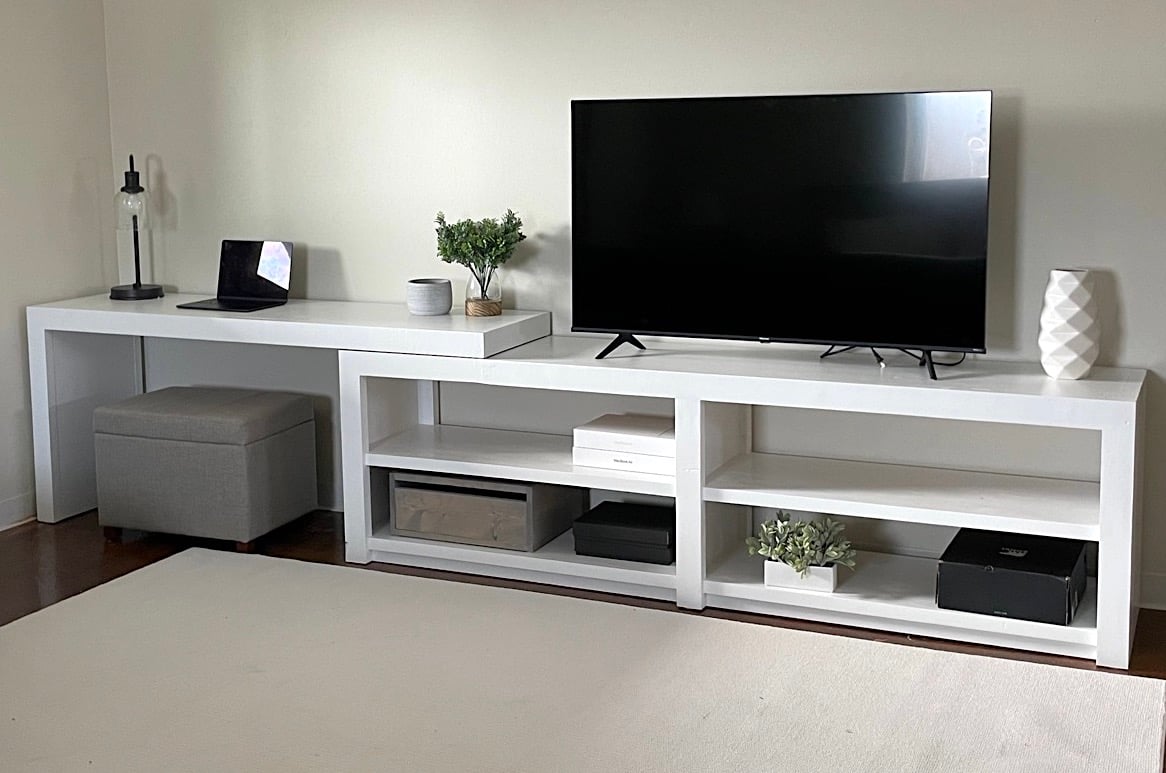
Desk and TV Straight Configuration: When you need both a desk and TV on the same wall, placed straight, this desk system can deliver both, and adjust in size for a perfect fit. We are using this configuration for a Airbnb rental, so the bedroom has both a desk and tv, but it looks cohesive.

Why I Built This Desk
I needed a 12 foot long wall system that provided both a desk and media center, with some storage, for an Airbnb rental project. I have been wanting to do a corner or L shaped rotating desk for a long time, and thought this was the perfect push to take on this giant desk project.
I love this modern style, it is inspired by a Pottery Barn Desk retailing for $1800 (for a smaller size), I was able to build it for about $200.
If I had done cabinetry, it would have been much more expensive and much more work. This was a very good solution that looks and works amazing.
How I Built This Desk
This desk certainly wasn't an easy project - it is huge. My husband helped me, the two of us were able to put the desk together in an afternoon. The sanding and painting took another day, working on and off as coats of paint dried. You could definitely tackle this over a weekend.
Here's the basic steps -
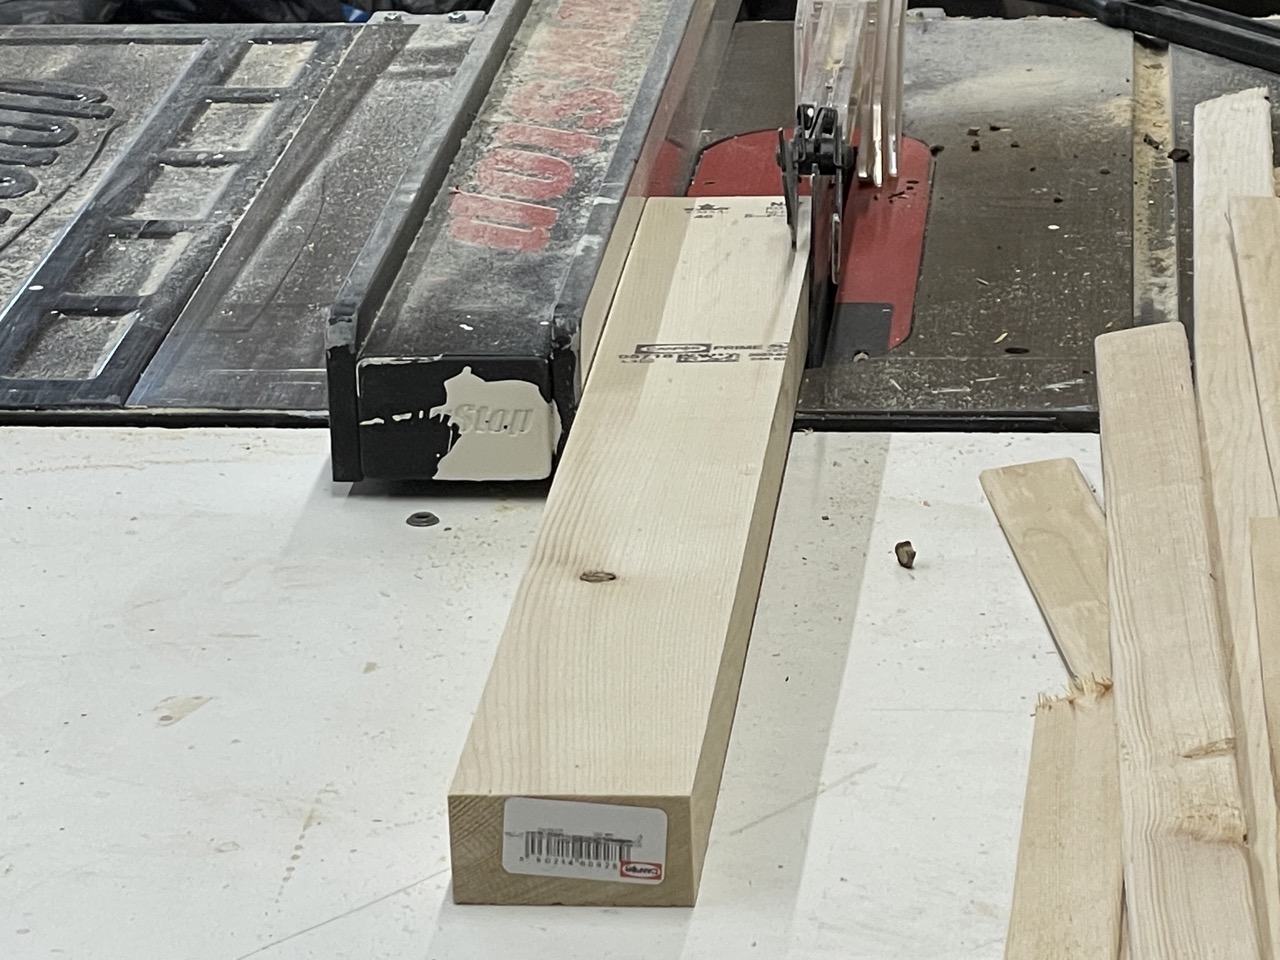
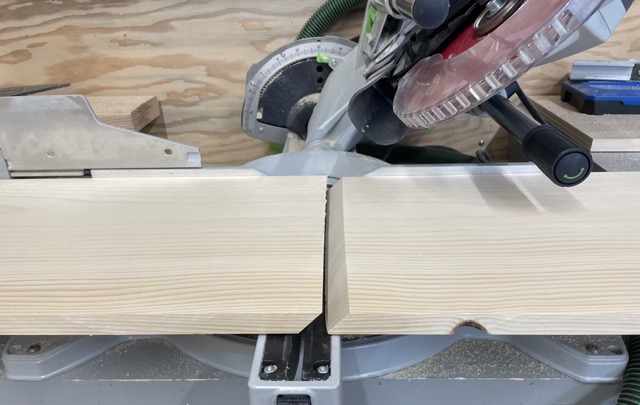
Ripping on Tablesaw
You'll need a tablesaw to do a good job on this project. You are saving $1600+ by building yourself, this is a big, nice piece - invest in a tablesaw.
The two sheets of plywood need to be ripped into 6 pieces, each 15-3/4" wide. The rip widths must be identical.
The 2x4s should be ripped twice, so the rounded edges are removed and the 2x4 width is 3". I ran the boards through first at 3-1/4" and then ran the second side through with the fence set at 3".
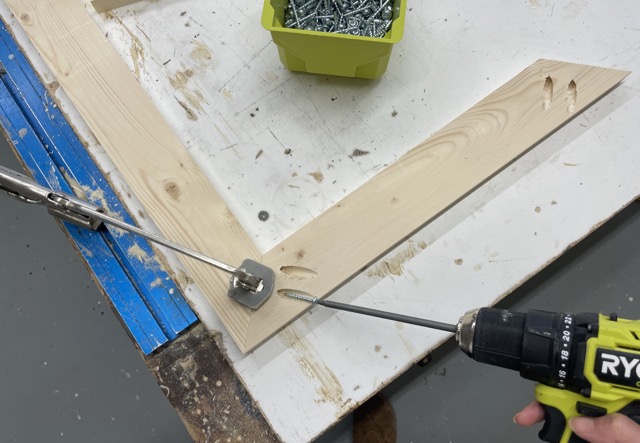
Assembling with Pocket Holes
For a professional looking project, pocket holes are the way to go. This is the same method furniture and cabinet companies use. It is a miracle that you can do pocket holes at home with a $100 tool.
Pocket holes give you precision and hidden fasteners that hold up over time.
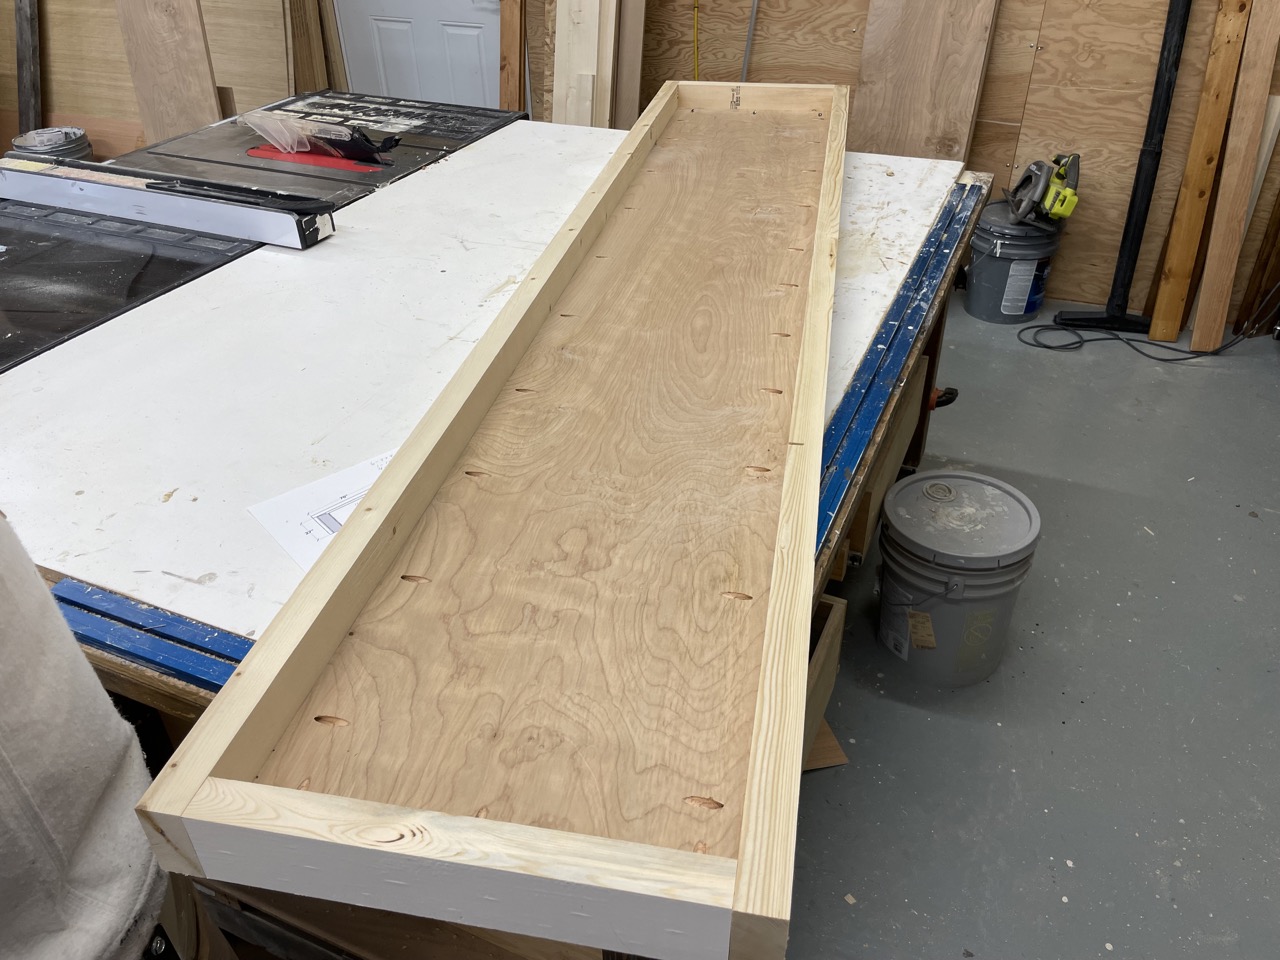
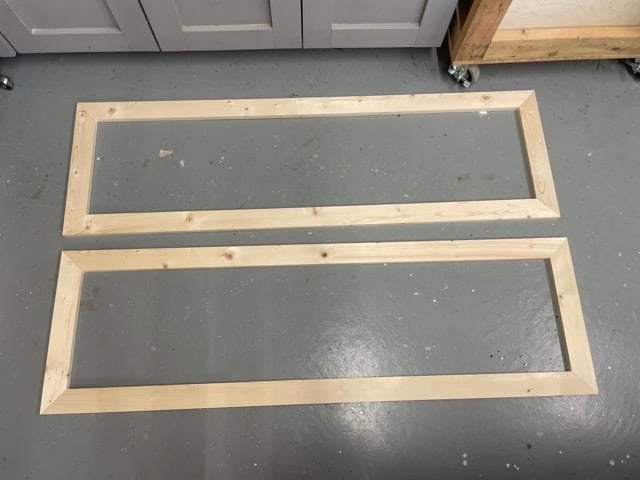
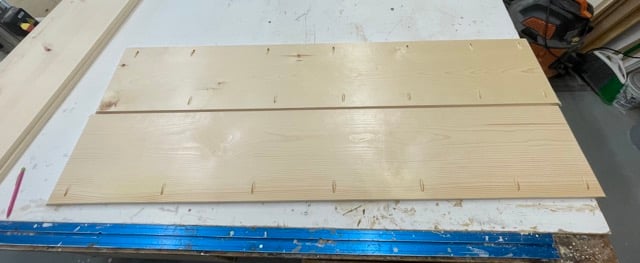
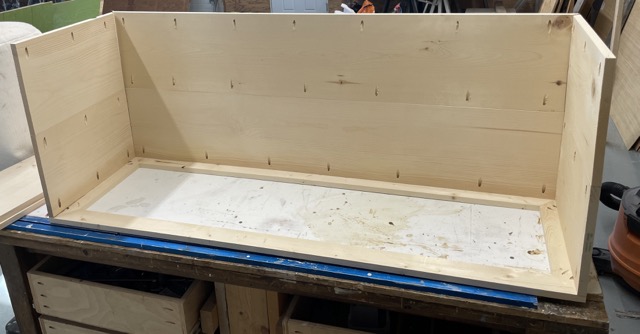
First I built the two tabletop pieces. They are 3/4" plywood framed with the ripped 2x4s.
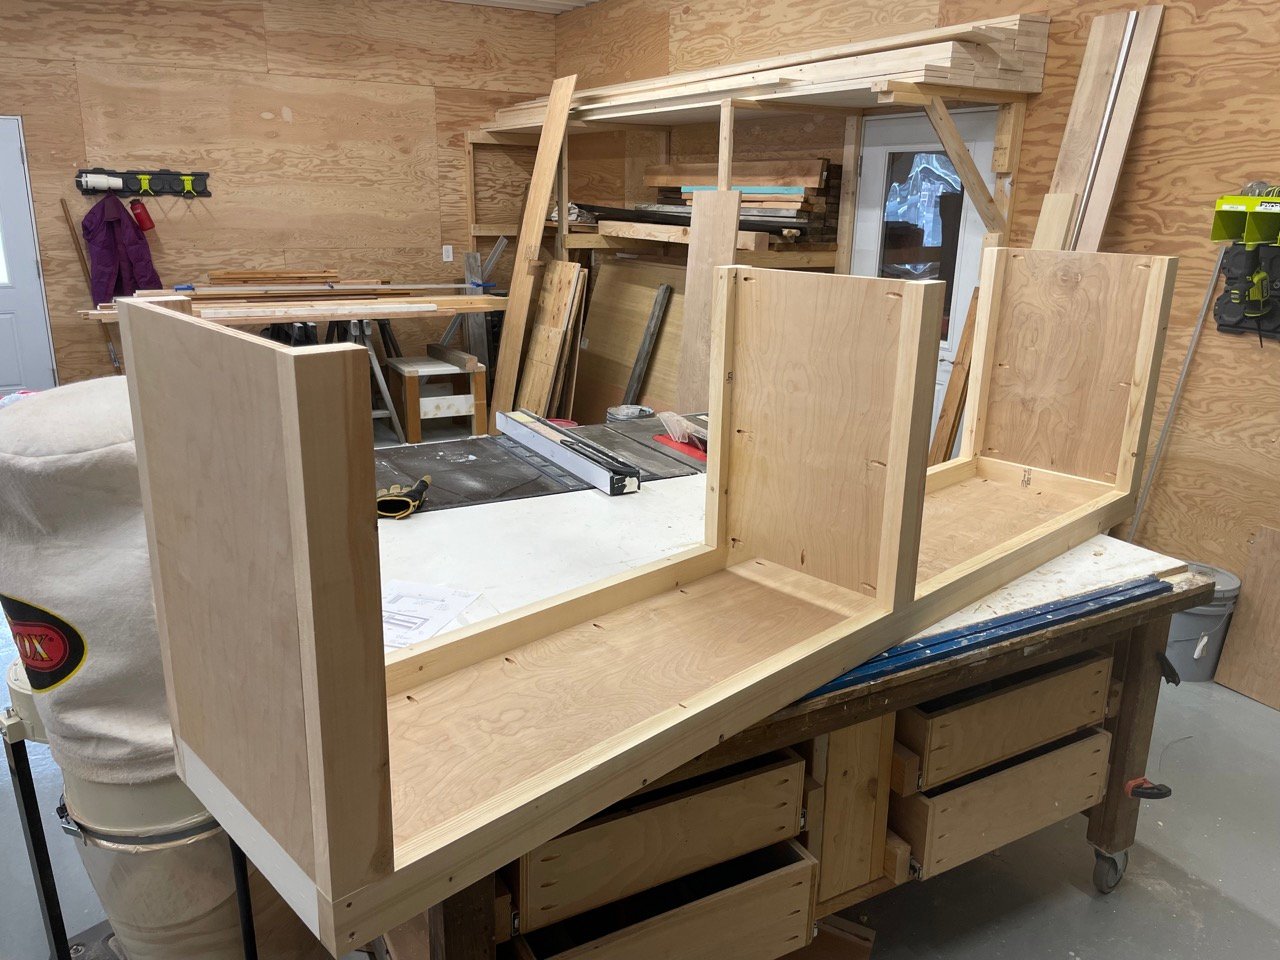
Then I attached the "legs" and inset the plywood panels.
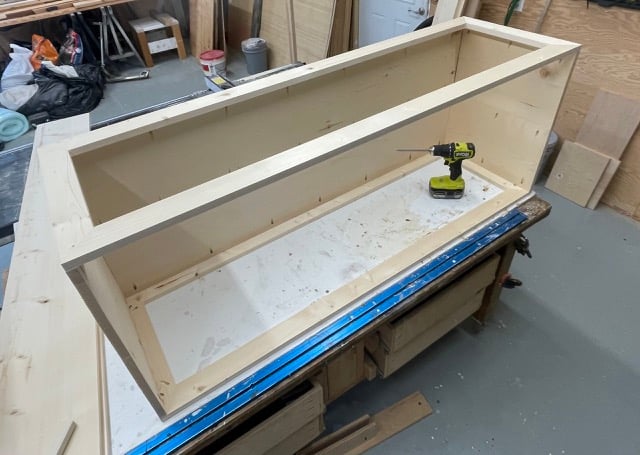
From there, I set the shelves in between the legs and the 1x3 bottom trim. I also attached the 1x3 bottom trim with pocket holes to the shelf bottom.
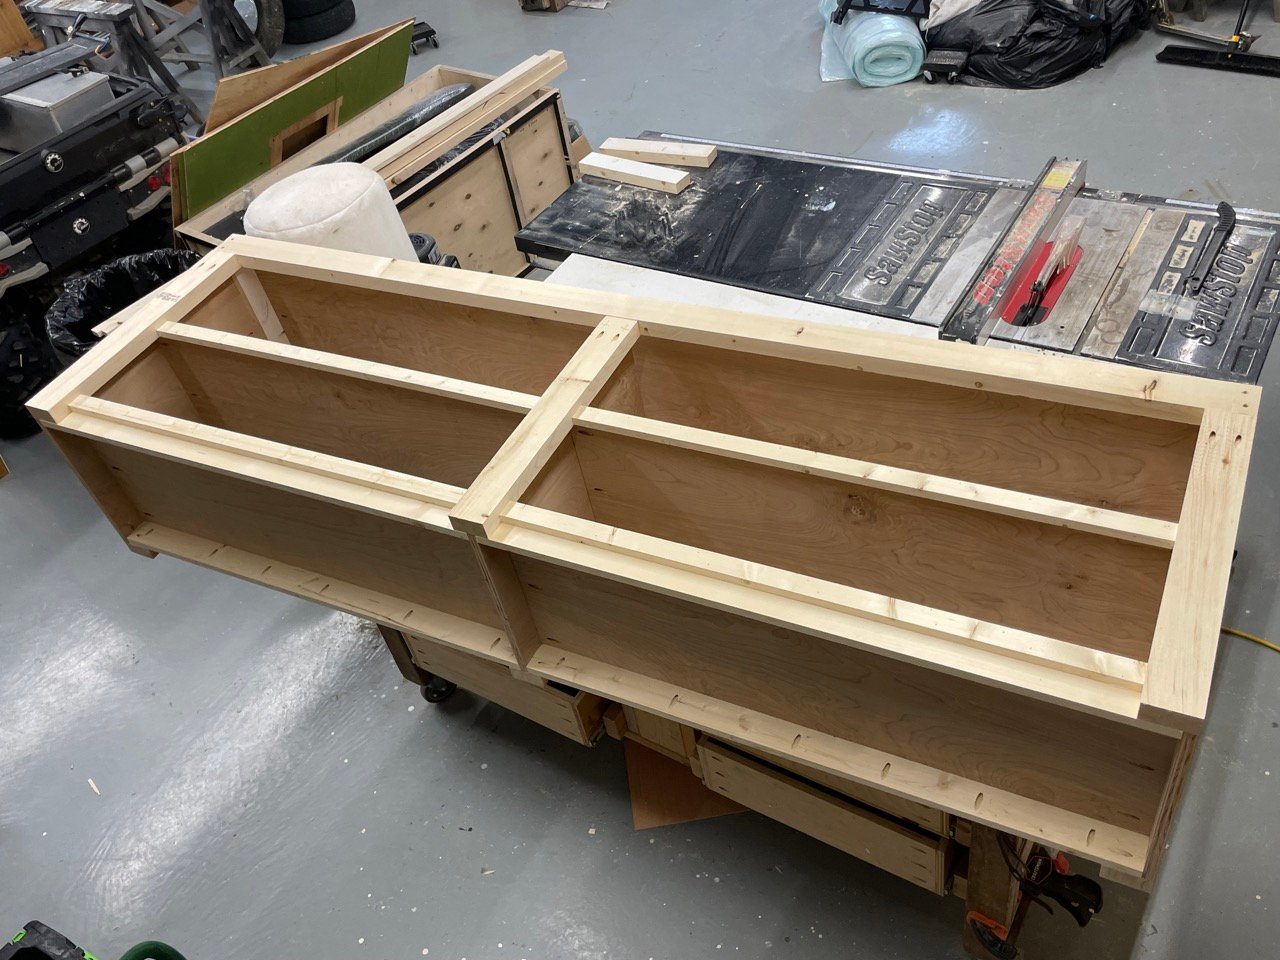
The final step was attaching the 1x2 trim to the shelf faces. I used 1-1/4" brad nails and wood glue.

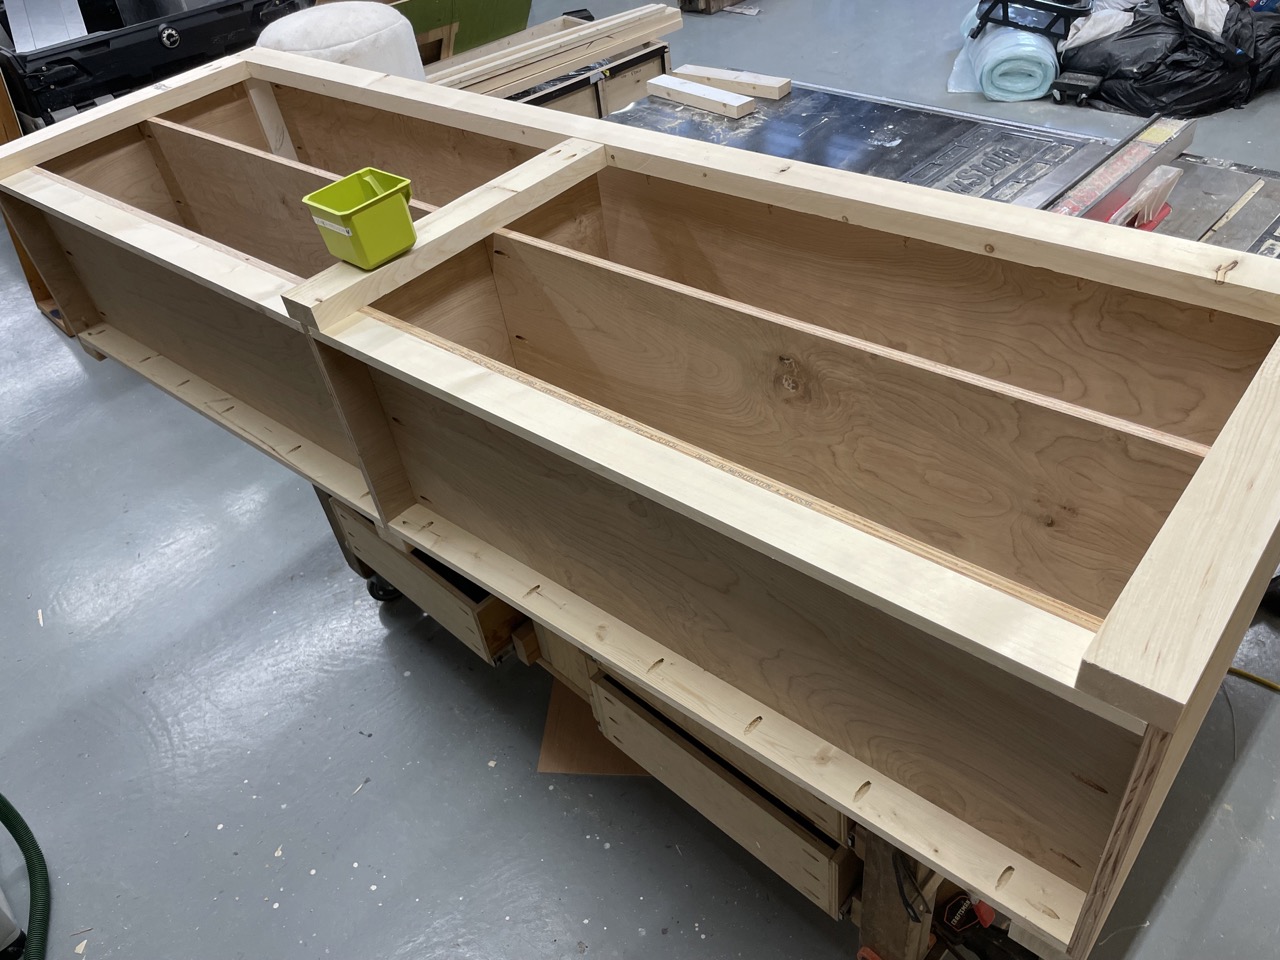
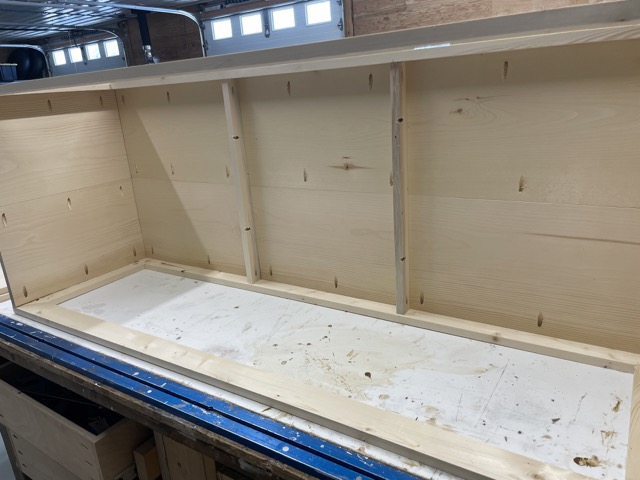
The desktop pieces i built the same way. It is very strong with this method - we did testing on it.
To finish the inside of the leg we added cleats with 1-1/4" brad nails
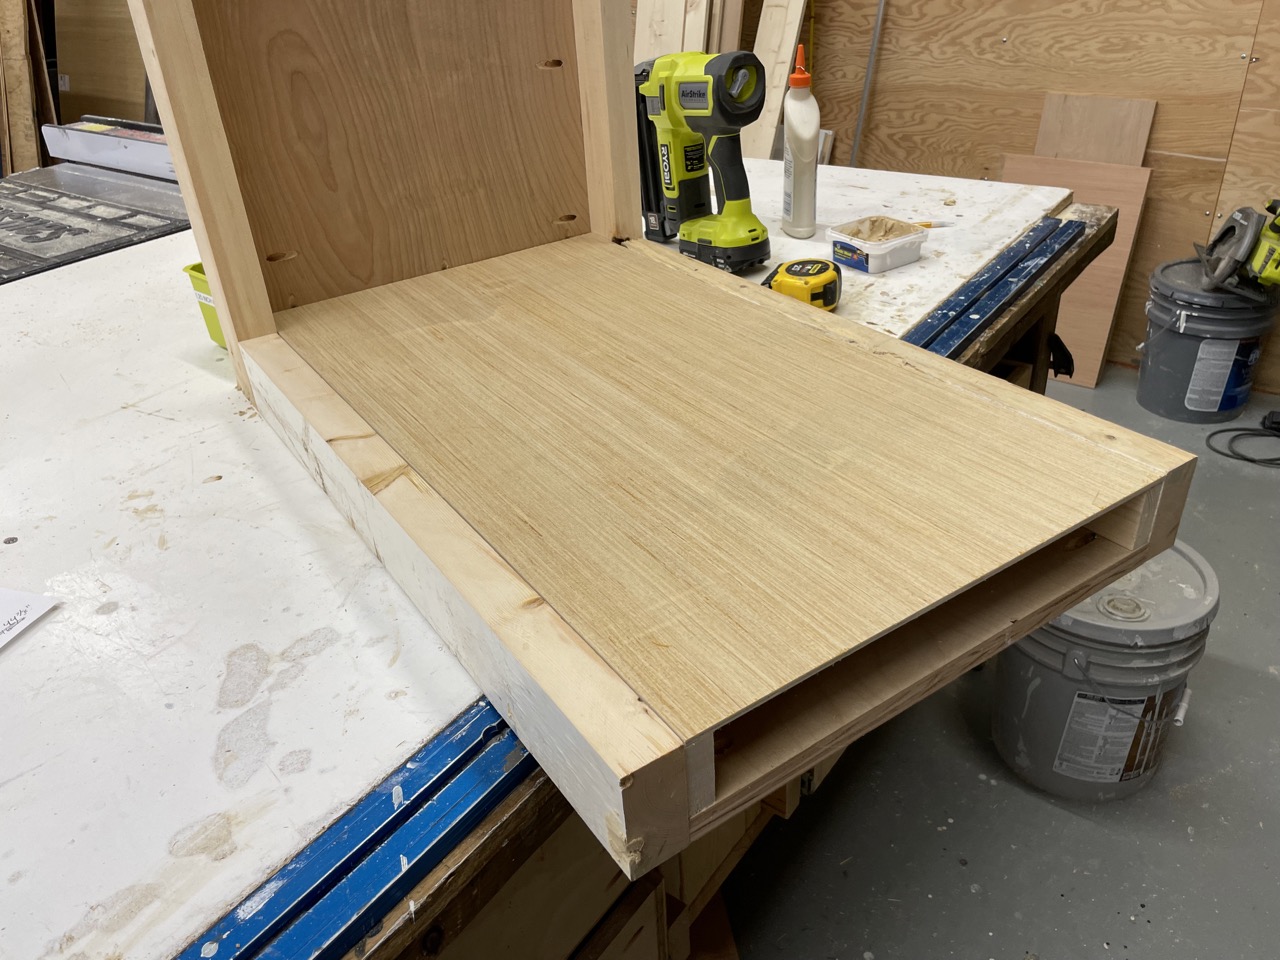
And then covered it with plywood. I did use 1/4" plywood (we ran out of 3/4") but the plans call for 3/4".
Finishing the Desk
The finish is a huge deal. It takes me as long to finish a project as it does to build it.
There were some nail holes to fill. We filled them with wood filler and let dry.
The entire project was sanded with 120 grit sandpaper.
I did slightly round the outside edges with the sander, sharp knife edges can get busted off easily.
I used a mini roller and brush for corners to paint. It took three light coats. A light, fine grit sanding was done between coats for a super smooth finish.
Modern L Shaped Rotating Desk Plans
Here's the free plans to build this desk. You can easily modify the sizes to fit your space and needs too.
from Recent Project Plans https://ift.tt/RXfOCk7
2023年3月26日星期日
"Q" Times New Roman Alphabet Series
“Q” in my alphabet bandsaw build series in up next… cut out in my favorite Times New Roman font – Enjoy!
from jimmydiresta https://www.youtube.com/watch?v=7xm7nzc_Yyk
from jimmydiresta https://www.youtube.com/watch?v=7xm7nzc_Yyk
2023年3月23日星期四
“P” Times New Roman Alphabet Series... #BandsawCowboy #diresta
Up next “P” in my alphabet bandsaw build series, cut out in Times New Roman font – Enjoy!
from jimmydiresta https://www.youtube.com/watch?v=kqiXxoOsL8Y
from jimmydiresta https://www.youtube.com/watch?v=kqiXxoOsL8Y
2023年3月21日星期二
“O” Times New Roman Alphabet Series... #BandsawCowboy #diresta
Ohhhh here we go … O in my alphabet bandsaw build series in Times New Roman font is up next – Enjoy!
from jimmydiresta https://www.youtube.com/watch?v=M91kgPf3pTA
from jimmydiresta https://www.youtube.com/watch?v=M91kgPf3pTA
2023年3月20日星期一
Round Modern Wood Side Tables
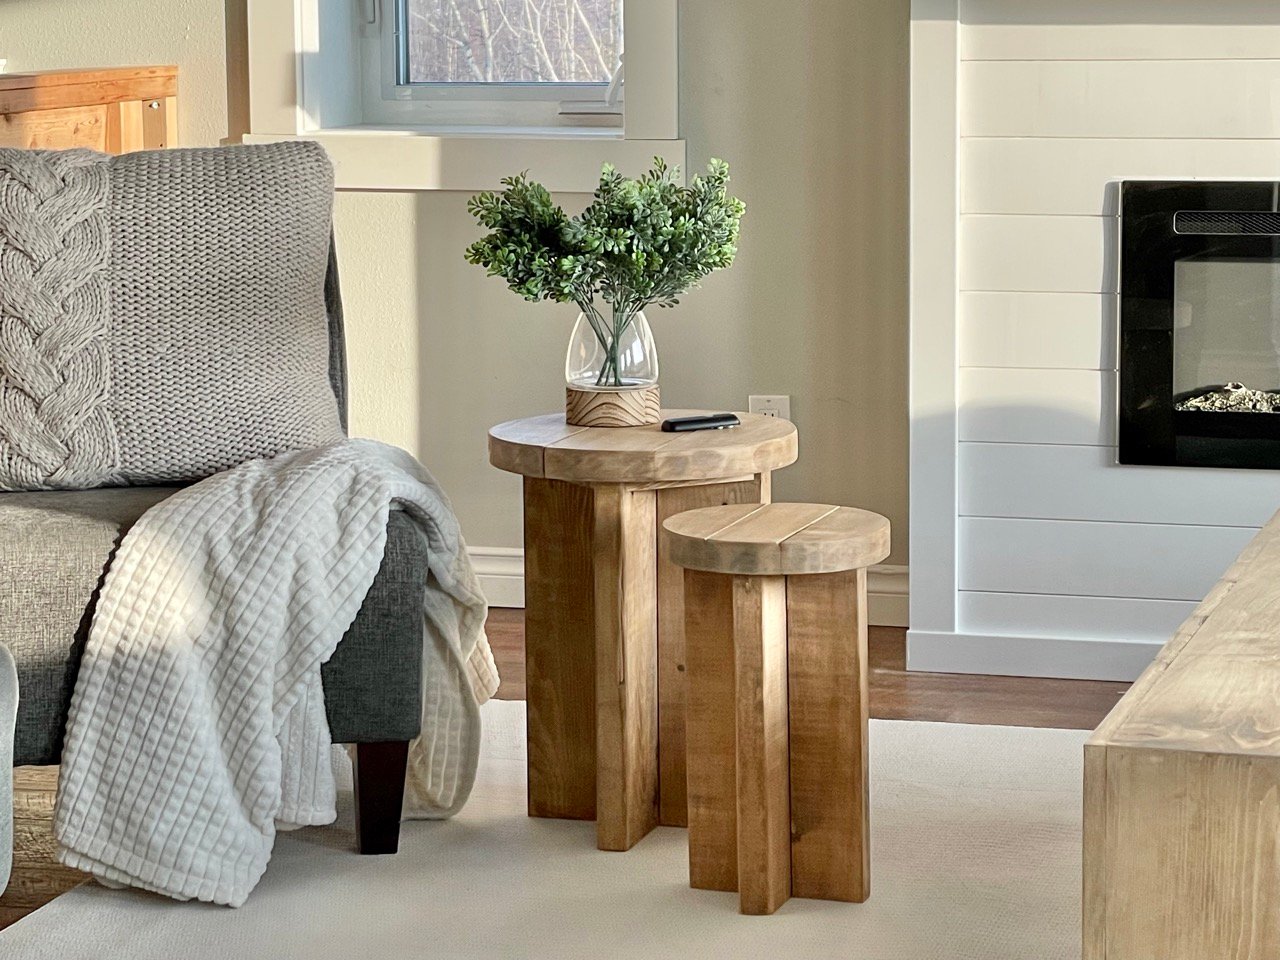
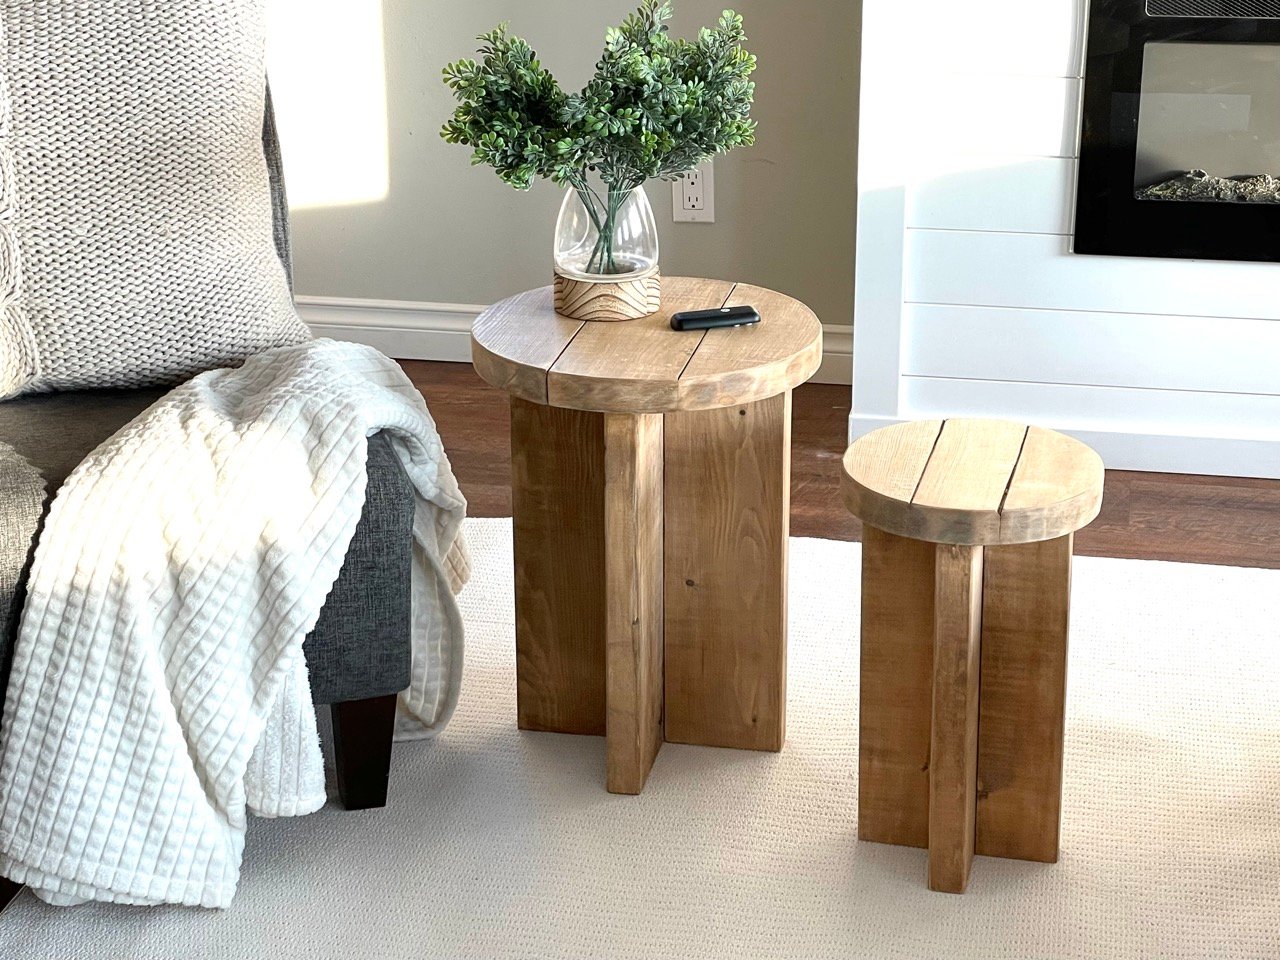
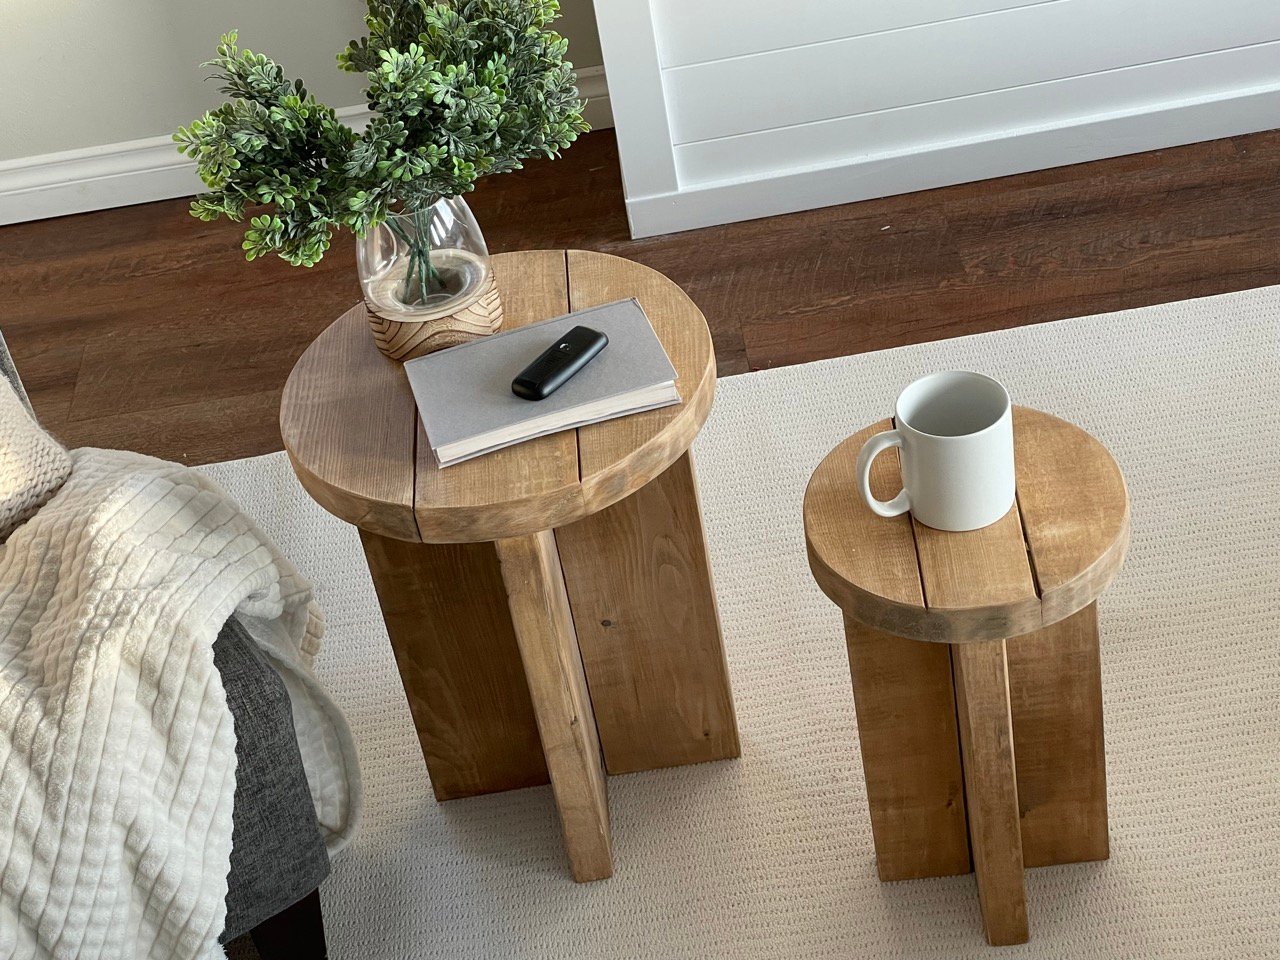
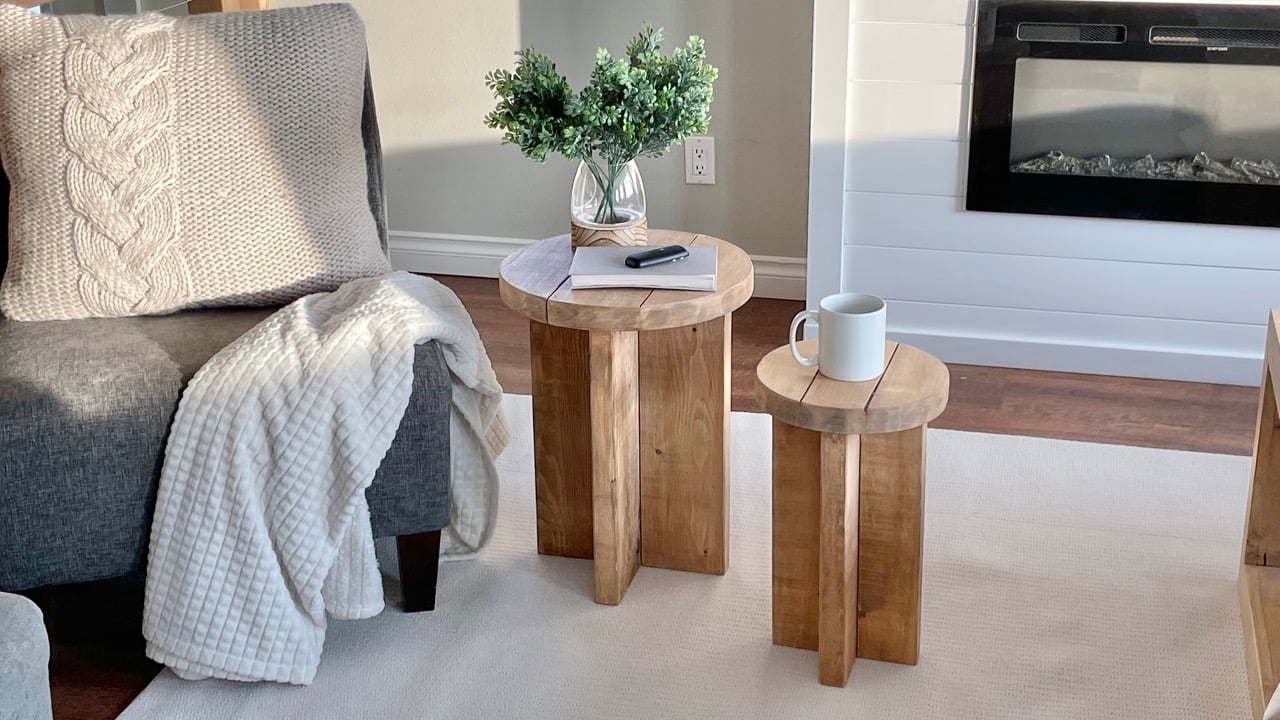
Why I Build These End Tables
It's always nice to have a nearby tabletop surface to set a coffee cup on or a remote. I've been loving the trend of more modern, chunky shapes, especially the extruded X shape.
These little end tables turned out so well and cost between $15-$20 to build! I love the rustic wood tones with the modern shape.
How to Build These End Tables
This is a free project plan. Please take a second to watch the video tutorial on how to build them - there's a few tricks that make all the difference with these end table builds.
Video Coming Soon
from Recent Project Plans https://ift.tt/e7g5tYO
Simple Vanity with Shelves and Light Up Mirror
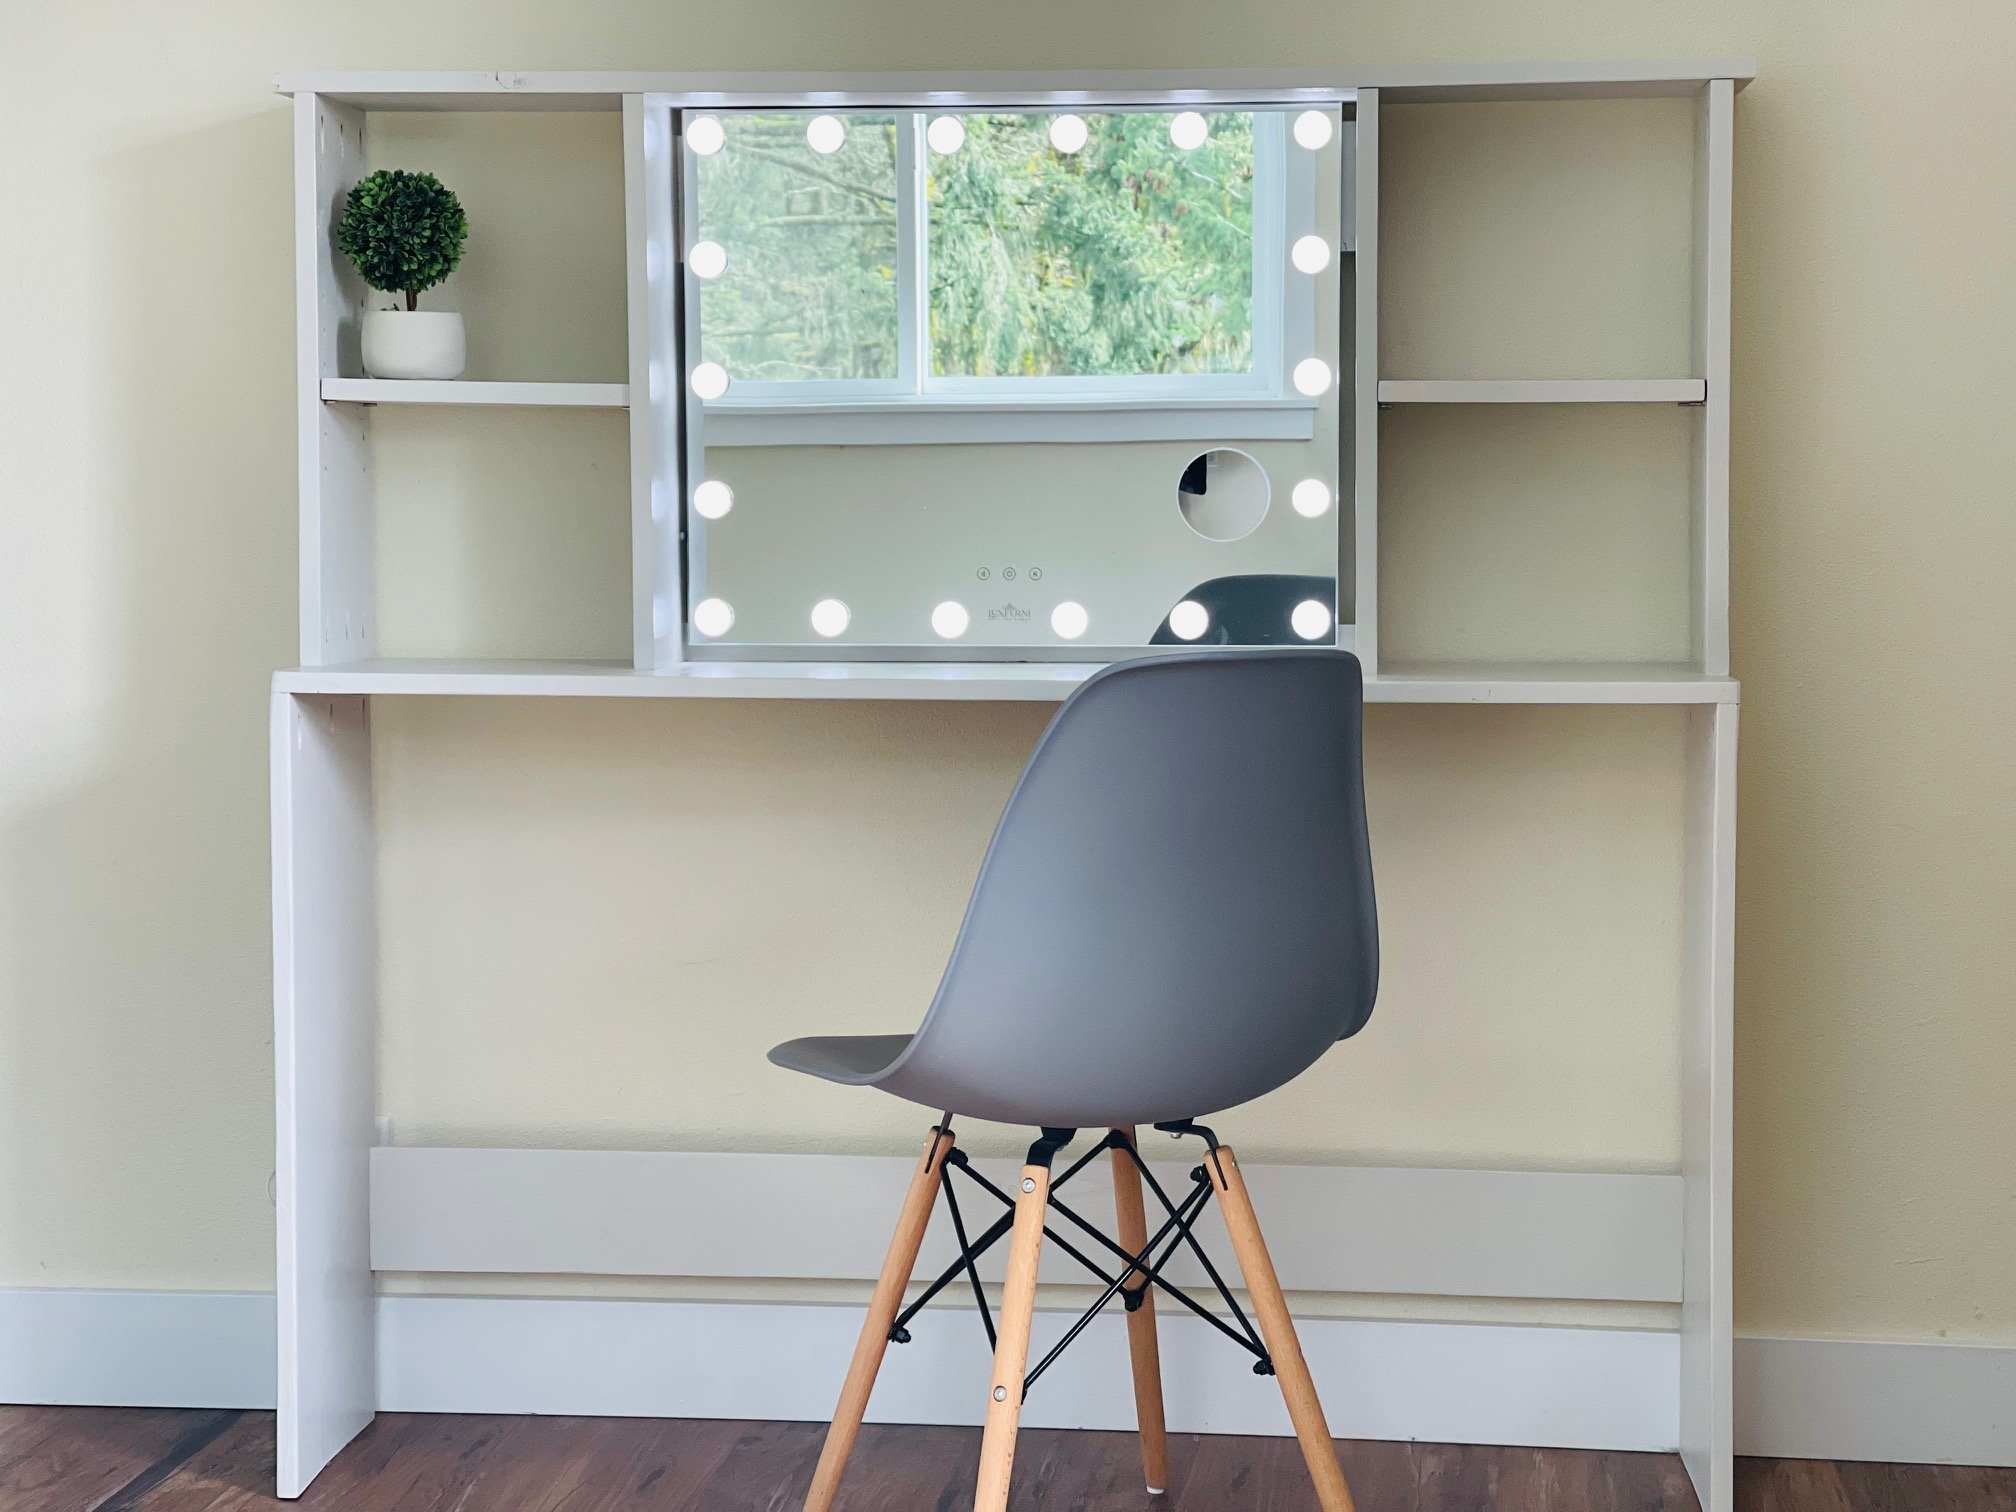
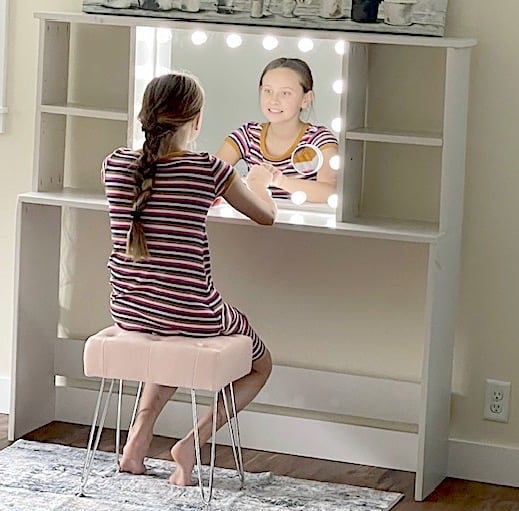
Why I Built This Vanity
With 3 children getting ready for school in the morning, 2 of them being teenage girls, I wanted to create a spot outside of the bathroom so they had another option for doing hair and makeup. Since buiding it, the girls have used it everyday and it's made a huge difference with our morning routine. My only regret is not building it sooner! I bought this mirror first and then built the hutch to fit.
Free Vanity Plans
The plans for this vanity follow. This is a super simple build, using 1x12 boards and simple joints.
from Recent Project Plans https://ift.tt/4DV5d1L
Bandsaw into a Multi Tool? #diresta
Check out this bandsaw mod... It's a great solution for the workshop - Enjoy!
from jimmydiresta https://www.youtube.com/watch?v=fcz5zZnEoRU
from jimmydiresta https://www.youtube.com/watch?v=fcz5zZnEoRU
2023年3月19日星期日
“N” Times New Roman Alphabet Series... #BandsawCowboy #diresta
Fresh out of the workshop… N in my alphabet bandsaw build series in Times New Roman font – Enjoy!
from jimmydiresta https://www.youtube.com/watch?v=TuMJVCOqf4g
from jimmydiresta https://www.youtube.com/watch?v=TuMJVCOqf4g
2023年3月18日星期六
I spent 7 hours welding this & my birds won't even care.
https://ift.tt/9BX7qr5 https://ift.tt/1QMKwxG come hang with me here !! I needed a way to carry my eggs to the house from the coop! I got steel rod at the the home depot and used my Lincon welder and made a basket! https://ift.tt/CMXeNVx metal bender https://a.co/d/3kq0hB9
from jimmydiresta https://www.youtube.com/watch?v=C6TqIJEG-Yk
from jimmydiresta https://www.youtube.com/watch?v=C6TqIJEG-Yk
“M” Times New Roman Alphabet Series... #BandsawCowboy #diresta
Up next from the workshop… M in my alphabet bandsaw build series in Times New Roman font – Enjoy!
from jimmydiresta https://www.youtube.com/watch?v=lBMDe-dFAyI
from jimmydiresta https://www.youtube.com/watch?v=lBMDe-dFAyI
2023年3月16日星期四
“L” Times New Roman Alphabet Series... #BandsawCowboy #diresta
Next up in my alphabet bandsaw build series, here is the letter “L” – Enjoy!
from jimmydiresta https://www.youtube.com/watch?v=tg_cMZuxx94
from jimmydiresta https://www.youtube.com/watch?v=tg_cMZuxx94
2023年3月15日星期三
“K” Times New Roman Alphabet Series... #BandsawCowboy #diresta
In Times New Roman Font… next up in my alphabet bandsaw build series, here is the letter K – Enjoy!
from jimmydiresta https://www.youtube.com/watch?v=sm03TfdIMo8
from jimmydiresta https://www.youtube.com/watch?v=sm03TfdIMo8
2023年3月14日星期二
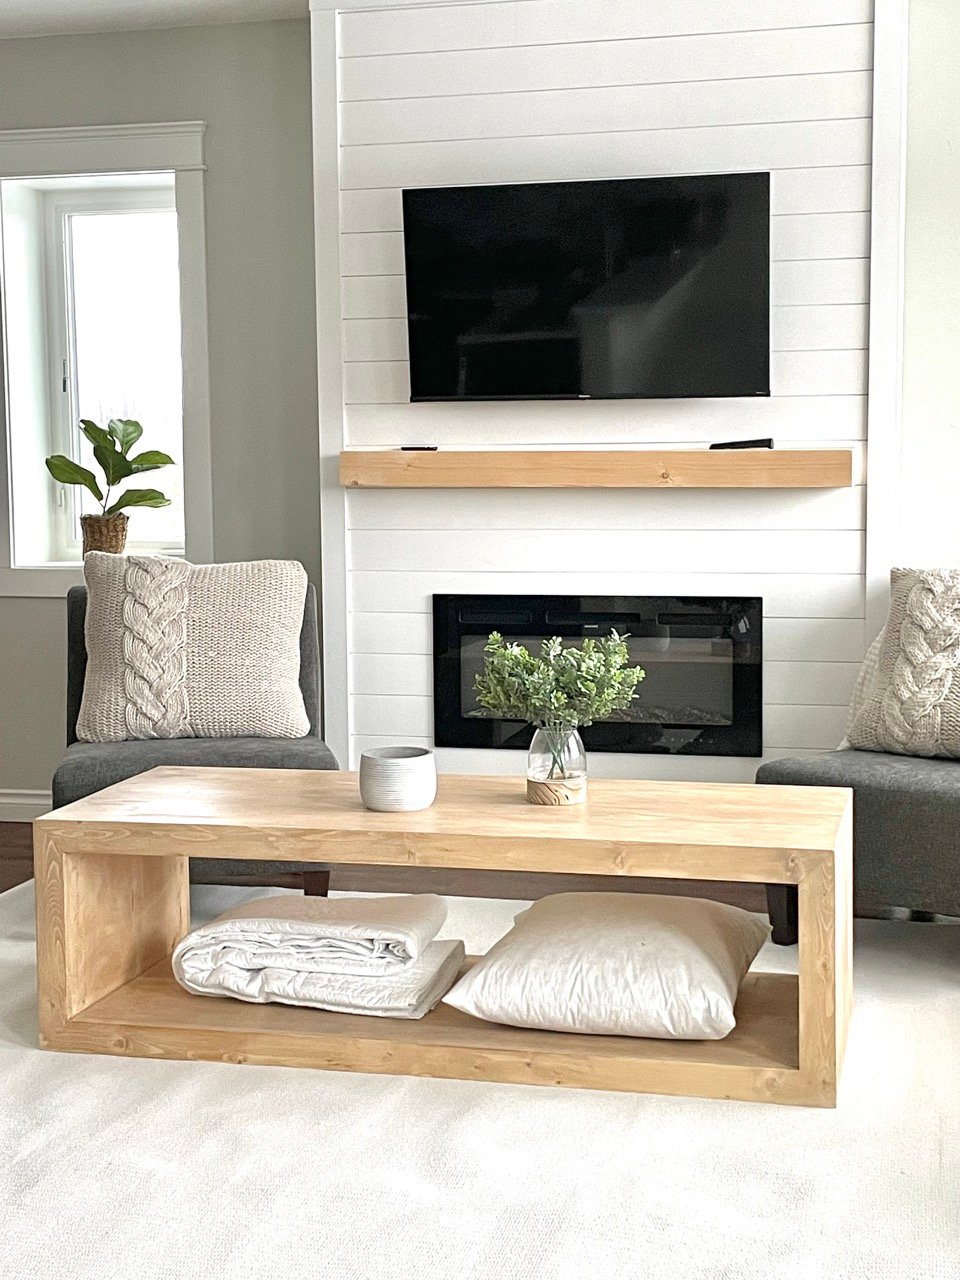
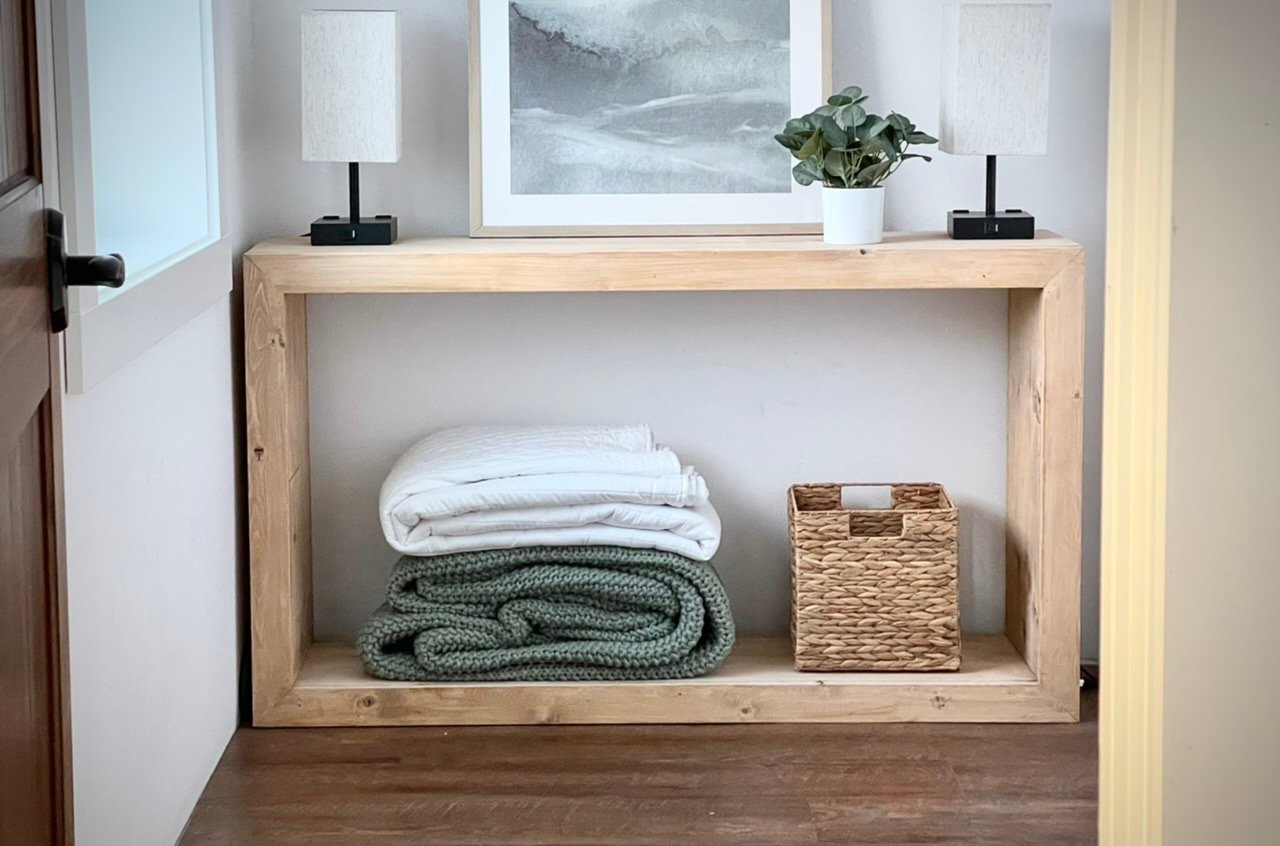
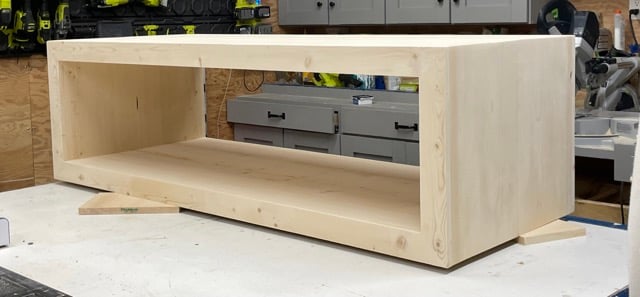
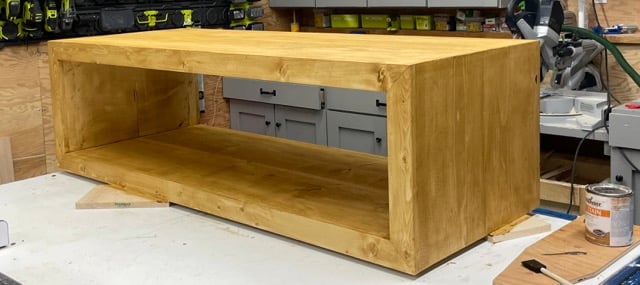
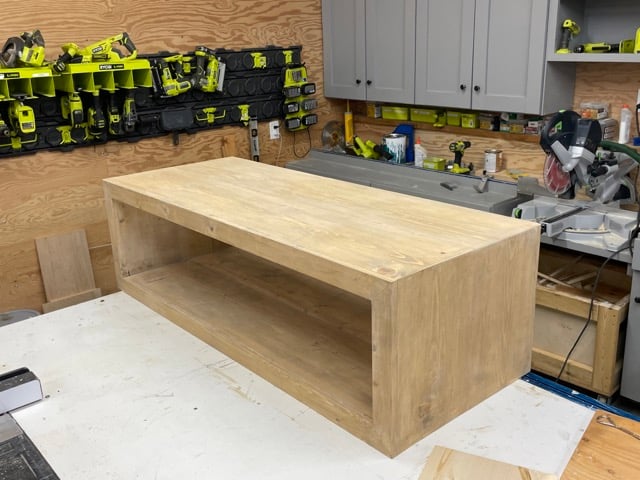
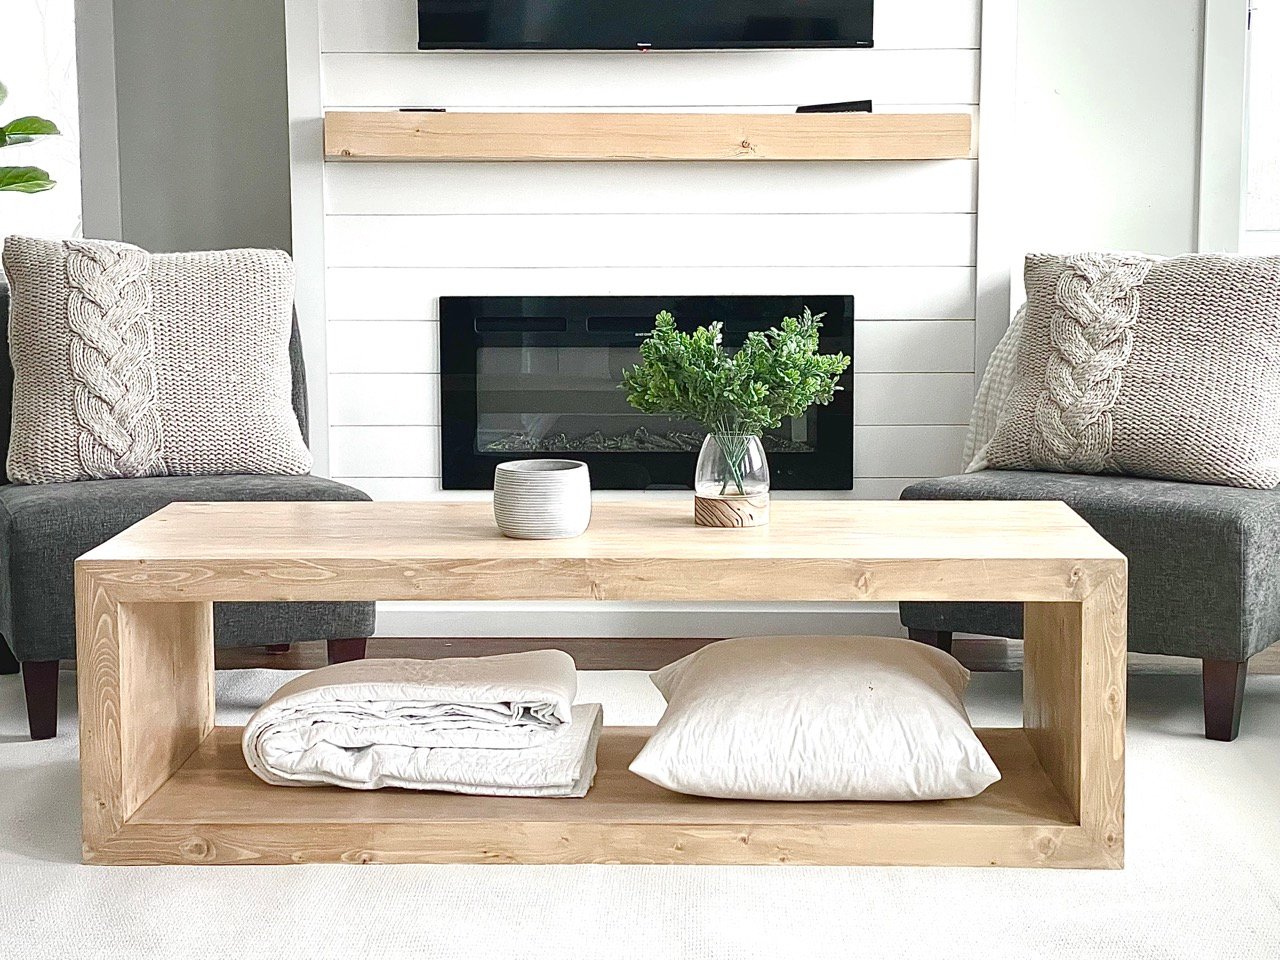
Waterfall Framed 60” Rectangle Coffee Table
See Also: Easy to Build Shiplap Fireplace Tutorial

Why I Built This Coffee Table
I built a similar styled console table here and the 52" version here (pictured below), and was just smitten with the sleek but rustic design, and just had to build the matching coffee table.
This entire collection is so beautiful!
Watch the Console Table Build Video
While I did not film the coffee table build, I did film the matching console table build, and the build steps are very similar. Please take a second to watch that video -
How I Built this Coffee Table
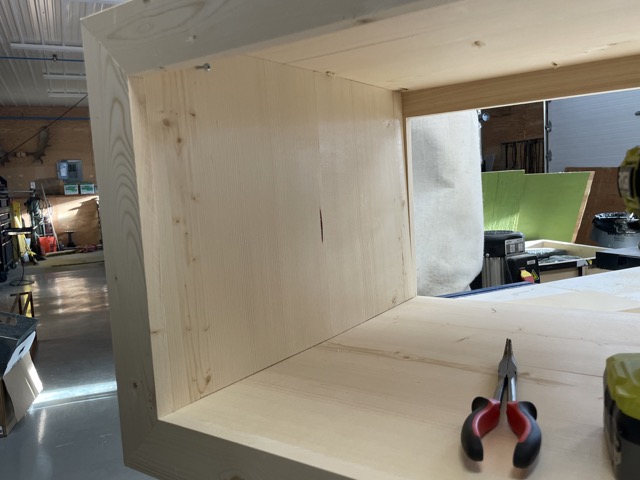
This coffee table was a challenge for me, but I enjoyed stretching my skills and creating something I was super proud of in the end. Do not attempt this project without the right tools and a good amount of building experience. This is an advanced project.
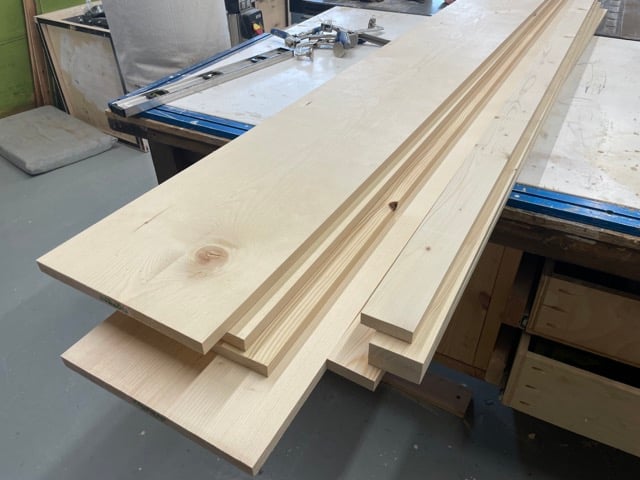
Here's the lumber I started with. I did run the boards through the table saw to create the square edges. My 1x12s ended up measuring 11-1/8" wide - just make sure all the 1x12 widths are the same. The 1x3s I actually ripped from 1x6 boards to get that square edge.
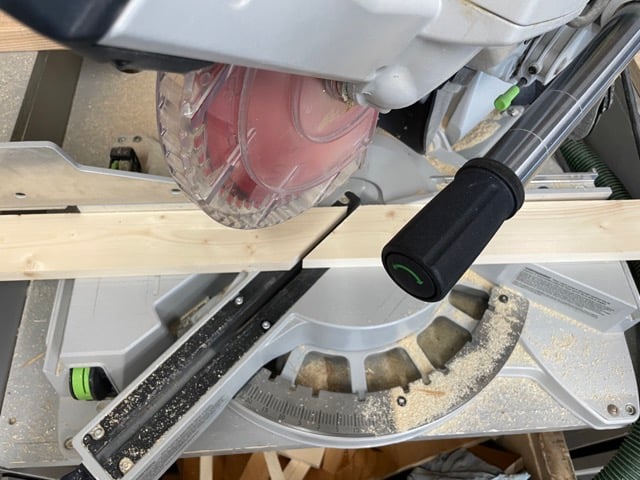
After testing my saw, I cut the face frame boards first. I am using a 10" sliding compound miter saw. This is the smallest saw I would recommend, a 12" would work better.
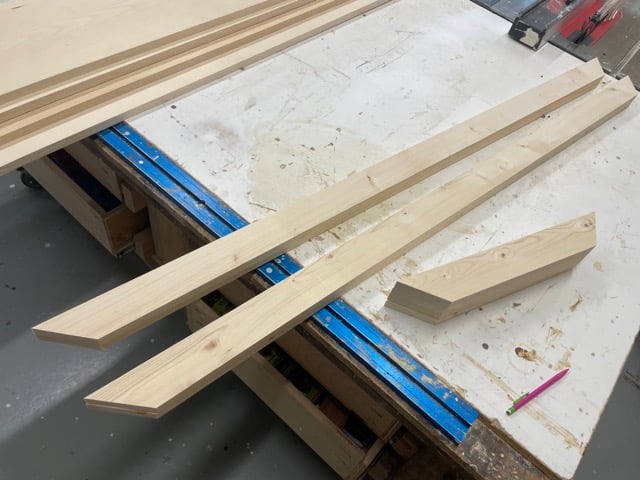
Here's the face frame pieces cut.
Then I drilled 3/4" pocket holes on the ends of the shorter face frame boards. I was careful not to let any pocket holes show on the side edges of the face frame boards.
Then I clamped the face frame boards and attach with 1-1/4" pocket hole screws.
The two face frames need to match EXACTLY.
Now for the 1x12s.
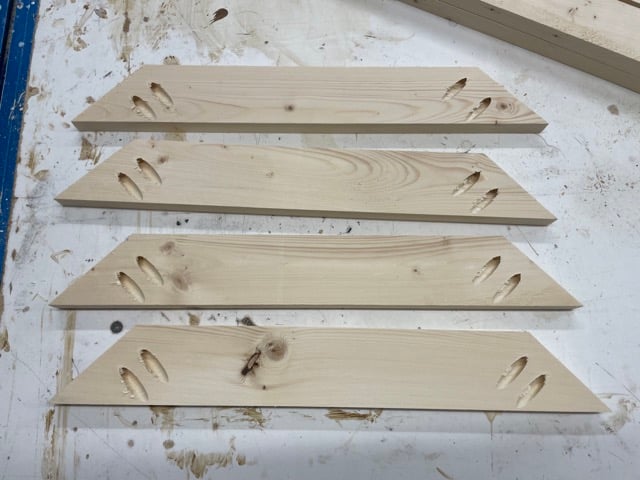
It was actually a challenge to make the 45 degree bevel cuts on the saw, the 1x12s wanted to move on me as I was cutting. Do double check your cuts and make sure they are straight all the way across.
Here's the two top pieces. I drilled pocket holes to attach the two pieces together, and also pocket holes to attach to the face frames.
After joining the two 1x12 pieces together, I attached to one of the face frames.
Then I repeated those steps for the two side panels.
Then I attach the second face frame.

For the corners, I nailed with 1-1/4" brad nails.
On the underside of the top (and later the bottom shelf) I added the 1x2 supports to help support the center of the coffee table.

Then I cut the bottom pieces, attach together and then fit inside the two face frames and attach to the coffee table.
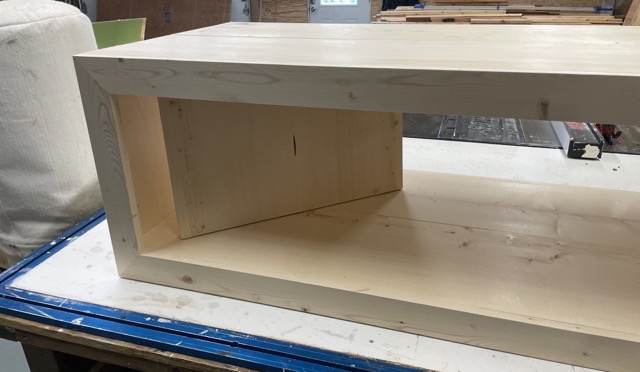
The inside pieces are 1x12s pocket holed together and set in place.
I had to use a screw to help me pull the panel back in place when I was setting it (see the screw at the top left?). Then later I removed the screw.
I nailed the inside panels on with 1-1/4" brad nails.
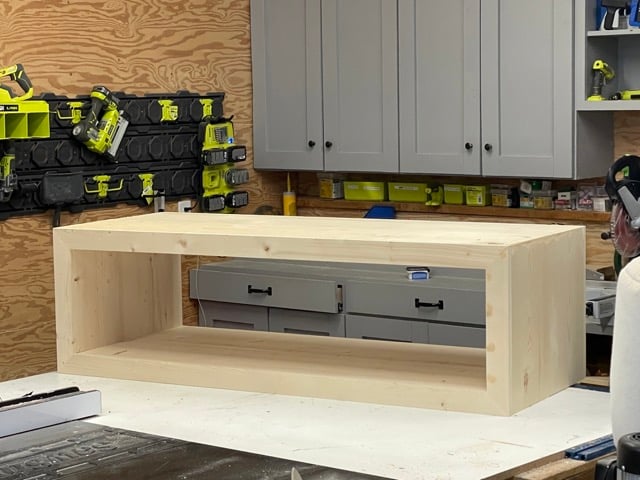
Construction is done!
This took about 3 hours to this point.
I filled the few nail holes with wood filler. I also filled the corners that ended up having small gaps.
Then I sanded with 120 grit sandpaper in the direction of the wood grain.
I stained the entire project with "golden oak" by Varathane. It was not right...
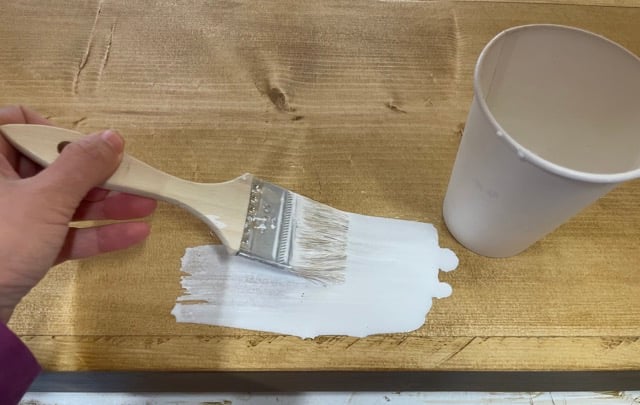
So I added a watered down white paint layer,
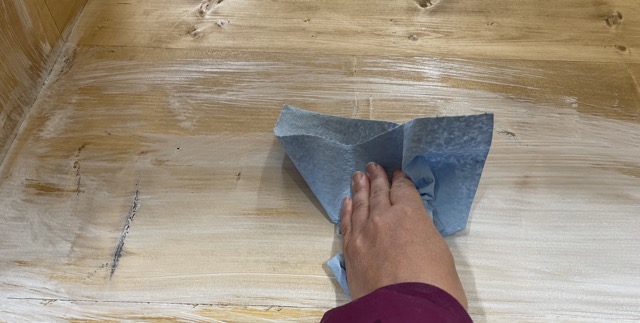
Wiping it in and off in a very light layer. So much better!
To protect the finish and make it wipe clean, I added a layer of clear Polyurethane.
This coffee table was not easy to build, but it was worth it!! I ended up spending about 8 hours on it and $150 in lumber. It is gorgeous, and I'm very proud that I was able to take on such a great project.
Free Plans to Build This Coffee Table
Here's the free plans to build this coffee table. Please send us in a photo if you build, we love seeing your work!
from Recent Project Plans https://ift.tt/iCoHq02
How to REALLY Show Off custom KNIVES…#diresta
In this shop project, I build a knife display for a custom line of knives – Enjoy!
from jimmydiresta https://www.youtube.com/watch?v=fEGTiSEvii8
from jimmydiresta https://www.youtube.com/watch?v=fEGTiSEvii8
2023年3月13日星期一
“J” Times New Roman Alphabet Series... #BandsawCowboy #DiResta
Fresh out of the workshop and just off the bandsaw... next up in my alphabet bandsaw build series, here is the letter J – Enjoy!
from jimmydiresta https://www.youtube.com/watch?v=1txmUxlrUTU
from jimmydiresta https://www.youtube.com/watch?v=1txmUxlrUTU
2023年3月10日星期五
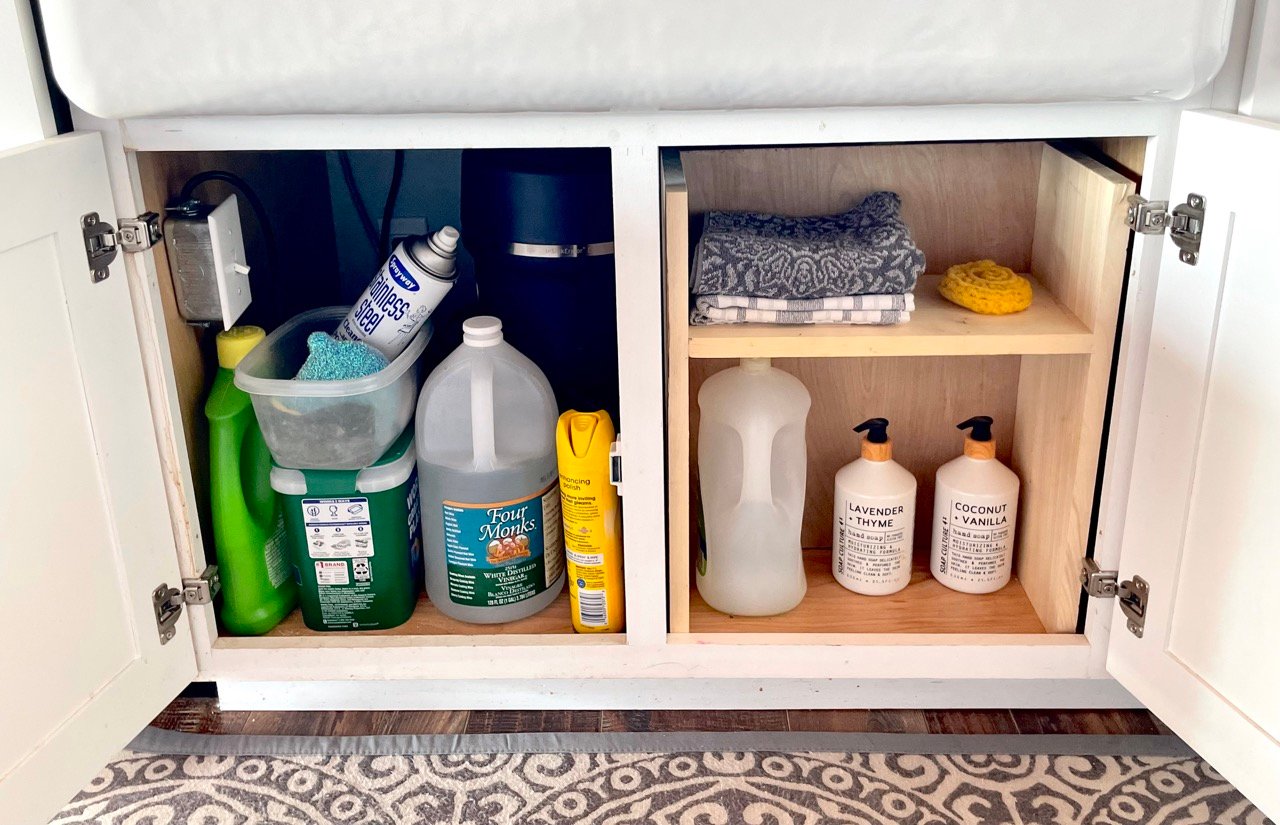
Under Kitchen Sink Organizer Shelf
Why I Built This
Under our kitchen sink was a serious mess. I couldn't find anything and the small stuff was taking up just as much space as the big stuff.
For about $10 I built this amazing, simple organizer that turned frustration into storage freedom!
The question is: Why wouldn't you build this?
Customize Easily For YOUR Under Sink Space
This project is designed for you to be able to customize for your sink space, and maximize the storage underneath your sink.
- If your space allows, the bottom should be left open to allow for pass through storage underneath.
- Measure your items that need storing and adjust the shelf height so you can fit your items on/under the shelf
- The shelf depth can be adjusted for a deeper shelf if your plumbing allows

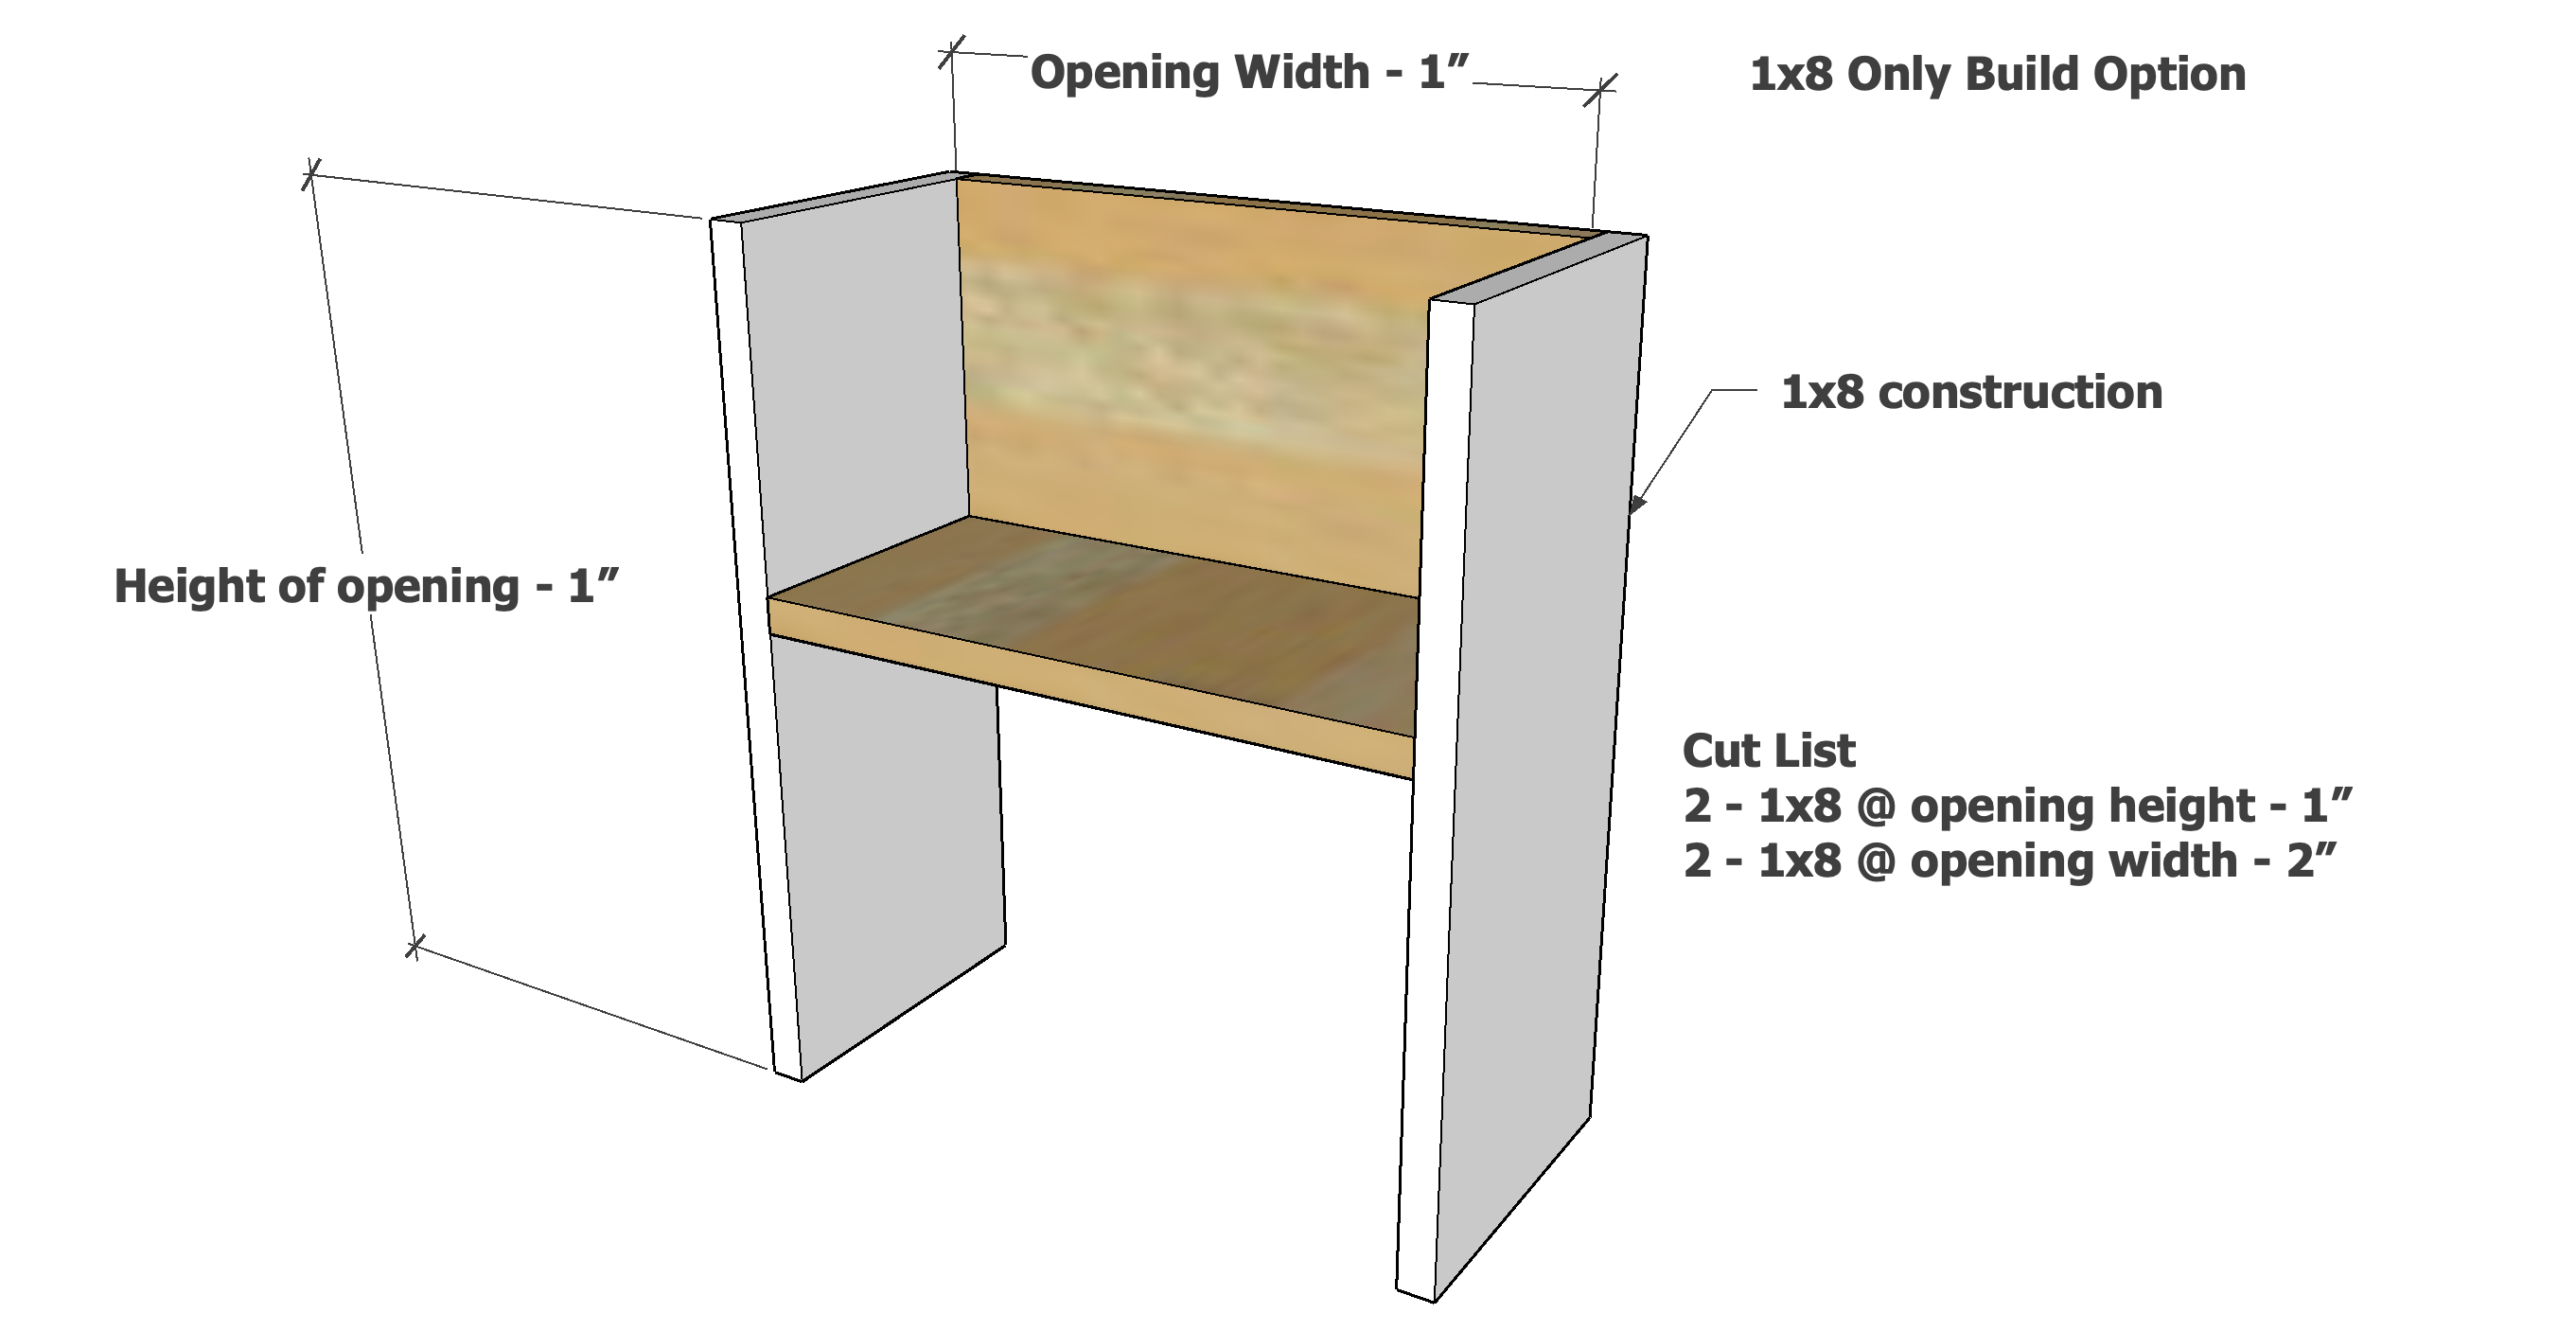
Build with 1 - 1x8 board, 6 feet long
This is a easy to customize project, but if you are looking for quick with minimal tools, here's the most basic version that you can build:
Video Showing How to Build this Under Sink Organizer
In this very quick build video, watch how I build this under sink organizer.
from Recent Project Plans https://ift.tt/s0wElhW
“i” Times New Roman Alphabet Series... #BandsawCowboy #diresta
From my workshop… next up in my alphabet bandsaw build series, here is the letter G – Enjoy! jimmydiresta
from jimmydiresta https://www.youtube.com/watch?v=c80gcFnFArk
from jimmydiresta https://www.youtube.com/watch?v=c80gcFnFArk
2023年3月9日星期四
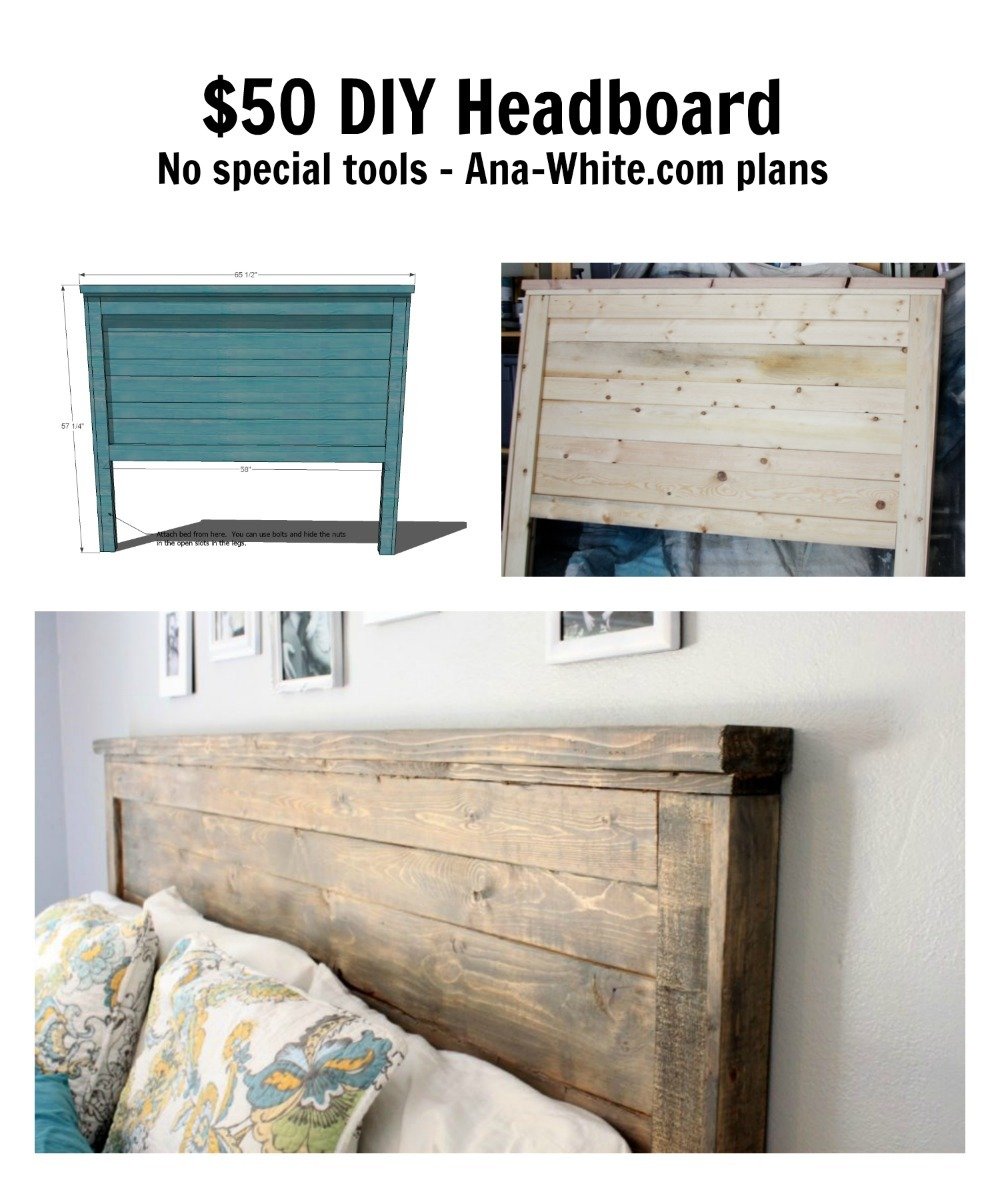
Easy Build Wood Headboard (All Mattress Sizes)
Photos submitted by Cynthia and Nicole.
Simplicity and the beauty of soild wood come together in this headboard to transform a room. This project can be completed in just a few hours. Available in all standard bed sizes.
Easy to build, all you need is a saw and nails - you can even use a hammer and nails!
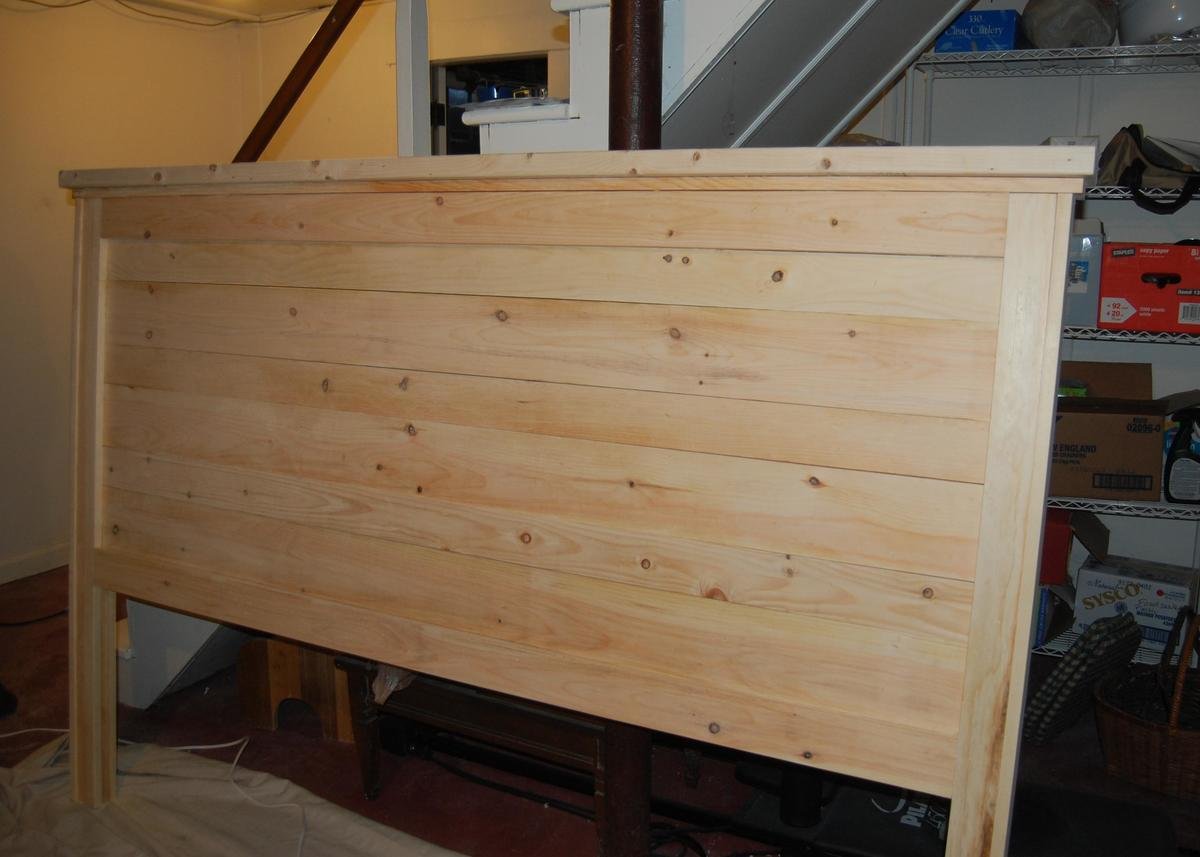
Most builders are spending about $50 making this beauty. Be sure to check out brag posts.
Free plans follow!
from Recent Project Plans https://ift.tt/6gVCULx
订阅:
博文 (Atom)