99¢ Woodworking Sale: https://ift.tt/rRmCscx CMT Thin Kerf Table and Miter Saw Blades: https://lddy.no/15sth CMT Full Kerf Table and Miter Saw Blades: https://lddy.no/15sti CMT ½” Shank Router Bits used in this video: https://lddy.no/15stj CMT ¼” Shank Router Bits used in this video: https://lddy.no/15stl CMT Sign Bits used in this video: https://lddy.no/15stm For an Additional 10% off use promo code: CMT10 I'll be at Maker Central UK this weekend come say Hi https://ift.tt/zADM6CS
from jimmydiresta https://www.youtube.com/watch?v=EF4HdES5hYk
2022年4月26日星期二
2022年4月25日星期一
2022年4月19日星期二
Resin wood desk lamp: How to make step by step
Making a wood and epoxy resin lamp All my woodworking plans https://ift.tt/bvyzJCg Materials Used - Mahogany Lumber - https://amzn.to/3vjogSs - Epoxy casting kit - https://amzn.to/3EDgZkR - Pigment - https://amzn.to/381WLEM - Sheathing tape - https://amzn.to/3JTbe3t - Melamine - Wood glue - Screws Electronics - Bulb and wire harness - https://amzn.to/3JXgl2h - Toggle Switch - https://amzn.to/37ZPJRh - Port - https://amzn.to/3EDzgyt - 12v Power supply - https://amzn.to/3jN7TIn Tools used - Hammer - - Table saw - https://amzn.to/3vqCjFZ - Orbital sander - https://amzn.to/3ErDiJP - Sandpaper - https://amzn.to/3rvjq3m - Clamps - https://amzn.to/37Z1EhU - Drill bits - - Iron https://amzn.to/3xU4u31 - Soldering kits - https://amzn.to/37sDe0n ********** My links ********** • Timberland pro work gear - http://bit.ly/TimberlandPRO_DIYCreators • Help me make more Video: https://ift.tt/us563LF • Instagram: https://ift.tt/ouaJtT9 • https://twitter.com/Diycreators • All my woodworking plans https://ift.tt/bvyzJCg
from DIY Creators https://www.youtube.com/watch?v=Hk0Jc_GUtXI
from DIY Creators https://www.youtube.com/watch?v=Hk0Jc_GUtXI
2022年4月18日星期一
DiResta Truck Bed Modifications
https://ift.tt/tA6Yhvw https://amzn.to/3JV3NZl In this video I make some much needed modifications to my 2018' Chevy truck bed to make it more efficient and useable for carrying loads and tools together! Thank you to my sponsors http://www.titebond.com https://ift.tt/DrFwuGJ https://ift.tt/xf8NdOj https://ift.tt/xf8NdOj
from jimmydiresta https://www.youtube.com/watch?v=CKNofmFRSp8
from jimmydiresta https://www.youtube.com/watch?v=CKNofmFRSp8
2022年4月9日星期六
DiResta Floating Side Tables
SKELETON KNIFE//POSTER: https://ift.tt/I75Ys2V Classic DiResta This Video first ran on the Rockler youtube channel in November of 2017 In this video I make 2 floating side tables from walnut and plywood. I build these in my old NYC shop and at the end of the Orignal video I installed them the wall of the shop to demonstrate them but at the very end of this video you can see where the tables are currently installed beside our bed thank you to http://www.titebond.com https://www.rockler.com the blade used on the drawer https://ift.tt/phoTxAK
from jimmydiresta https://www.youtube.com/watch?v=4VZTNuCKdo0
from jimmydiresta https://www.youtube.com/watch?v=4VZTNuCKdo0
2022年4月5日星期二
DIY Custom Bookshelf Storage with Shelf Help App
Good storage that fits just right is the cornerstone of a tidy, organized, and easy to maintain home.
After a decade of designing furniture, I realized that all storage furniture is really just a plywood box, trimmed or with doors/drawers to make up everything from a simple bookshelf to a full kitchen. The technical term is case furniture.
So if it's just a box with trim.. why isn't there an app that lets you design that box, and then you have the structure to add the trim too?
That's why I created Shelf Help a couple years ago! It's a FREE app that you can use to design your own furniture without having to learn a complicated software. In this video, I use the Shelf Help app to make this bookshelf - watch it!
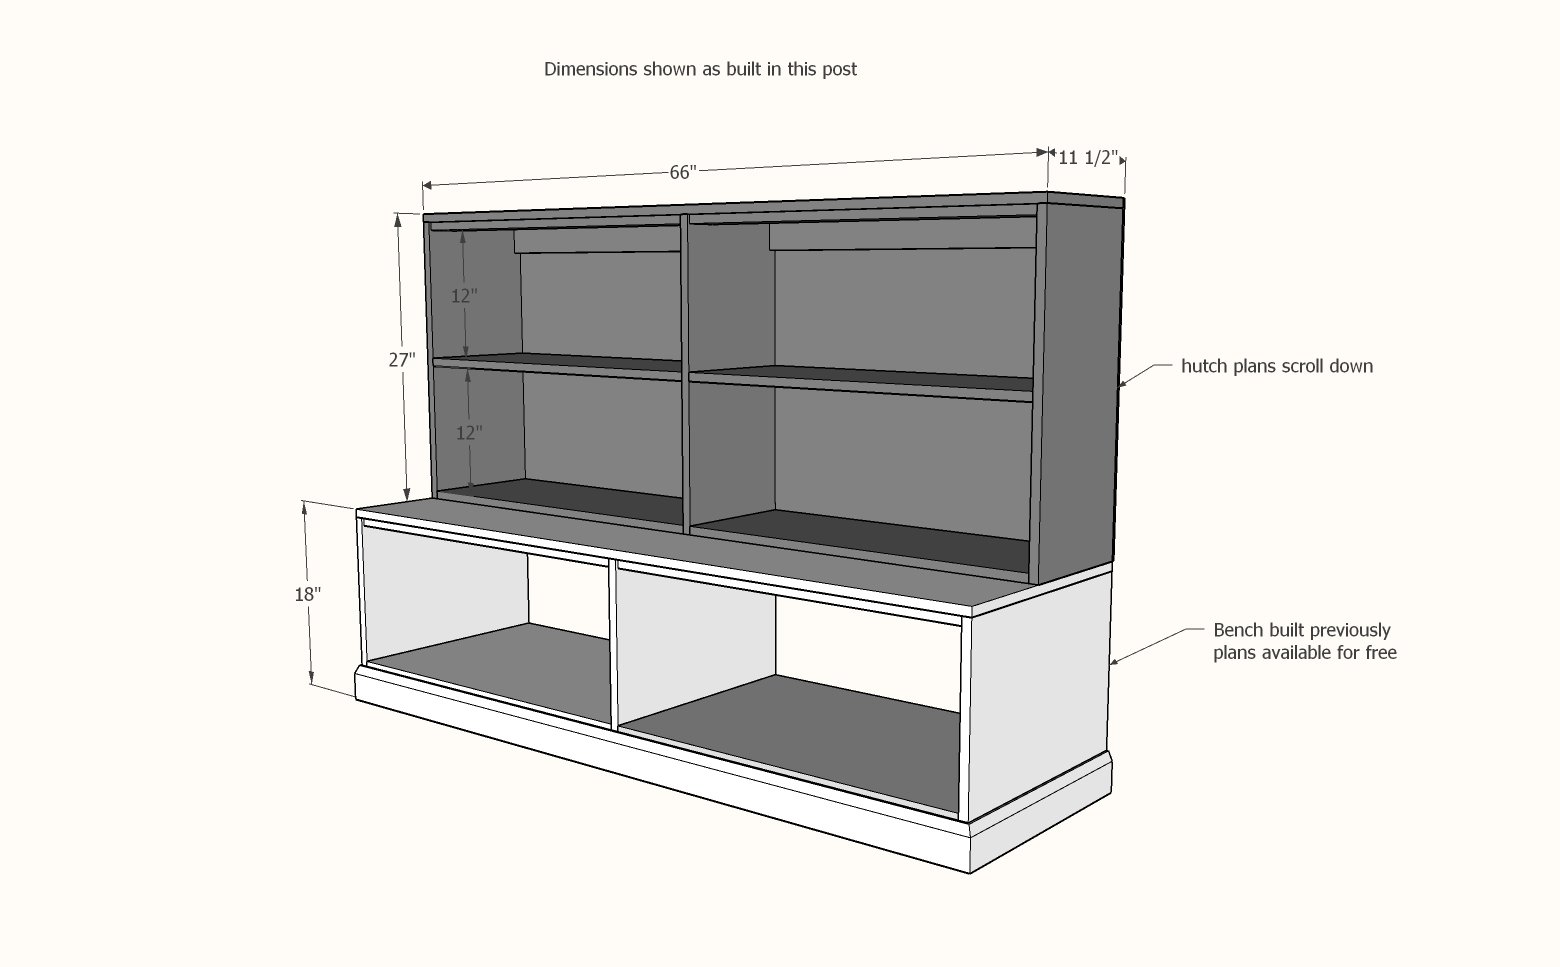
Dimensions
Here's the exact dimensions I used for this project.
Tools and Materials Needed
You will need a few tools and materials to do this project:
- Measuring tape, pencil, speed square, hearing protection, eye protection (the basics)
- Drill
- Kreg Pocket Hole Jig (I use the K5) with 1-1/4" pocket hole screws
- Brad Nailer (I use the Ryobi AirStrike cordless brad nailer) with 5/8" long brad nails
- Plywood carcass kit from Shelf Help or cut your own using 3/4" cabinet grade plywood, with front edges finished with edge banding
- 1/4" hardwood plywood for the back
- 1x3 boards for bay supports (board feet needed = measure the overall width of the project times two)
- Finishing supplies to include medium and fine sandpaper, wood filler, primer and paint or wood stain and clear coat
Open Base Bench Plans
The open base was built by me a couple weeks prior. It turned out really great and I love the sizing in the space and for my baskets and bins. The plans are free and available here.
Open Shelf Hutch - Designing the Plans
The open shelves on top I just finished. They could be made taller or even shorter - really endless options here for customization. You can also use them over other cabinets - kitchen cabinets, console cabinets, or as towers on either side of a tv. I kept a classic toy storage height - just right for kids being able to put their own toys away, and still room on top for decor.
I first penciled out what I was looking for on scratch paper.
Then I entered the outside dimensions into the Shelf Help Configurator.
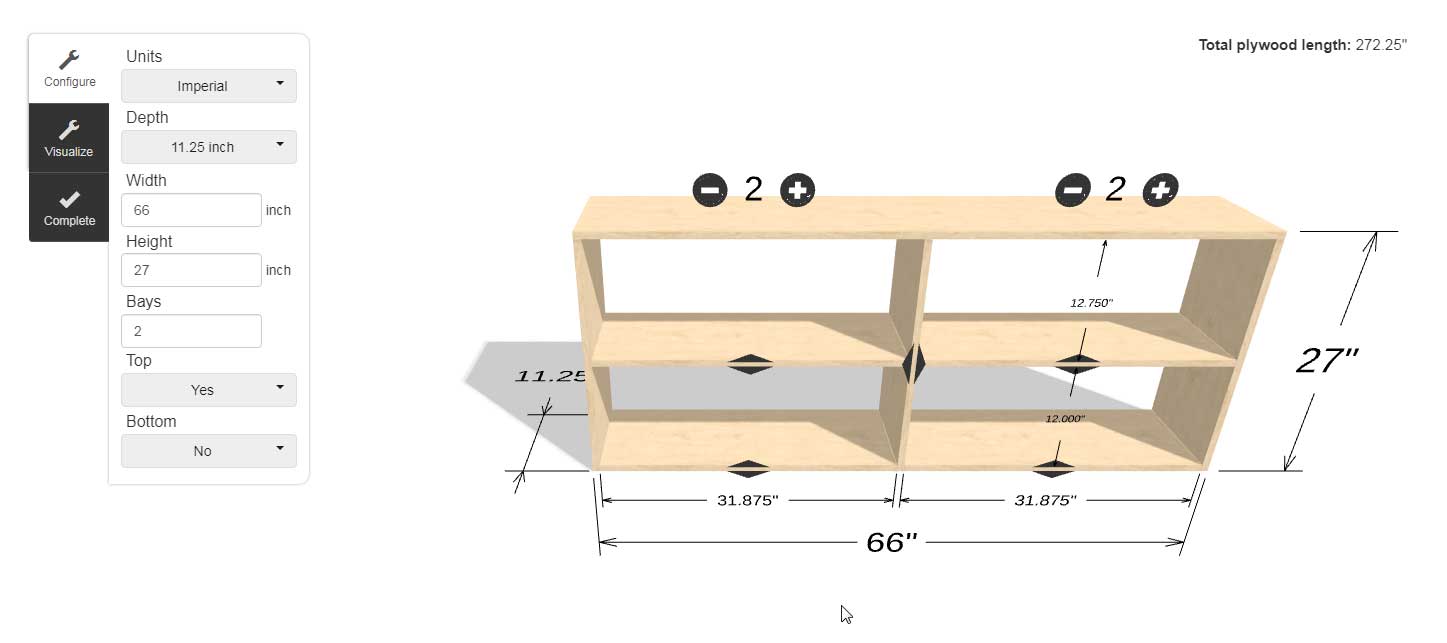
Plywood Pieces
From there, you can use the Shelf Help app create plans for you that include a cut list. You can cut your own plywood - use 3/4" cabinet grade hardwood plywood. Cut with a table saw or track saw. Finish the front edges with edge banding.
You can alternatively have the precut pieces shipped to your front door using the Shelf Help app.
Carcass Assembly
Once you have your plywood pieces in hand, it's time for assembly.
Mark out on the plans the location of all pocket holes. Then drill the pocket holes in the pieces. For the 11-1/4" width, I used two pocket holes, but three could also be used.
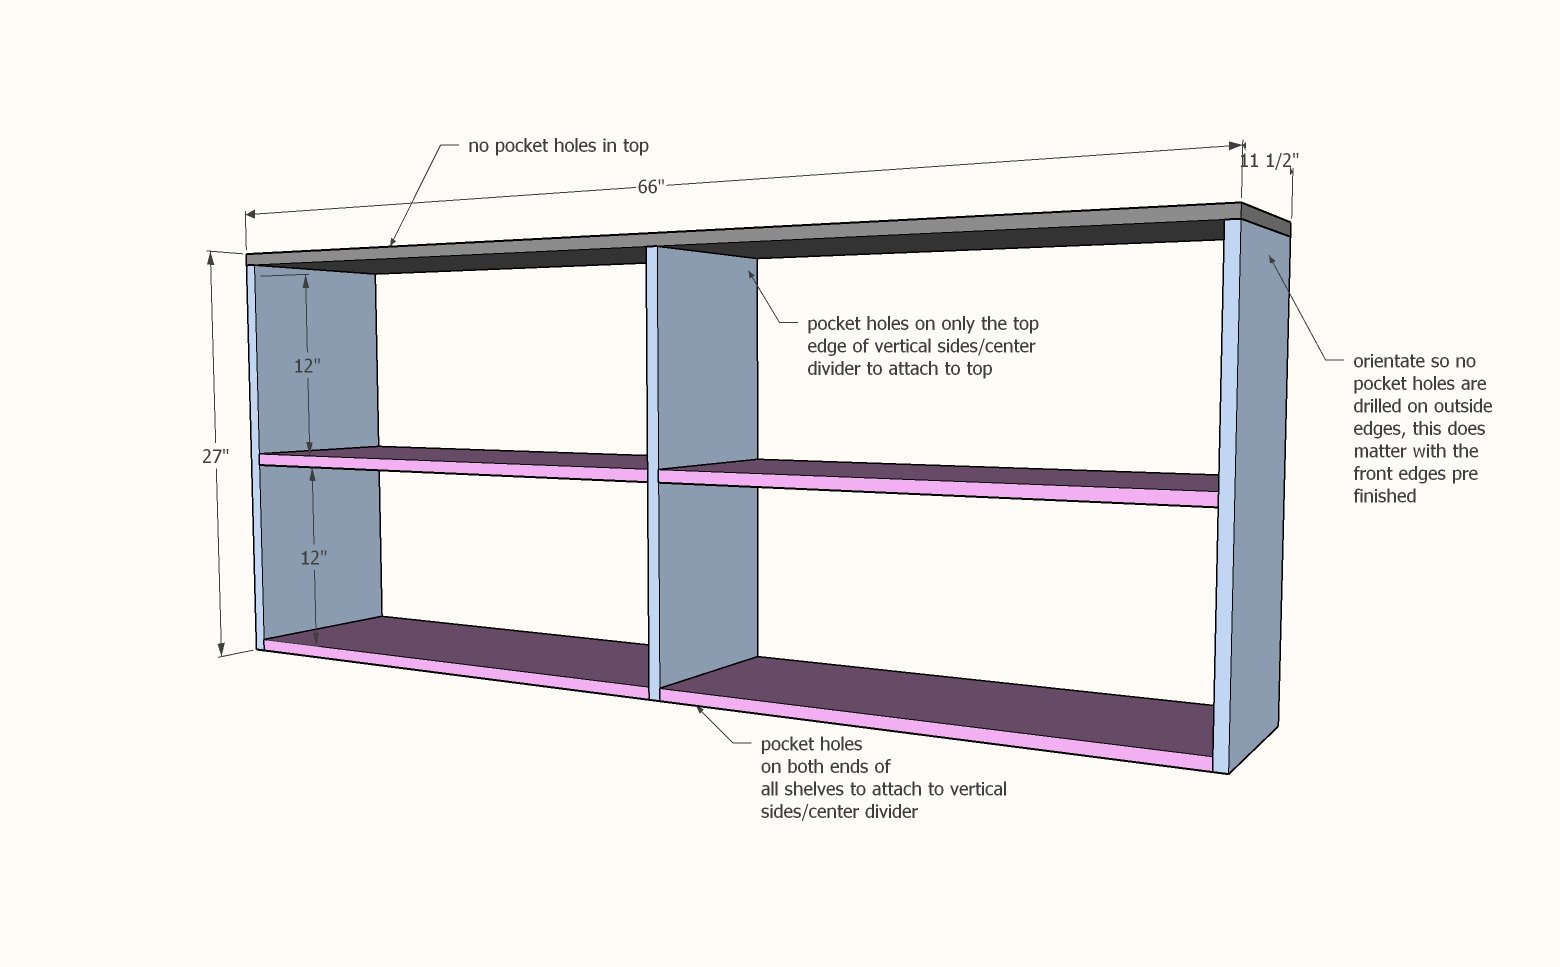
Then assemble the carcass. I started by attaching the verticals to the underside of the top. Then the shelves to the verticals.
Bay Supports
The plywood carcass on it's own is not enough to keep the project rigid. Bay supports help with this. At least one at the top back is recommened, pocket holes on top and side edges.
A bay support at the front will help as well, and make the project look more finished. I only pocket holed the ends. Then just use the 1-1/4" pocket hole screws like regular screws, and screwed through the middle of the bay support into the underside of the top.

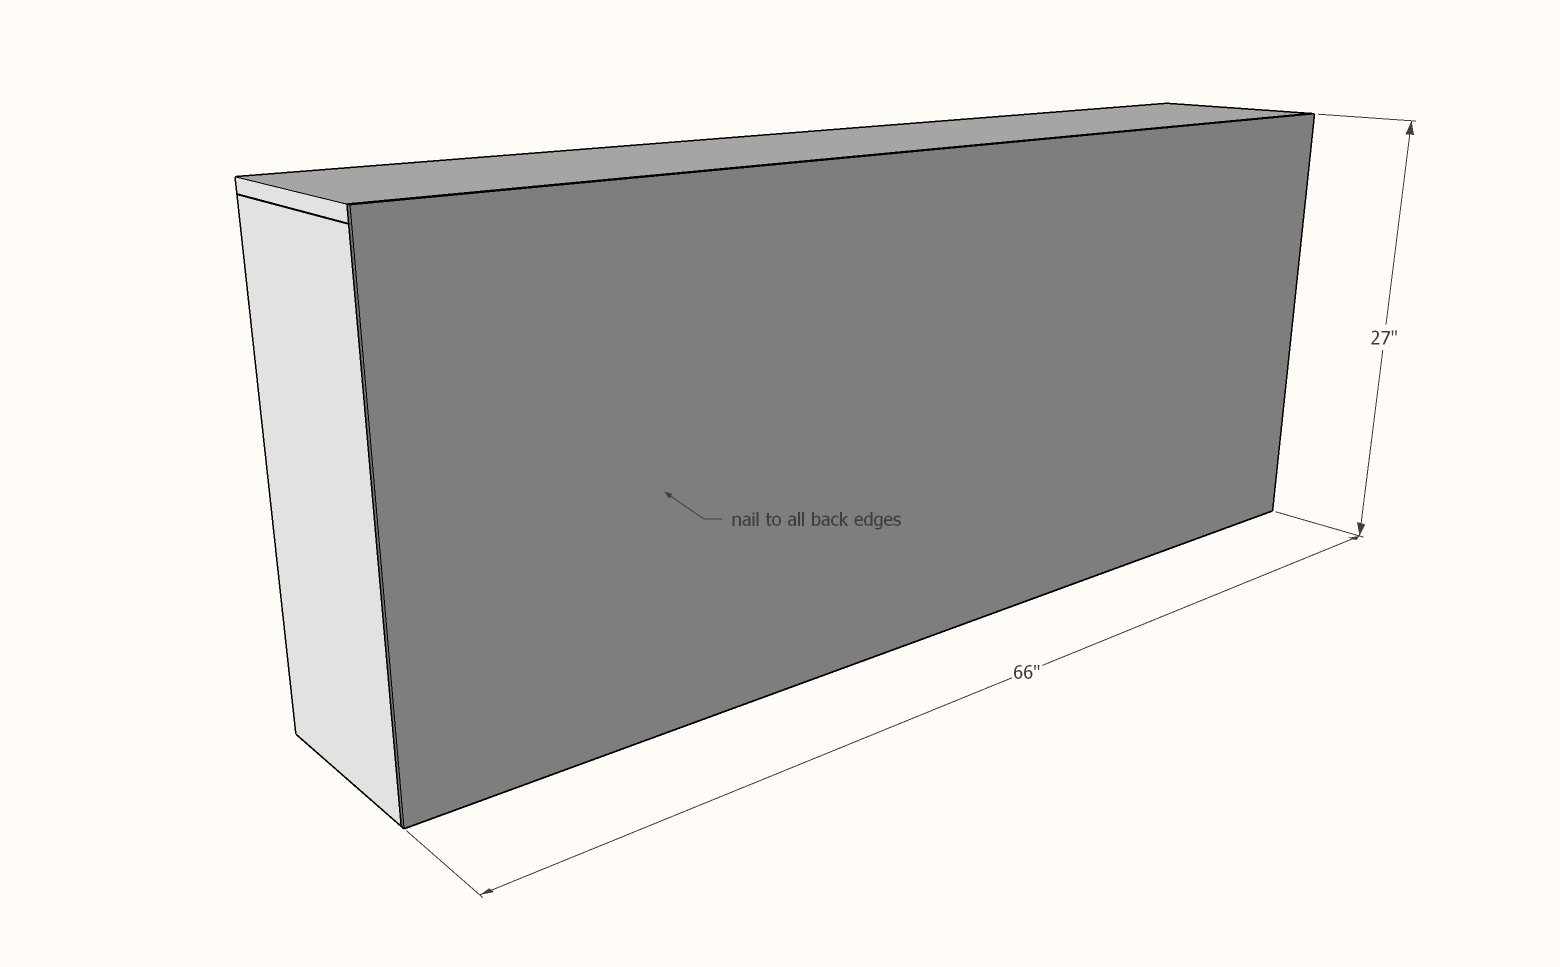
Back
I highly recommend a back for this piece, as it is at eye level and will help contain the contents of the shelves.
Use 1/4" plywood - for painting, this could be just about anything. For staining, match the wood species of the carcass.
Cut about 1/4" overall smaller, so the outside edge is not visible.
Attach to back with glue and 5/8" brad nails to all back edges.
Finishing
To finish, I filled any exposed holes with wood filler and let dry.
Then I did a light sanding with medium grit sandpaper, followed by fine sandpaper using a hand sanding block.
Then I removed all sanding residue with a vacuum with a soft bristled brush attachment.
I applied one coat of primer with a brush and small roller.
Then I applied two coats of cabinet grade paint in a semigloss sheet with a brush and small roller.
I did lightly sand in between coats with fine sandpaper.
from Recent Project Plans https://ift.tt/en3Ks2S
2022年4月2日星期六
DiResta Steel & Oak Chevy Truck Mod
SKELETON KNIFE//POSTER: https://ift.tt/dhOIJPM JIMMY'S WORKSHOP: https://ift.tt/hdlqFQB In this video I modify and make truck sides for my chevy flat bed truck, so I can carry loads and unusual cargo safely. Thank you to https://ift.tt/YzWlyv2 https://ift.tt/dWY4o5M http://www.titebond.com
from jimmydiresta https://www.youtube.com/watch?v=XtmWcO9e_20
from jimmydiresta https://www.youtube.com/watch?v=XtmWcO9e_20
订阅:
博文 (Atom)