Colonial workmen relied on the right planes
from FineWoodworking https://ift.tt/31tEFGE
2020年6月30日星期二
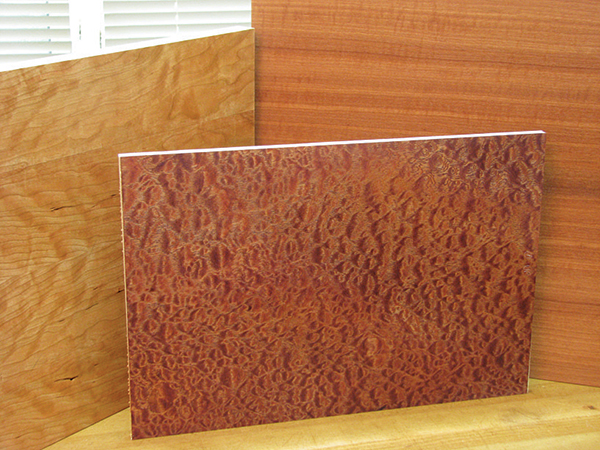
High-quality Hardwood
 Some of you may know that Woodworker’s Journal has a group of online folks who have volunteered to be surveyed about various woodworking topics.
Recently one small part of a survey asked about the challenge to getting good-quality wood for project building. That struck a nerve with me, and I wanted to ask our Weekly readership if that is your experience, too.
Generally, are you having increased difficulty finding good-quality hardwood or other species to use in your shop? Is the quality of the wood available your challenge, or are you demanding better stock than you have previously? Let me know what you think. After all, you can’t do woodworking without wood!
Rob Johnstone, Woodworker’s Journal
![]()
Veneering with a Vacuum Pump
A vacuum pump and veneer bag is a fully portable system that can be used anywhere. Here, learn some simple veneering techniques.
![]()
Cutting Bowl Blanks from a Tree
![]()
Dale Larson from the American Association of Woodturners takes you through the best methods for harvesting bowl blanks from a tree, and how to maximize your chances for getting the grain patterns you want.
![]()
From Our Sponsor

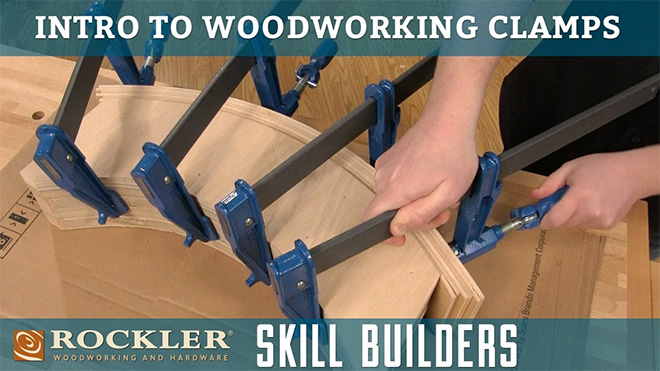
| How many clamps does a woodworker need? Probably a few more! Clamps have all kinds of uses in a shop setting, and when you need ’em, well, you REALLY need ’em! The video below explores and explains some of the basic types and common applications of various clamps. |


15% OFF: Excludes gift cards, product bundles with gift cards or free products, power tools, Porter-Cable dovetail jigs, CNC machines, Leigh products, SawStop, Festool, Tormek, Ready2Rout, select Rockwell products, taxes, Apollo sprayers, shipping charges, sale items and other promotions. Other exclusions may apply.
FREE SHIPPING: $39+ Orders. Additional shipping charges will apply for select oversized items, express orders, international orders, and orders to Alaska, Hawaii, Guam, Puerto Rico, and the Virgin Islands. Rockler reserves the right to limit quantities, correct errors or omissions and modify or end this promotion at any time. Neither 15% off nor FREE SHIPPING can be combined with any other offer or applied to previous orders. Not valid with Rockler’s Professional Catalog and independent resellers. Offer ends 7/2/20.
The post High-quality Hardwood appeared first on Woodworking | Blog | Videos | Plans | How To.
from Woodworking | Blog | Videos | Plans | How To https://ift.tt/3eMLdE7
Grind and get back to work – fast
For Megan Fitzpatrick, there is simply no faster way to remove a chip from a blade or erase a too-large secondary bevel than a high-speed wheel grinder.
from FineWoodworking https://ift.tt/3gbAKCn
from FineWoodworking https://ift.tt/3gbAKCn
What Will You Learn Next?
In response to Rob’s inquiry last week about what new things you’d like to learn next in your woodworking hobby, here’s what several have shared. – Editor
“I’ve tried just about every type of woodworking except for turning. I’ve debated for years about whether I should buy a lathe. I keep pretty busy working on other projects, but turning has always fascinated me. I just don’t know if I want to spend the money on a lathe and all of the accessories that go along with it. I should probably decide pretty soon, because I’m not getting any younger!” – Carol Johnston
“I have a little single-car garage, and in July I am going to have a ‘L’-shaped garage built. I will be challenged to set it up so I can actually do things in it.” – Dave Phelps
“I am trying to get better at using hand planes.” – Rudy Gonzalez
“I’m getting old. It is time I learned how to build a small deck with a wheelchair ramp off of it — just in case.” – RileyG
The post What Will You Learn Next? appeared first on Woodworking | Blog | Videos | Plans | How To.
from Woodworking | Blog | Videos | Plans | How To https://ift.tt/3igPYrG
2020年6月29日星期一
Uprooted Red Oak Recovery | Urban Logging
from Matthew Cremona https://www.youtube.com/watch?v=EI5F_RY9irA
When a dowel joint breaks
Broken dowel joints are common when restoring old chairs. David Johnson demonstrates his techniques for bringing life back to these classics.
from FineWoodworking https://ift.tt/2Zd27VG
from FineWoodworking https://ift.tt/2Zd27VG
2020年6月28日星期日
2020年6月26日星期五
Chair Kits, Dressing Vanity, Workbench Kits Update
from Matthew Cremona https://www.youtube.com/watch?v=0mt7BpWLSWo
Charcooties Board
Show Notes coming soon.
The post Charcooties Board appeared first on The Wood Whisperer.
from The Wood Whisperer https://ift.tt/2BFWMOH
It’s time Thomas Day took his place alongside Townsend, Phyfe, and the others
An innovative and skilled pre-Civil War craftsman, Thomas Day was one of the leading figures of American furniture.
from FineWoodworking https://ift.tt/31gP4W5
from FineWoodworking https://ift.tt/31gP4W5
DIY Electromagnet | Vise For Excelsior Drill Press
from Black Beard Projects https://www.youtube.com/watch?v=e_ua18J8NOg
"You Can't Make That From Plywood"! Oh, Yes I Can.
from John Heisz - I Build It https://www.youtube.com/watch?v=G4TnBqM9yhY
2020年6月25日星期四
Improved Project Dollies
Mover’s dollies can come in handy for moving large projects around the shop when working alone, but their narrow top frames and carpeted surfaces would often cause my projects to slip off. So I replaced the carpet with a piece of 3/8″ plywood and stapled a section of foam mat on top of it. The plywood adds surface area and the mats resist slipping.
– Steve Meyer
Defiance, Missouri
The post Improved Project Dollies appeared first on Woodworking | Blog | Videos | Plans | How To.
from Woodworking | Blog | Videos | Plans | How To https://ift.tt/3i22Od9
2020年6月24日星期三
My imgcomp motion triggered timelapses program
from Matthias random stuff https://www.youtube.com/watch?v=ztSH9vYAIcM
IMPORTANT: How woodworkers injure their hearing and eyesight
from Stumpy Nubs https://www.youtube.com/watch?v=GrGHtM4hZoM
Tool Review: Wagner Orion 950 Pinless Moisture Meter
Rollie Johnson says that Wagner's new meter makes it dead-easy to determine if lumber is ready to use.
from FineWoodworking https://ift.tt/37XcuAX
from FineWoodworking https://ift.tt/37XcuAX
Level up your drill press
These jigs, accessories, and tricks for your drill press will let this must-have tool work even better.
from FineWoodworking https://ift.tt/2A3nxfC
from FineWoodworking https://ift.tt/2A3nxfC
2020年6月23日星期二
What you need to know about your woodworking router's speed
from Stumpy Nubs https://www.youtube.com/watch?v=YezRMbWTfC8
Workshop Tip: Add a door handle to your router-table push block
The handle makes it easier to control the push block and leaves the other hand free to control the workpiece.
from FineWoodworking https://ift.tt/3hUfSkS
from FineWoodworking https://ift.tt/3hUfSkS
Woodworking is All That
The term “woodworking” is both specific and broad. Framing carpenters are certainly working with wood every day, and scroll saw experts are too. You get the picture — woodworking constitutes a great many possibilities. The feedback I received from our Weekly crowd about kits a couple of weeks ago spurred some thoughts on the subject. Readers indicated that kits can be an entry point into a new type of woodworking. And a recent survey we conducted indicates that 38 percent of those queried had used this pandemic period to learn something new about this broad craft. That got me wondering about what aspects of woodworking you are interested in learning. What are you hankering to take on next? Send in your thoughts and we will share what we can in the Feedback section.
Rob Johnstone, Woodworker’s Journal
![]()
Finishing Outdoor Furniture
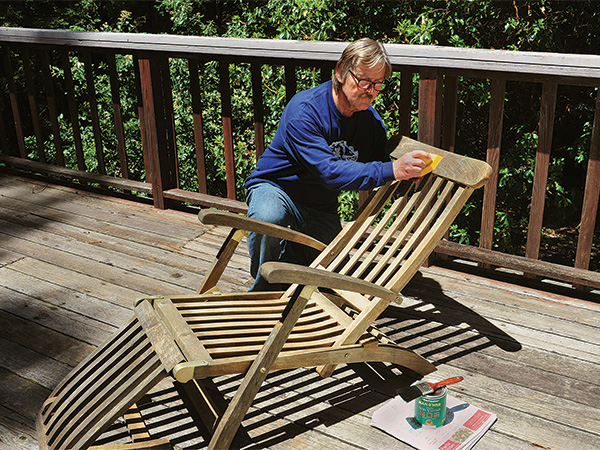
What’s the difference between interior and exterior varnish? . Our expert presents several options for exterior finishes – including leaving the wood au naturel.
![]()
Project: Yard Tool Organizer
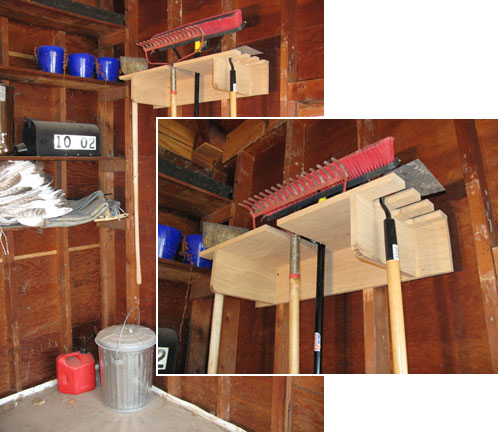
This fast and easy project gets your long-handled yard tools off the floor and helps organize your garage and keep it clean.
![]()
From Our Sponsor
| If you want a silky-smooth finish on your next project, there’s a simple way to achieve it! Our Skill Builder video takes you through the process of filling wood grain to put your project on the fast track to the smoothest possible finish. |


15% OFF: Excludes gift cards, product bundles with gift cards or free products, power tools, Porter-Cable dovetail jigs, CNC machines, Leigh products, SawStop, Festool, Tormek, Ready2Rout, select Rockwell products, taxes, Apollo sprayers, shipping charges, sale items and other promotions. Other exclusions may apply.
FREE SHIPPING: $39+ Orders. Additional shipping charges will apply for select oversized items, express orders, international orders, and orders to Alaska, Hawaii, Guam, Puerto Rico, and the Virgin Islands. Rockler reserves the right to limit quantities, correct errors or omissions and modify or end this promotion at any time. Neither 15% off nor FREE SHIPPING can be combined with any other offer or applied to previous orders. Not valid with Rockler’s Professional Catalog and independent resellers. Offer ends 7/2/20.
The post Woodworking is All That appeared first on Woodworking | Blog | Videos | Plans | How To.
from Woodworking | Blog | Videos | Plans | How To https://ift.tt/2Z4DA54
How To Make A Power Hacksaw Machine Part-2 || DIY Power Hacksaw
from Mistry MakeTool https://www.youtube.com/watch?v=sLq6l4Rjvl0
DIY Workbench // mobile and multipurpose (I needed this)
from DIY Creators https://www.youtube.com/watch?v=_ravTLhvBhw
2020年6月22日星期一
The mighty pipe clamp
Considering its versatility, Mke Farrington thinks the pipe clamp is an underrated, yet cost-effective, tool.
from FineWoodworking https://ift.tt/3hNz7MS
from FineWoodworking https://ift.tt/3hNz7MS
2020年6月21日星期日
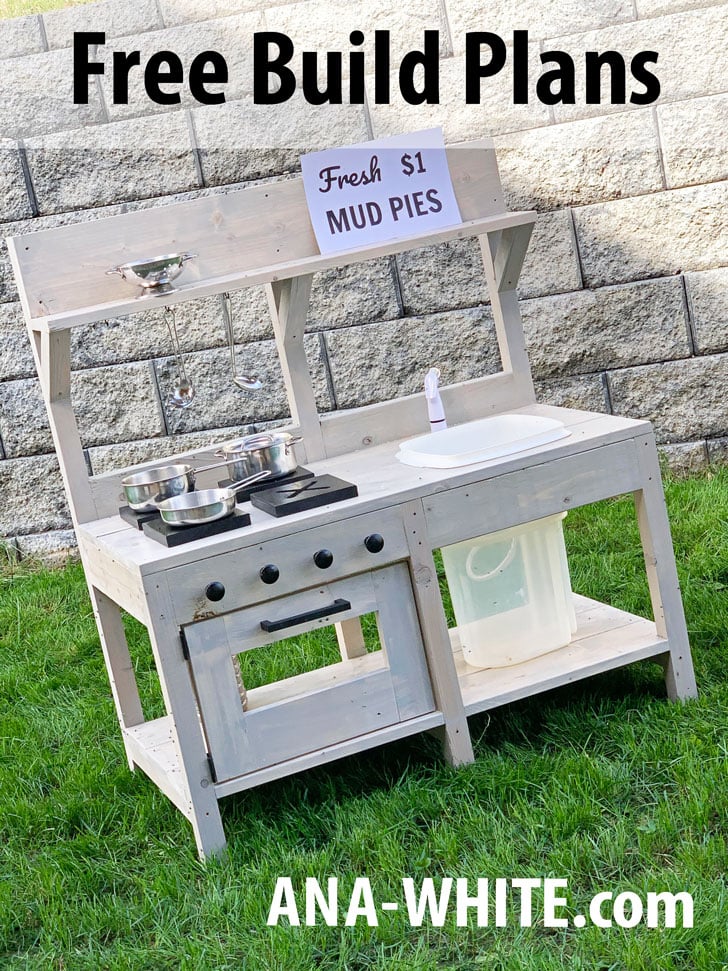
Mud Kitchen
The best part of the kitchen is the sink! Right?
My kids have always loved play kitchens, and I've built many. But not having a working sink with real running water always required alot of imagination.
Then I discovered the MUD KITCHEN!!!
Mud Kitchen Features
- Real working sink that hooks up to a garden hose
- Faucet cannot be left on - automatically turns off when not actively in use
- Drain water can be reused
- Hooks for storing pots, pans and utensils
- Removeable "stove" pieces to customize use (ie use as a potting bench or rock cleaning and paint station)
- Storage shelf
- Easy to customize and decorate
- Sturdy construction using time tested methods suitable for outdoor use
- Cedar flat surfaces will last longer
- About $50 in new materials to build
- Simple construction that most anyone can tackle with a few tools
We LOVE this mud kitchen as is, but I did want to mention my six year old son thought it would make a fantastic fish cleaning station. He also is washing rocks and painting them. I could also see this used as a child's potting bench, serving area for kids, lemonade stand, or wildflower florist station. The options are endless!
Video Tutorial
I did a video tutorial of this build, please take a moment to watch before you tackle this project:
Mud Kitchen Plans
The mud kitchen plans follow, please share a photo if you build - we love seeing your projects.
from Recent Project Plans https://ift.tt/313uloE
Shop Made Drawer Pulls
from Jay Bates - Woodworking Videos https://www.youtube.com/watch?v=8N3s4wK-LHk
Making Vertical Blinds with Exposed Mechanical Linkage - Woodworking
from John Heisz - I Build It https://www.youtube.com/watch?v=cwY2MN5VD8E
Building a Camper - Solar Set Up, Insulation, Windows
from Laura Kampf https://www.youtube.com/watch?v=jOxFt5LjxjI
2020年6月20日星期六
Shop Made Drawer Pulls
There’s a reason why a lot of people like to make their own shop furniture or shop jigs. Making it yourself saves money and allows for greater customization. The same holds true for hardware. With a little bit of time and scrap wood I was able to experiment by making a few different drawer pulls. […]
Important workbench maintenance tasks you should be doing
from Stumpy Nubs https://www.youtube.com/watch?v=tkAtZd9RZdA
2020年6月19日星期五
Case Hardening in Wood – Tension Set
I’ve recently gone through a stretch of unstable lumber from various different sources. All the lumber reacted the same way when cut. Right before finishing the cut with the blade the lumber would *POP* releasing tension and cupping the wood instantly. I thought it would be a good learning opportunity to see what was going […]
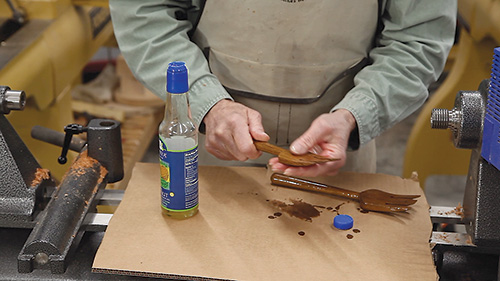
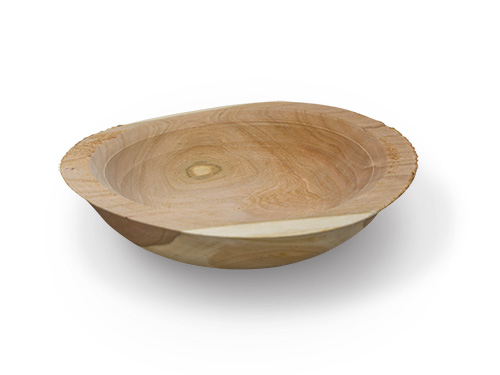
Five Quick and Easy Woodturning Finishes
One of woodturning’s attractions is that a beautiful object can be turned in a relatively short period of time. So turners tend to like finishes that beautify and protect their handiwork, pronto. In that spirit, here are some of my choices for quick, simple finishes to try.
Shellac
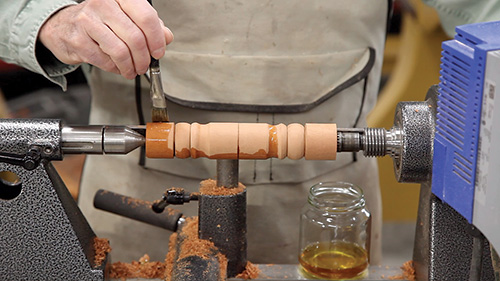
it’s still on the lathe and stationary.
Shellac is a splendid traditional finish for spindle turnings, bowls and boxes. Any finish will stick to shellac and vice versa. It also dries incredibly quickly and is food safe.
While you can buy premixed liquid shellac at a hardware store, I prefer to use dry shellac flakes that have to be dissolved in denatured alcohol. This “old school” shellac will give much better results at the lathe. I mix a small amount of dewaxed shellac flakes with enough denatured alcohol to cover them. I cap the container and let the flakes dissolve over a period of 12 to 24 hours. You can accelerate the process slightly by placing the bottle in a sunny window or outside on warm summer days. This will yield a super-saturated solution — what finishers call an “8-lb. cut,” which equates to 8 pounds of shellac dissolved in one gallon of alcohol.
A full-strength solution like this is far too viscous for our needs and must be diluted by mixing one part full-strength shellac to three parts alcohol. This reduces it to a 2-lb. cut, which is about right for a simple padding application on the lathe.
With the turning mounted in the lathe and stationary, I brush on the shellac. When the wood is completely saturated, start the lathe and burnish the finish with either shavings from the floor or a small piece of paper towel. You need quite a bit of speed for this process to work. I use 1,800 rpm for any spindle between 1/2″ and 2″ in diameter. I increase the speed for parts thinner than 1/2″, and I decrease the speed for turnings over 2″. Let common sense be your guide here.
The friction of the shavings or paper causes the alcohol to evaporate, and the shellac melts into a smooth finish. A second coat followed by burnishing and even a third is good measure. Much depends on the strength of the shellac and the wood you are finishing. Open-grain woods will take more coats than close-grained varieties.
Be sure to insulate your hands with sufficient shavings or paper towel to prevent burns, and remove the toolrest to avoid pinches.
If the finish doesn’t seem to build well, your shellac mixture is too thin; add some full-strength liquid shellac to it. If you are getting streaks with chips sticking to the work, the solution is too thick. Add more alcohol.
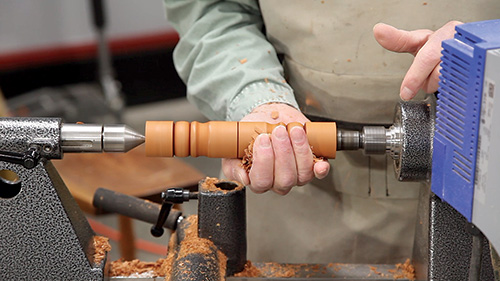
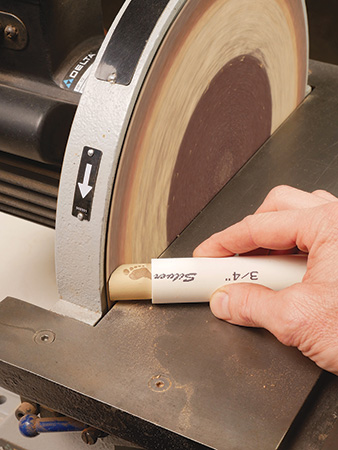
Carnauba Wax
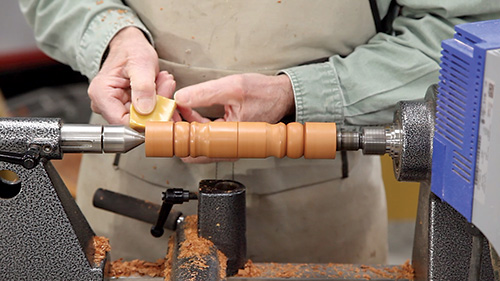
Pure carnauba wax is a fine finish in its own right. It’s a quick finish I use by itself for handles, boxes and turnings. Carnauba is the hardest of waxes and comes from the leaves of a Brazilian palm tree. It is so hard that it cannot be applied in its natural form. It’s an ingredient in many automotive waxes, furniture waxes and friction polishes for turning. These all have various forms of mineral spirits as a vehicle to apply the polish. Once the spirits evaporate, the wax can be buffed out.
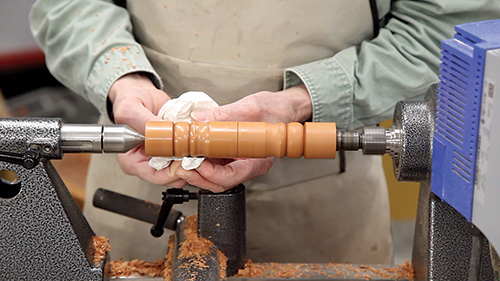
At the lathe, pure carnauba in solid form is a friction polish par excellence, but you must use sufficient speed (per the speeds for shellac, above) to apply it. Hold the wax against the turning to coat the wood, then use chips or paper towel to melt it into a smooth, glossy coating.
Blended Oil Finishes
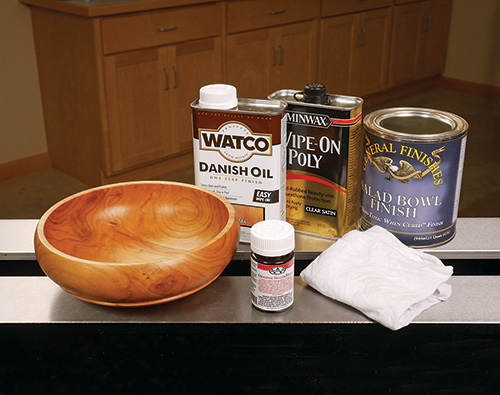
Like shellac, traditional oil finishes have been around for a long time. You can make your own by mixing equal parts of an oil-based varnish, a drying oil such as tung or boiled linseed and mineral spirits. While I’ve tried this homemade brew, I feel premixed commercial examples work just as well and save you the labor.
My favorite commercial oil finish these days is Waterlox Original Sealer Finish — a tung oil-based coating made in Cleveland. Other oil finishes that work well are Minwax Antique Oil (a linseed-based oil finish) and the widely available Watco Danish Oil.
Oil/varnish blends like this polymerize into a hard, durable coating within 24 hours. They have a healthy appetite for oxygen, which is what is needed for them to polymerize. Therefore, a can of oil finish either has to be decanted into smaller containers or used within a day or two to prevent the mixture from beginning to cure. Heat is released in the polymerization process, making this finish potentially flammable if rags are wadded up tightly after use. So, take great care to spread them out flat until the finish dries, and be just as cautious about throwing away brushes and wood shavings saturated with the wet finish. A fireproof metal trash can is a sensible safety measure to add to your shop if you plan to work with a lot of blended oil finishes.
Oil/varnish finish is a great coating for bowls. It can be applied to a bowl that has been turned from unseasoned (green) or dry wood. Since it will inhibit water loss from the end grain, a rough-turned green bowl will dry more evenly, and less checking will occur.
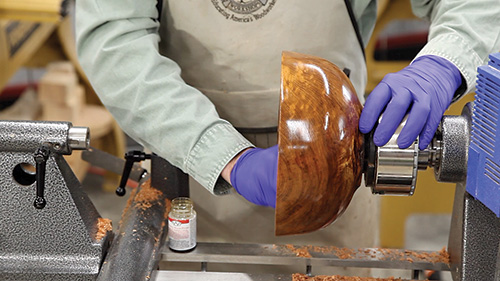
I use blended oil finish for most of my bowls. Once I have sanded a green or dry bowl up to 180-grit, I wipe on the first coat of finish. Then I sand the bowl with 180-grit again. Wet finish actually makes the sanding process more efficient, because the mixture of wood dust and oil fills the wood pores and then hardens into an ideal wood filler that perfectly matches the wood. Burnishing the applied and sanded finish with wood shavings enhances the pore-filling process.
I sand subsequent coats of finish into the wood at 24-hour intervals with progressively finer sandpaper. I use 220-grit for the second coat and 320 for all subsequent coats. Depending on the intended use and the wood the bowl is turned from, I apply anywhere from three to five coats of finish.
It’s handy to keep the bowl on the faceplate for the entire finishing process, which works better for dry wood bowls that aren’t inclined to warp. This doesn’t work as well with green bowls that will continue to distort in the hours following turning.
In terms of food safety issues, be sure to check the safety data sheets for whichever finish you choose. Waterlox’s data sheet, for instance, says that the finish is food safe after 30 days of drying subsequent to the last coat applied.
Walnut Oil
If you want an absolutely food-safe finish, it’s hard to beat walnut oil. You can find it at most grocery stores. In fact, I use my leftover walnut oil as a salad dressing — that’s how safe it is.
Walnut oil is my go-to finish for treenware and bowls that are intended to be used. Application is child’s play too: just pour some on the object to be finished and rub it in with your hands, then wipe off the excess. Although the object can be used immediately, it’s better to wait three or more days for the oil to soak in and begin to dry. Walnut oil will dry eventually, but it is slow to polymerize and does not form a very durable coating. However, you can recoat any time you wish to good effect, whenever the wood begins to look dry.
No Finish at All
That’s right, no finish at all is often a great option for turned objects. Bowls and treenware were seldom finished in antiquity.
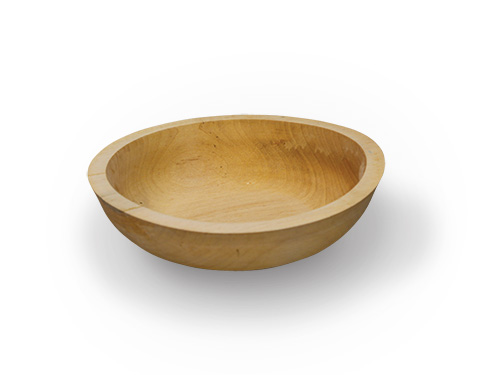
Cooking oil and washing by hand will soon build an attractive patina that will enhance the character of your turned projects permanently.
The post Five Quick and Easy Woodturning Finishes appeared first on Woodworking | Blog | Videos | Plans | How To.
from Woodworking | Blog | Videos | Plans | How To https://ift.tt/2YeXKdy
Bone Damascus Chopper | Knifemaking
from Black Beard Projects https://www.youtube.com/watch?v=CTJ-s2C7X-Y
STL218: Megan Fitzpatrick’s favorite tool storage
Megan Fitzpatrick joins Barry and Ben to discuss Moxon vises, wooden vs. metal-bodied handplanes, tri-squares vs. combo squares, grinders, and why it's worth building a tool chest.
from FineWoodworking https://ift.tt/3deVnM7
from FineWoodworking https://ift.tt/3deVnM7
Free Videos for Father’s Day
In honor of Father’s Day, we’ve assembled an excellent collection of video workshops that you can watch FREE all weekend.
from FineWoodworking https://ift.tt/2Yf62C5
from FineWoodworking https://ift.tt/2Yf62C5
2020年6月18日星期四
Free webinar: Tools and the furniture maker with Allan Breed
Register now! Join period furniture maker Allan Breed, a master of carving as well as casework, Thursday, June 25th, for a free webinar.
from FineWoodworking https://ift.tt/37Ht33O
from FineWoodworking https://ift.tt/37Ht33O
How to accurately set your table saw bevel angle
from Stumpy Nubs https://www.youtube.com/watch?v=8JebPTBB8wI
Recommended resources: Fundamentals of Handplanes
Check out our collection of articles specifically picked to help with this series.
from FineWoodworking https://ift.tt/2UWC9o2
from FineWoodworking https://ift.tt/2UWC9o2
Recommended resources: Limbert Inspired Coffee Table
Check out our collection of articles specifically picked to help with this project.
from FineWoodworking https://ift.tt/3hCoVXs
from FineWoodworking https://ift.tt/3hCoVXs
Recommended resources: Garden Chair
Check out our collection of articles specifically picked to help with this project.
from FineWoodworking https://ift.tt/2YRhBih
from FineWoodworking https://ift.tt/2YRhBih
Recommended resources: Federal Side Table
Check out our collection of articles specifically picked to help with this project.
from FineWoodworking https://ift.tt/3hFqWlA
from FineWoodworking https://ift.tt/3hFqWlA
Recommended resources: Building Custom Picture Frames
Check out our collection of articles specifically picked to help with this project.
from FineWoodworking https://ift.tt/2UUNBAT
from FineWoodworking https://ift.tt/2UUNBAT
Recommended resources: Build an Elegant Side Table
Check out our collection of articles and videos specifically picked to help with this project.
from FineWoodworking https://ift.tt/3eclLaI
from FineWoodworking https://ift.tt/3eclLaI
2020年6月17日星期三
Abrasive Cleaner Holder
Synthetic wine corks work great for cleaning abrasives. But all it takes is accidentally bumping your fingers against the spinning sandpaper once, when the cork slips or wears down too far, to want some sort of a holder for the cork that makes this task safer.
Here’s my solution: I insert the cork into a 4-1/2″-long section of 3/4″ I.D. PVC plumbing pipe. Wine corks usually have an outside diameter of about 13/16″, which makes a good friction fit inside this “handle.” It’s a simple fix that saves my skin!
– Jim Wilson
San Marcos, Texas
The post Abrasive Cleaner Holder appeared first on Woodworking | Blog | Videos | Plans | How To.
from Woodworking | Blog | Videos | Plans | How To https://ift.tt/2UUE5NV
Table saw not working right? The proper way to adjust/align it...
from Stumpy Nubs https://www.youtube.com/watch?v=tNfvtStKkFA
Tie Downs & Stuff - Urban Logging Trailer Build Pt 8
from Matthew Cremona https://www.youtube.com/watch?v=n-FmxEjJKlQ
Using SketchUp to Create Patterns
Using SketchUp and Layout, Dave Richards demonstrates how to create full-size printed patterns to use for router templates or bending forms.
from FineWoodworking https://ift.tt/3hvaZhQ
from FineWoodworking https://ift.tt/3hvaZhQ
How long does wood take to dry (faster than I thought it would)
from Matthias random stuff https://www.youtube.com/watch?v=kcGUGS4AaI8
2020年6月16日星期二
Painting Outdated Oak Cabinets
Many houses and condos feature simple builder-grade oak cabinets. They’re inexpensive, simple, unobtrusive, and very “vanilla” so they won’t clash with appliances or other accessories one might add to a kitchen. But for those who wish to make their kitchen look a little more stylish, the outdated oak cabinets just don’t cut it. You guys probably know by now that I’m not real big on paint in general. I like to build with quality hardwoods and I use finishes that enhance their natural beauty. But in this case, we’re talking about mass-produced oak consisting mostly of sheetgoods. Furthermore, these cabinets are in my mom’s new condo and she really likes the painted look, so I’m going to make her happy.
To Pore Fill or Not to Pore Fill?
Oak is an open-grained species so if you just slap on a coat of paint, the pores will telegraph through the finish and you won’t have a smooth appearance. This isn’t necessarily a bad thing, depending on your preferences. In our case, my mom wants the doors to have a smooth appearance so we’re pore-filling. The filler I use is Timbermate. This stuff is usually used as a putty and is very thick but it’s also water-soluble, so you can simply dilute it until you have a spreadable loose pancake batter consistency. Most times, one coat is all you’ll need. After the filler dries, the excess is sanded off and the only filler left on the doors and drawers is the stuff that’s packed into the grain. Just FYI, I did not do the pore-filling process on the face frames and cabinets inside the house. It’s a VERY dusty procedure and most of the face frames are covered by doors and drawers.
Paint
There are a TON of paint products on the market that would work on cabinets. Since I rarely delve into paint, I’m sticking with the materials I’m familiar with and that’s General Finishes Milk Paint. In spite of its name, this paint is actually an acrylic blend but provides the matte look that’s associated with traditional milk paint. Even though it’s more durable than the traditional stuff, it should still be top-coated with something like General Finishes High Performance if it’s to be in a high-use environment.
I used a turbine HVLP system to spray the doors and drawers and a brush and roller to paint the face frames and cabinets. I chose not to paint the cabinet interiors. If you do paint the interiors, consider the wear and tear of dishes and glasses and that the surfaces might look pretty bad after a while.
Stuff I Used:
- Timbermate Wood Filler
- General Finishes Milk Paint – We used Linen and Dark Chocolate
- General Finishes High Performance (Satin)
- Fuji Q5 Turbine Sprayer
- Fuji Semi-Pro 2 Turbine (a more budget-friendly option)
- Rubber Sanding Grips
The post Painting Outdated Oak Cabinets appeared first on The Wood Whisperer.
from The Wood Whisperer https://ift.tt/3hyIyzv
Not Expecting That…
Once again the Weekly faithful have surprised me. Last week, I confessed that I am about to build a ukulele for my granddaughter from a kit. I expected to be called out as a woodworking fraud and have my “workshop card” recalled.
To be fair, a few of you have let me know that, in your opinion, kits are not woodworking (see Feedback in this issue). But a surprising number of readers have expressed the opinion that a kit is a good way to attempt a new aspect of woodworking. Kits definitely have their place — especially for building things like musical instruments and boats.
So I am relieved to retain my woodworking credentials, and I will let you all know how the ukulele project unfolds. Apparently, even old dogs like me can learn some new tricks.
Rob Johnstone, Woodworker’s Journal
![]()
Circle-cutting Jig with Fine Adjustment
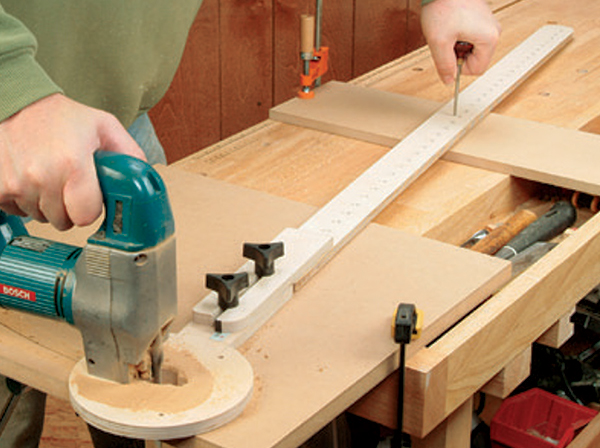
This jig allows you to cut out or shape accurate circles, semicircles and arcs using a standard jigsaw or router.
![]()
VIDEO: Six Things to Know Before Buying a Jointer
What should you consider when you’re shopping for a woodworking jointer? Your budget is an obvious consideration, but there are also six features or options that are important to consider, including the board capacity, the cutterhead style, the fence, the type of infeed and outfeed table lifts, if it has casters or a mobile base, and the drive belt tensioning system. In this video, Chris Marshall goes over the pros and cons of different options available.
![]()
From Our Sponsor
| Here’s an economical way to help sustain top table saw performance – make your own zero-clearance throat plates! Learn the steps in our handy Skill Builder video below. |
![]()


15% OFF: Excludes gift cards, product bundles with gift cards or free products, power tools, Porter-Cable dovetail jigs, CNC machines, Leigh products, SawStop, Festool, Tormek, Ready2Rout, select Rockwell products, taxes, Apollo sprayers, shipping charges, sale items and other promotions. Other exclusions may apply.
FREE SHIPPING: $39+ Orders. Additional shipping charges will apply for select oversized items, express orders, international orders, and orders to Alaska, Hawaii, Guam, Puerto Rico, and the Virgin Islands. Rockler reserves the right to limit quantities, correct errors or omissions and modify or end this promotion at any time. Neither 15% off nor FREE SHIPPING can be combined with any other offer or applied to previous orders. Not valid with Rockler’s Professional Catalog and independent resellers. Offer ends 7/2/20.
The post Not Expecting That… appeared first on Woodworking | Blog | Videos | Plans | How To.
from Woodworking | Blog | Videos | Plans | How To https://ift.tt/2N0DN3X
订阅:
博文 (Atom)