2025年4月9日星期三

Open End Kitchen Wall Shelf – Stylish Way to Finish a Cabinet Run

🛠️ Why I Built This Open Kitchen Wall Cabinet

For this standard kitchen layout, I wanted to give the upper cabinets a more custom, designer look—and create a spot to add some decor and warmth to the wall. The end of this run of cabinets is located above a peninsula bar, which made a traditional wall cabinet impractical. It would’ve been hard to access and felt heavy above the open space.

This open wall cabinet was a simple, beginner-friendly way to solve all of that. It adds style, easy storage, and makes the space feel more open and intentional.


📸 Photos of This Wall Cabinet in the Kitchen

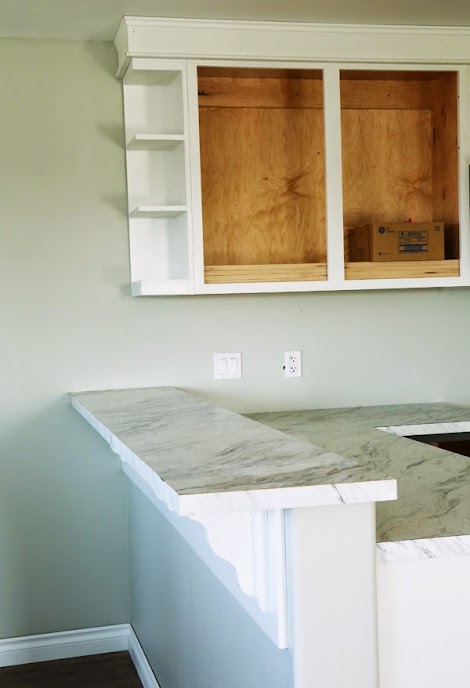
Above the peninsula bar:

Open End Wall Shelf Above Bar

This open end wall shelf wraps the corner and finishes off the upper cabinets without blocking sightlines or making the space feel closed in.

Side view of the wall cabinet and bar area:

Side view of open kitchen wall cabinet

The open shelf allows for quick access and easy styling, and it avoids the awkward reach you'd need with a full-depth cabinet.

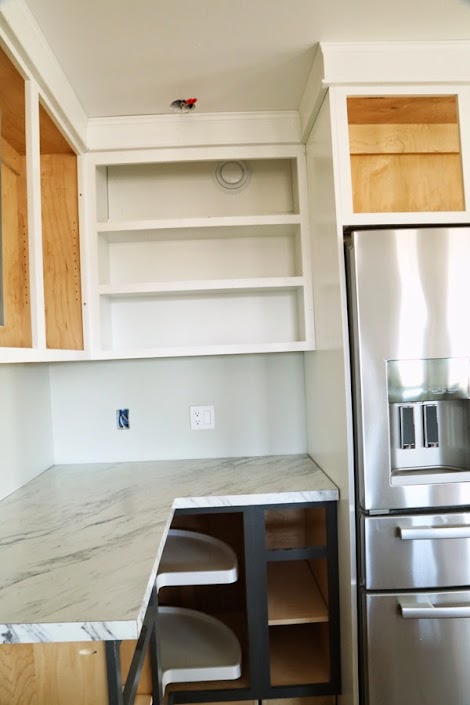
Balancing the kitchen layout with a second open cabinet:

Open wall cabinet balancing kitchen layout

We added a matching open cabinet on the opposite end of the upper cabinets to keep things feeling balanced and intentional.


✨ Open Wall Cabinet Features

  • Open on the front and side – Perfect for corner installs or finishing off a cabinet run
  • Beginner-friendly build – Simple construction with just a few tools
  • Easy to customize – Paint or stain to match your kitchen
  • Great for decor – Display plants, bowls, cookbooks, or everyday dishes
  • Works in tricky layouts – Ideal for peninsulas, dining nooks, or small kitchens
  • Makes stock cabinets feel custom – Adds that built-in designer look without the cost

📐 Free Plans to Build Your Own Open Wall Kitchen Cabinet

You can build this cabinet with basic tools and a little time!

Our free plans include:

  • Step-by-step building instructions
  • Detailed diagrams
  • Complete cut list and shopping list

This is a super easy way to elevate your kitchen—without the stress of a full cabinet install.


from Recent Project Plans https://ift.tt/ebJSj37

Octagon Picnic Table with Open Seats


Why We Built this Octagon Picnic Table with Open Seats

Our friend is the postmaster at our small local post office.  As you can imagine a rural town in Alaska, our post office is incredibly busy with package deliveries.  To thank the workers, we built this picnic table for them to use on their very short lunch breaks.  Thank you, postal workers in Delta Junction, Alaska!
 

Why You’ll Love This Picnic Table:

  • Free plans included – No need to buy blueprints! Download full instructions at no cost.

  • Step-by-step guidance – Comes with detailed diagrams, a complete cut list, shopping list, and a full video tutorial.

  • Open-seat design – Easy to get in and out—no climbing over benches.

  • Roomy & social – Seats 8 adults comfortably and keeps everyone close for conversation.

  • Durable & sturdy – Built to last with outdoor use in mind.

  • Beginner-friendly – Only a few basic tools needed to build!

Whether you're hosting family dinners or weekend BBQs, this picnic table is a practical and beautiful addition to your outdoor space.

👉 Check out tons of reader-submitted photos for ideas and inspiration!


Video Tutorial of Building this Octagon Picnic Table with Open Seats

Watch the video to see the building techniques used to make this 


from Recent Project Plans https://ift.tt/OagJ7bD

2025年4月8日星期二

Modern Outdoor Loveseat from 2x4s and 2x6s


Modern Outdoor Loveseat Plans

Following much love for our Modern Outdoor Chairs and many requests for a Loveseat plan, we are excited to share with you brand new plans. We love the simple build process, how this project looks amazing from all sides, it's heavy enough to not blow away in the wind, and we have matching plans to build it all!


How Do I Finish Outdoor Furniture?

Make sure you check out our Outdoor Wood Finishing Secrets post.


from Recent Project Plans https://ift.tt/TM8OGmH

2025年4月7日星期一

1x12 Easy to Build and Hang Modular Closet System

Looking for the BEST DIY-friendly way to upgrade your closet on a budget? My free modular closet system set of plans has you covered:

  • ✅ Fully customizable — mix and match six different modules to fit your space and style

  • 🪚 Super beginner-friendly — all units built from easy-to-find 1x12 boards

  • 💰 Budget-friendly — way cheaper than buying! No need to spend thousands on a closet!

  • 🔨 Simple to build and install — French cleat system makes hanging a breeze

  • 📏 Free plans with diagrams, cut lists, and step-by-step video tutorials

  • 🧰 Works for small closets, big walk-ins, or anywhere you need organized storage

  • ✅ Designed to fit 11" cube storage bins!

It’s hands-down the easiest and most affordable way to get a custom closet look without the custom price tag.  I love this method SO much that I've already built it 3 different times!

modular closet system

shown in closet double hanging and 3 shelf hanging closet components


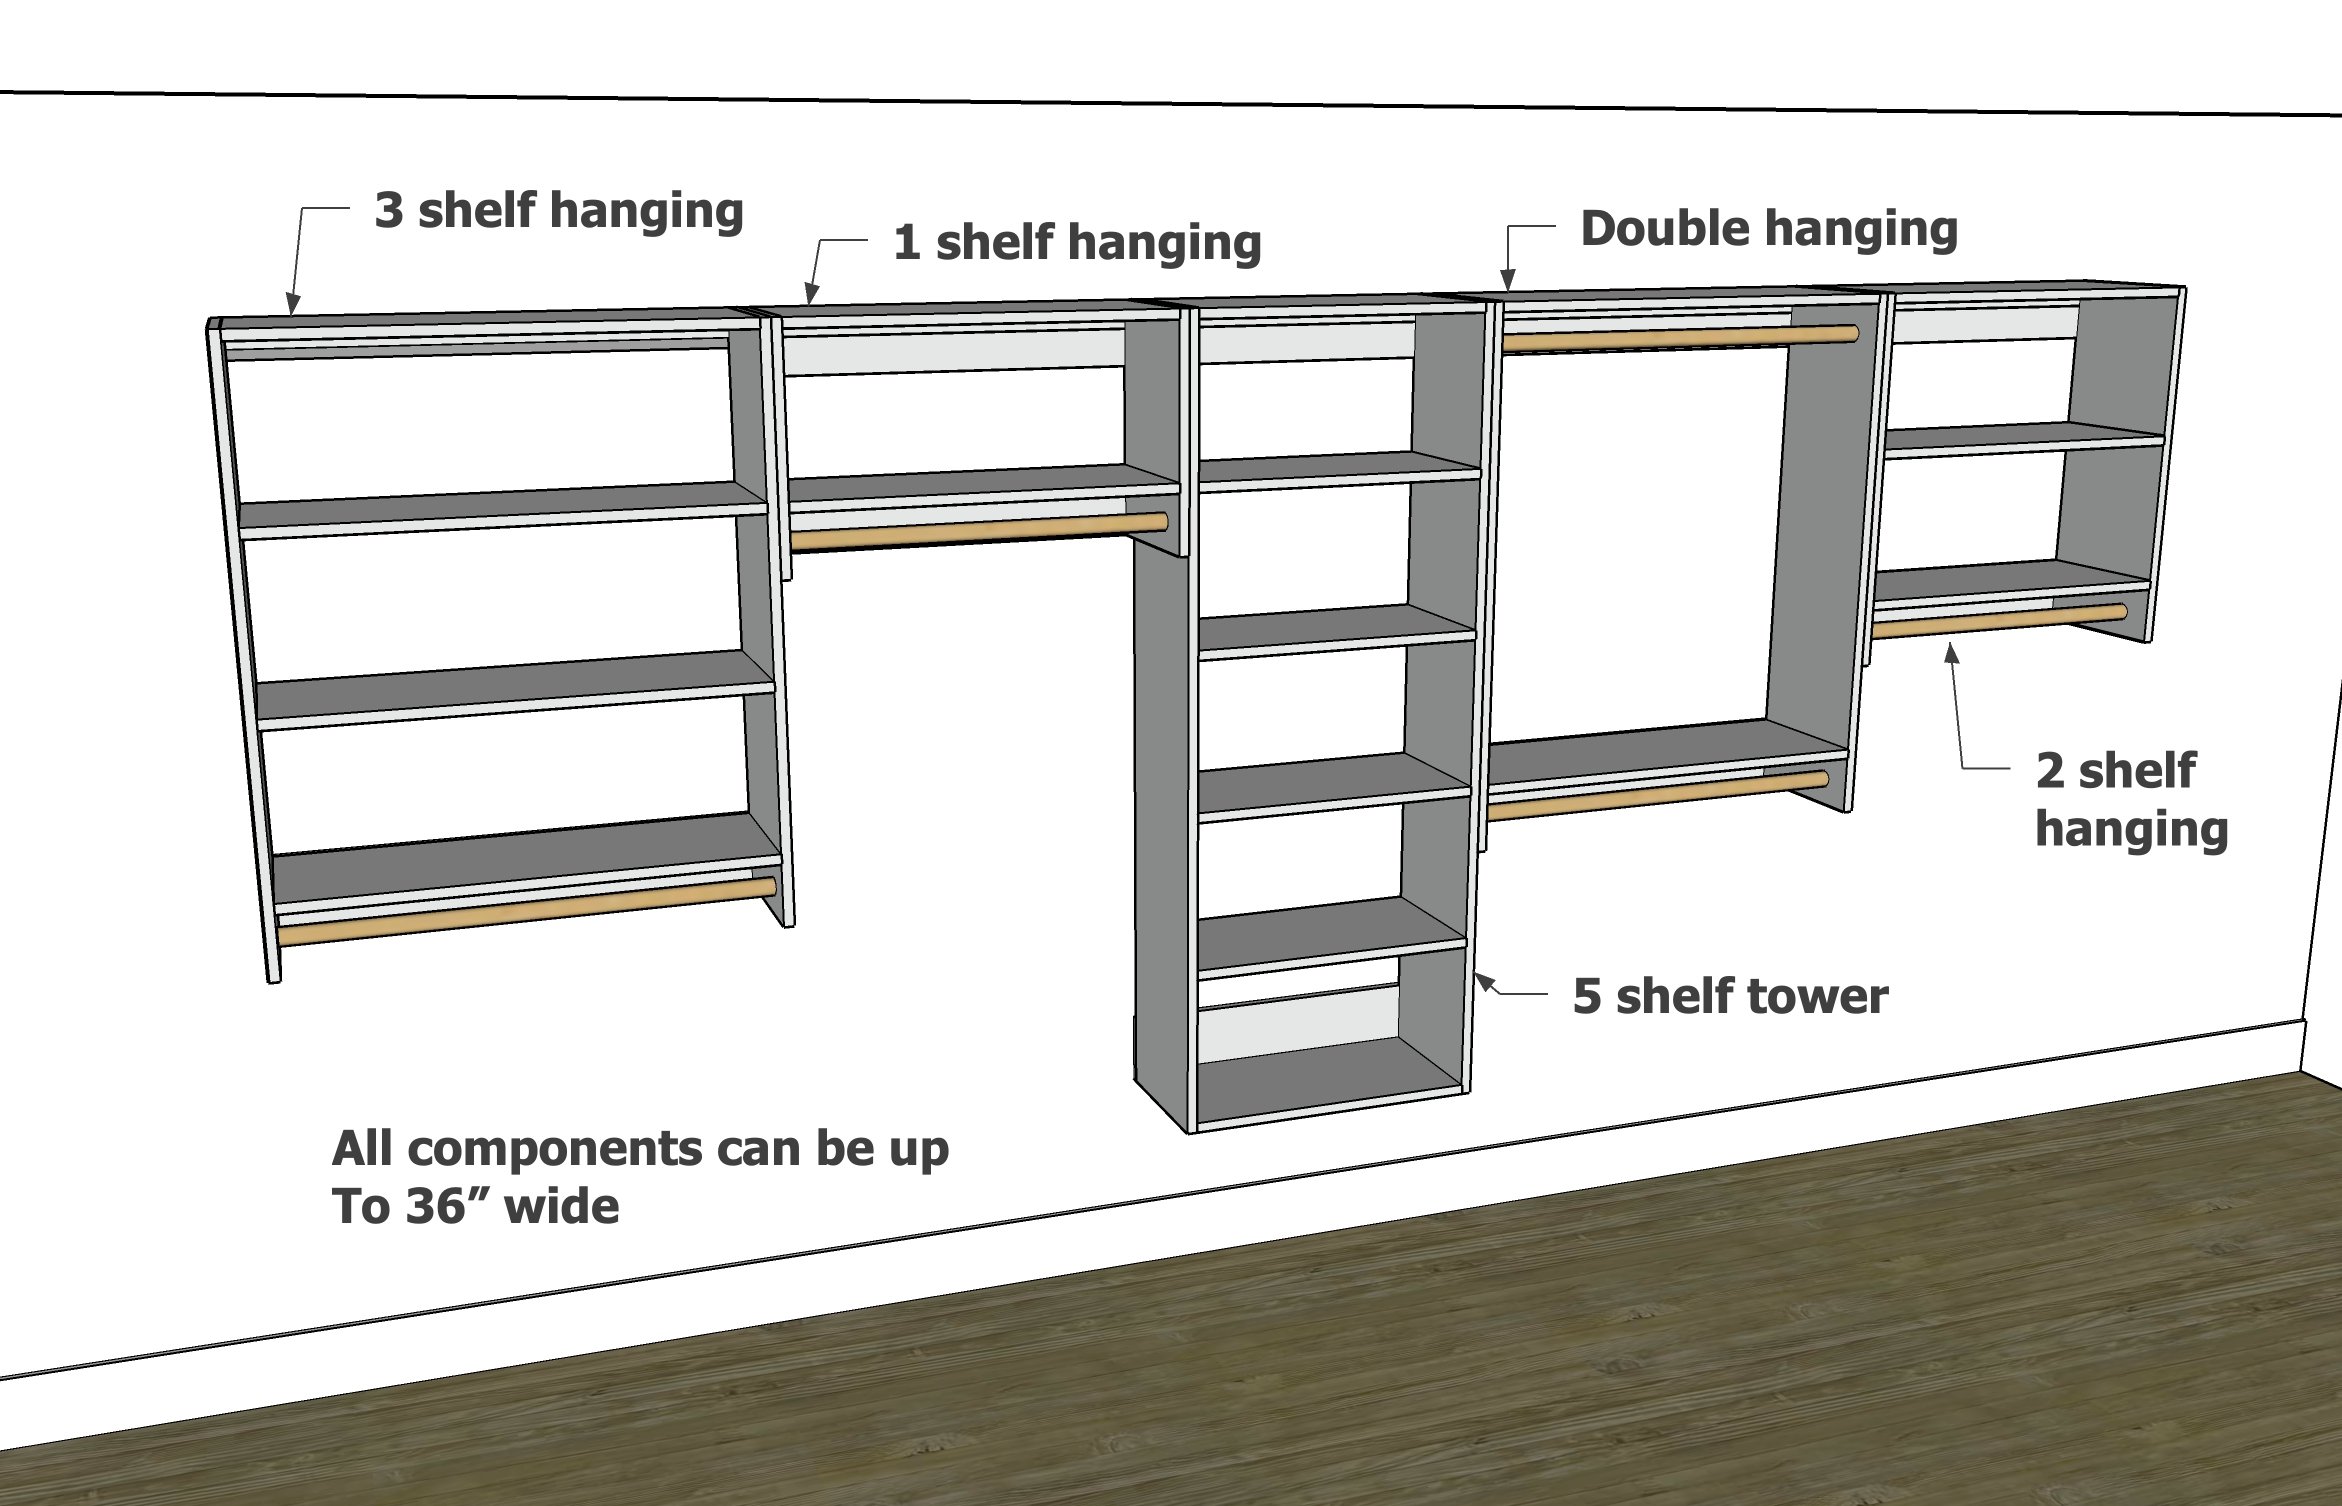
Modular Closet Components

By using different organizers, you can create the closet of your dreams!  Here are the standard modular closet components.

diy modular closet plans

All of the components are constructed with the same steps, the only difference is the length of the sides and the number of shelves.  Follow the construction steps below, but use the diagrams linked below to come up with your cut lists.


📏 Measuring & Planning Your Closet Components

Before you start cutting boards, take a few minutes to plan your closet layout. A little prep goes a long way!

  • Measure your closet carefully – Take note of the total width, height, and depth.

  • Leave 1" of wiggle room – Always subtract about an inch from the total width to make installation easier, especially if you’re building wall-to-wall.

  • Plan for hanging vs. shelving – Think about what you’ll be storing. Need double hanging for shirts and pants? Or more shelf space for bins and shoes? You can mix and match the units to fit your needs.

  • Stick to standard shelf sizes – Each shelf fits 11" deep storage cubes, so aim for widths like 24" or 36" to keep things simple and efficient.

  • Sketch your layout – A quick drawing (even on paper) helps visualize how the components will stack and fit in your space.

Taking time to plan ensures your closet not only looks great, but functions perfectly for your daily life!


EASY! Hanging Your Closet Organizers

Hanging this closet system is SO easy!!!  Just cut a 1x3 board to the full length of your closet, and attach it to the back wall to studs in the wall, with the bottom of the cleat at 72" (or as desired).  Then just set the organizers on the 1x3, so the 1x6 back piece sits on top, and then screw the organizers to studs in the wall.  This way you can hold the organizers in place, match them all up, and make sure everything is hung level!


Modular Closet Build Video

I have built this closet plan in full closet systems three times now.  It is my go-to plan for easy to build closets (and easy to hang).  In this video, I built using a French cleat hanging system (but it is not necessary to hang with the French cleat, you can use the 1x6 method as instructed in the plans).


from Recent Project Plans https://ift.tt/hajk1mI

2025年3月22日星期六

Free Plans: DIY Bathroom Tall Boy Cabinet

Sponsored by Kreg Tool

This post is sponsored by the amazing Kreg Tool Company—and it’s a perfect fit. I used my Kreg pocket hole jig, screws, hardware jig, concealed hinge jig and shelf pin jig, cutting guides throughout this build, and it made the process fast, strong, and beginner-friendly, and the end result so professional looking!


Why I Built this Project

We bulk shop for toilet paper.  It's been stored in our pantry, but that takes up a lot of valuable space in our pantry.  I have a spot behind the door of my powder room that would be perfect for storing toilet paper.  But I wanted something that looks nice and is sturdy and will hold up for a long time.  So I decided to build my own bathroom storage cabinet.

diy bathroom cabinet tall boy


Why You’ll Love This Bathroom Cabinet

  • Lots of storage – The lower cabinet is deep and spacious—perfect for those bulky bathroom items, all hidden behind doors!

  • Display + function – Open upper shelves let you style the top while keeping everyday items within reach.  You can even use as extra counter space or working space!

  • Great Size – Tall and wide, this cabinet delivers tons of storage, and is big enough to hold large towels

  • Well Thought Out Plans – Only one sheet of plywood and you can build all this!  Simple construction, basic tools, and a polished look you’ll be proud of


How I Built this Project

This project is built from one sheet of 3/4" thick plywood.

ripping plywood for bathroom cabinet

I ripped it into three strips 15-1/4" wide by 8 feet long, using a circular saw and a guide.  Here's some awesome guides that I recommend to help making ripping easier.

crosscut plywood for bathroom tall boy cabinet

Next, I crosscut the plywood pieces to length using a miter saw.  The cut list below details out exactly what size pieces to cut.

edge banding plywood edges

The plywood edges for the fronts of the pieces need to be finished.  I used edge banding and an iron to attach.  Here is a good tutorial and video on doing edge banding.

poct hole joints

Next, I used my Kreg 720 Pocket Hole Jig to drill pocket holes and build the carcasses.  You really need pocket holes for precision when trying to make a nice project like this one! I love the Kreg 720 because it auto adjusts, saving steps!

building the box

Then I attached the remaining pieces to build the carcass.  I built two carcasses, they will stack so it's easier to move into the room (see photos below).

back of cabinet

For the back, I used 1/4" underlayment, using 3/4" brad nails and glue to attach. The plywood squares up the cabinet.

Now for the cabinet doors!  I built them of course!  I'm testing out a new method for building cabinet doors, and need some time to see how they hold up.  In the meantime, here's a few door tutorials to look through: Frame and Panel Doors Using 1/2" plywood panel, Shaker doors with tablesaw and router, MDF Shaker Doors, or also consider ordering from an online cabinet company.

cabinet doors

Once the doors were made, to install them, I used the Kreg Concealed Hinge Jig to quickly and easily install the concealed hinges on the cabinet doors.

hanging cabinet doors

Then just hung the doors in the cabinet.  These concealed hinges are so adjustable, it's hard to mess up!

For the upper cabinet, I did no doors.  The lower cabinet I added doors.

painting doors

Next just rolled on a good quality cabinet paint.

Once that is dry, I am going to install the adjustable shelves with shelf pins.

shelf pin jigs

I used the Kreg Shelf Pin Jig to drill precise holes for the shelf pins, no  rocking shelves!

stacking cabinet

Then stack the two cabinets, and add the shelves!

cabinet hardware jig

The last step is to install the hardware.  I used my Kreg Cabinet Hardware Jig to quickly (and straight) drill holes for the knobs.

Here's what one sheet of plywood and some doors looks like painted up -

diy bathroom cabinet

I moved it into the house, this thing is HUGE.  I am so glad I built it in the two pieces so it was easy to move.  It holds a TON, like everything you would need to store can fit in there.  That's three extra large bath towels folded in there.  

diy bathroom cabinet tall boy

We are thrilled with how this tall bathroom cabinet turned out and see it as a forever project for our home!


Watch!  Build Video for This Project

VIDEO COMING SOON


Free Plans to Build Your Own Bathroom Tall Boy Cabinet

Ready to build this yourself?  Here's the free plans, enjoy!


from Recent Project Plans https://ift.tt/9sIeb24

2025年3月5日星期三

Charlie Nightstand

Love the classic, timeless look of the Pottery Barn Kids Charlie Nightstand but want an affordable DIY option? Our free woodworking plans make it easy to build your own! This sturdy, kid-friendly nightstand features a spacious drawer, lower shelf for storage, and clean lines that work in any bedroom.

Our plans include:

✅ Cut List & Shopping List – Get everything you need in one trip

✅ Step-by-Step Diagrams – Simple, beginner-friendly instructions

✅ Video Tutorial – Watch the full build process

✅ Matching Dresser Plans – Complete the set with our Charlie Dresser DIY Plans

With basic tools and easy-to-follow instructions, you can build this Pottery Barn-inspired nightstand for a fraction of the cost. Click here to download the free plans and start building today! 

Want the full bedroom set? Check out our matching Charlie Dresser plans!


Why I Built this Project

I built the 7 drawer dresser for my daughter a few months ago and we LOVE how it turned out!  She's been using it and loving it.  After a lot of requests, I'm adding more plans to this collection, first up the nightstand plans!


How I Built this Project

Build photos coming soon


Watch!  Build Video for This Project

This nightstand follows the same steps as the matching dresser build.  Here is the matching dresser video


Free Plans to Build Your Own Charlie Inspired Nightstand

Ready to build this yourself?  Here's the free plans, enjoy!


from Recent Project Plans https://ift.tt/51wMmIJ

2025年3月4日星期二

Corrugated Metal Raised Planter Plans

Why I Built this Project

I wanted some easy to access planters on my back porch for growing vegetables, so I could just snip what I need for a meal or homemade salsa whenever I need it!  For about $20 a planter, I was able to make these!

You could dress them up with more wood paneling, make them different sizes - this is just a starting point!


Why We Love this Corrugated Panel and Wood Planter

  • Quick and easy to build
  • Budget friendly
  • Small footprint
  • Can be used on deck or added to a garden or greenhouse
  • Only need basic tools to assemble
  • Grow my own food
  • Easy to modify for size and height
  • Visually appealing 

How I Built this Project

I found these 3' panels of corrugated metal that worked perfect for this project. I appreciated that I didn't have to cut the metal. I started by cutting my 2x4's and fence pickets according to the plan.

material

Then just lay two of the 2x4's on their side, apply glue and begin attaching the fence pickets with screws. Be sure to keep them flush to top and sides and then just work your way down adding the other pickets. Make 2 of these. 

assemble

I went with three rows of fence pickets, but you probably could get away with two.

assemble

If you are going to add a stain or outdoor paint, this is the time to sand it all down and get the wood portion finished. Once the legs are done. I also drilled holes in the bottom of the metal for water drainage before adding it to the frame. I just set the panel on top of a 2x4 scrap piece to drill into.

drill holes

Holes for water drainage in the bottom.

metal

Next, you will set the metal inside of each frame. I used clamps to keep it in place and then I predrilled holes through the metal where I wanted the screws to go and attached it with some metal lathe screws.

assemble

You could also using roofing screws here.

predrill

The metal roofing is surprisingly strong and structural!  I was expecting to have to add bracing at the bottom, but the metal screws hold well!

drill

Once the planter was built, I added some landscape cloth to the bottom and filled with dirt.

dirt

It took about 1.5 cubic feet of dirt to fill.

dirt

I love how this planter is right on my deck!

done

Watch!  Build Video for This Project

Video coming soon!


Variations to this Metal Roofing Planter

If you love the simplicity of this project, but want to change it up, here are a few ideas:

metal roofing planter plans tall

Taller: Increase the height, but add additional support to the legs.


metal roofing planter long

Longer: Use longer pieces of tin, but support the middle with middle legs.  You may need to run leg cross bracing at angles between the outside legs and center legs, especially if you increase the overall height.


metal roofing planter pretty

Refined: If you are looking for a more attractive planter, for about $10 more, you can enclose the front and back with more cedar fence pickets.


Free Plans to Build Your Own Corrugated Panel and Wood Planter

Ready to build this yourself?  Here's the free plans, enjoy!


from Recent Project Plans https://ift.tt/i5rA9dT