2026年7月27日星期一
2026年7月25日星期六
Projects You Can Make with Framing Lumber and Screws
from Recent Project Plans https://ift.tt/ujIBx9P
2026年7月20日星期一
DIY Open Wardrobe Closet with Shelves – Free Plans
Why I Built this Project
My daughter moved to to a different room, and needed more closet space. So one day she came home with some lumber

And took over the shop for a couple of days ...

It turned out really awesome, super strong and sturdy and great freestanding - not flimsy at all!

This is a great closet for a dorm room, entryway, short term rental, or anywhere you need some extra hanging space without putting holes in the wall. She's using it in as a supplemental closet.
Free Plans to Build Freestanding Closet with Shelving
from Recent Project Plans https://ift.tt/I6HyfqT
2026年7月17日星期五
2026年7月15日星期三
2026年7月8日星期三
Homeschool Woodworking Guide for Alaska 2026/27 School Year
from Recent Project Plans https://ift.tt/ashdOkp
2026 Guide for Homeschooling Woodworking in Alaska: Funding, Coursework and More
from Recent Project Plans https://ift.tt/K7swJ2l
2026年7月7日星期二
Simple Small Trestle Desk - Free Build Plans!
design image is rendered from plans, actual results may vary
Why We Made this Desk
Do you need a simple, small desk for your kids, but don't want to pay a fortune for it?
I partnered up with my super amazing friend Brook from Being Brook (yes, she is really super amazing, I exaggerate not) to bring you a simple desk that you can make from 2x4s and 2x6s.

More Projects to Build!
The entire room features DIY projects. One of our favorites is the bed!

You can also build this bed with free plans and the X bench!
from Recent Project Plans https://ift.tt/gjfY1rz
Stack and Store Lap Desks
Design image is rendered from plans
Our children have been home from school for a month now. The papers, the books - it's everywhere. How to organize and make systems?
My friend has three school aged children in a very small A frame - so adding desks to the slanted walls would have been very difficult (or at the least, very space consuming). There's also not enough room to add three more desk chairs to her living room. She's been brainstorming ideas on how to create desks for the kids despite these challenges. Finally, we decided to try something creative.
Together we designed lap desks that stack up like a bookcase when not in use. Each child has their own lap desk, that holds all their supplies. When in use, simply flip over and it's a sturdy, perfect sized workspace. The lap desks are big enough for a child under five feet tall to sit with crossed legs.
We went simple with our lap desks - but though there could be so many creative ways that these little desks could be modified.
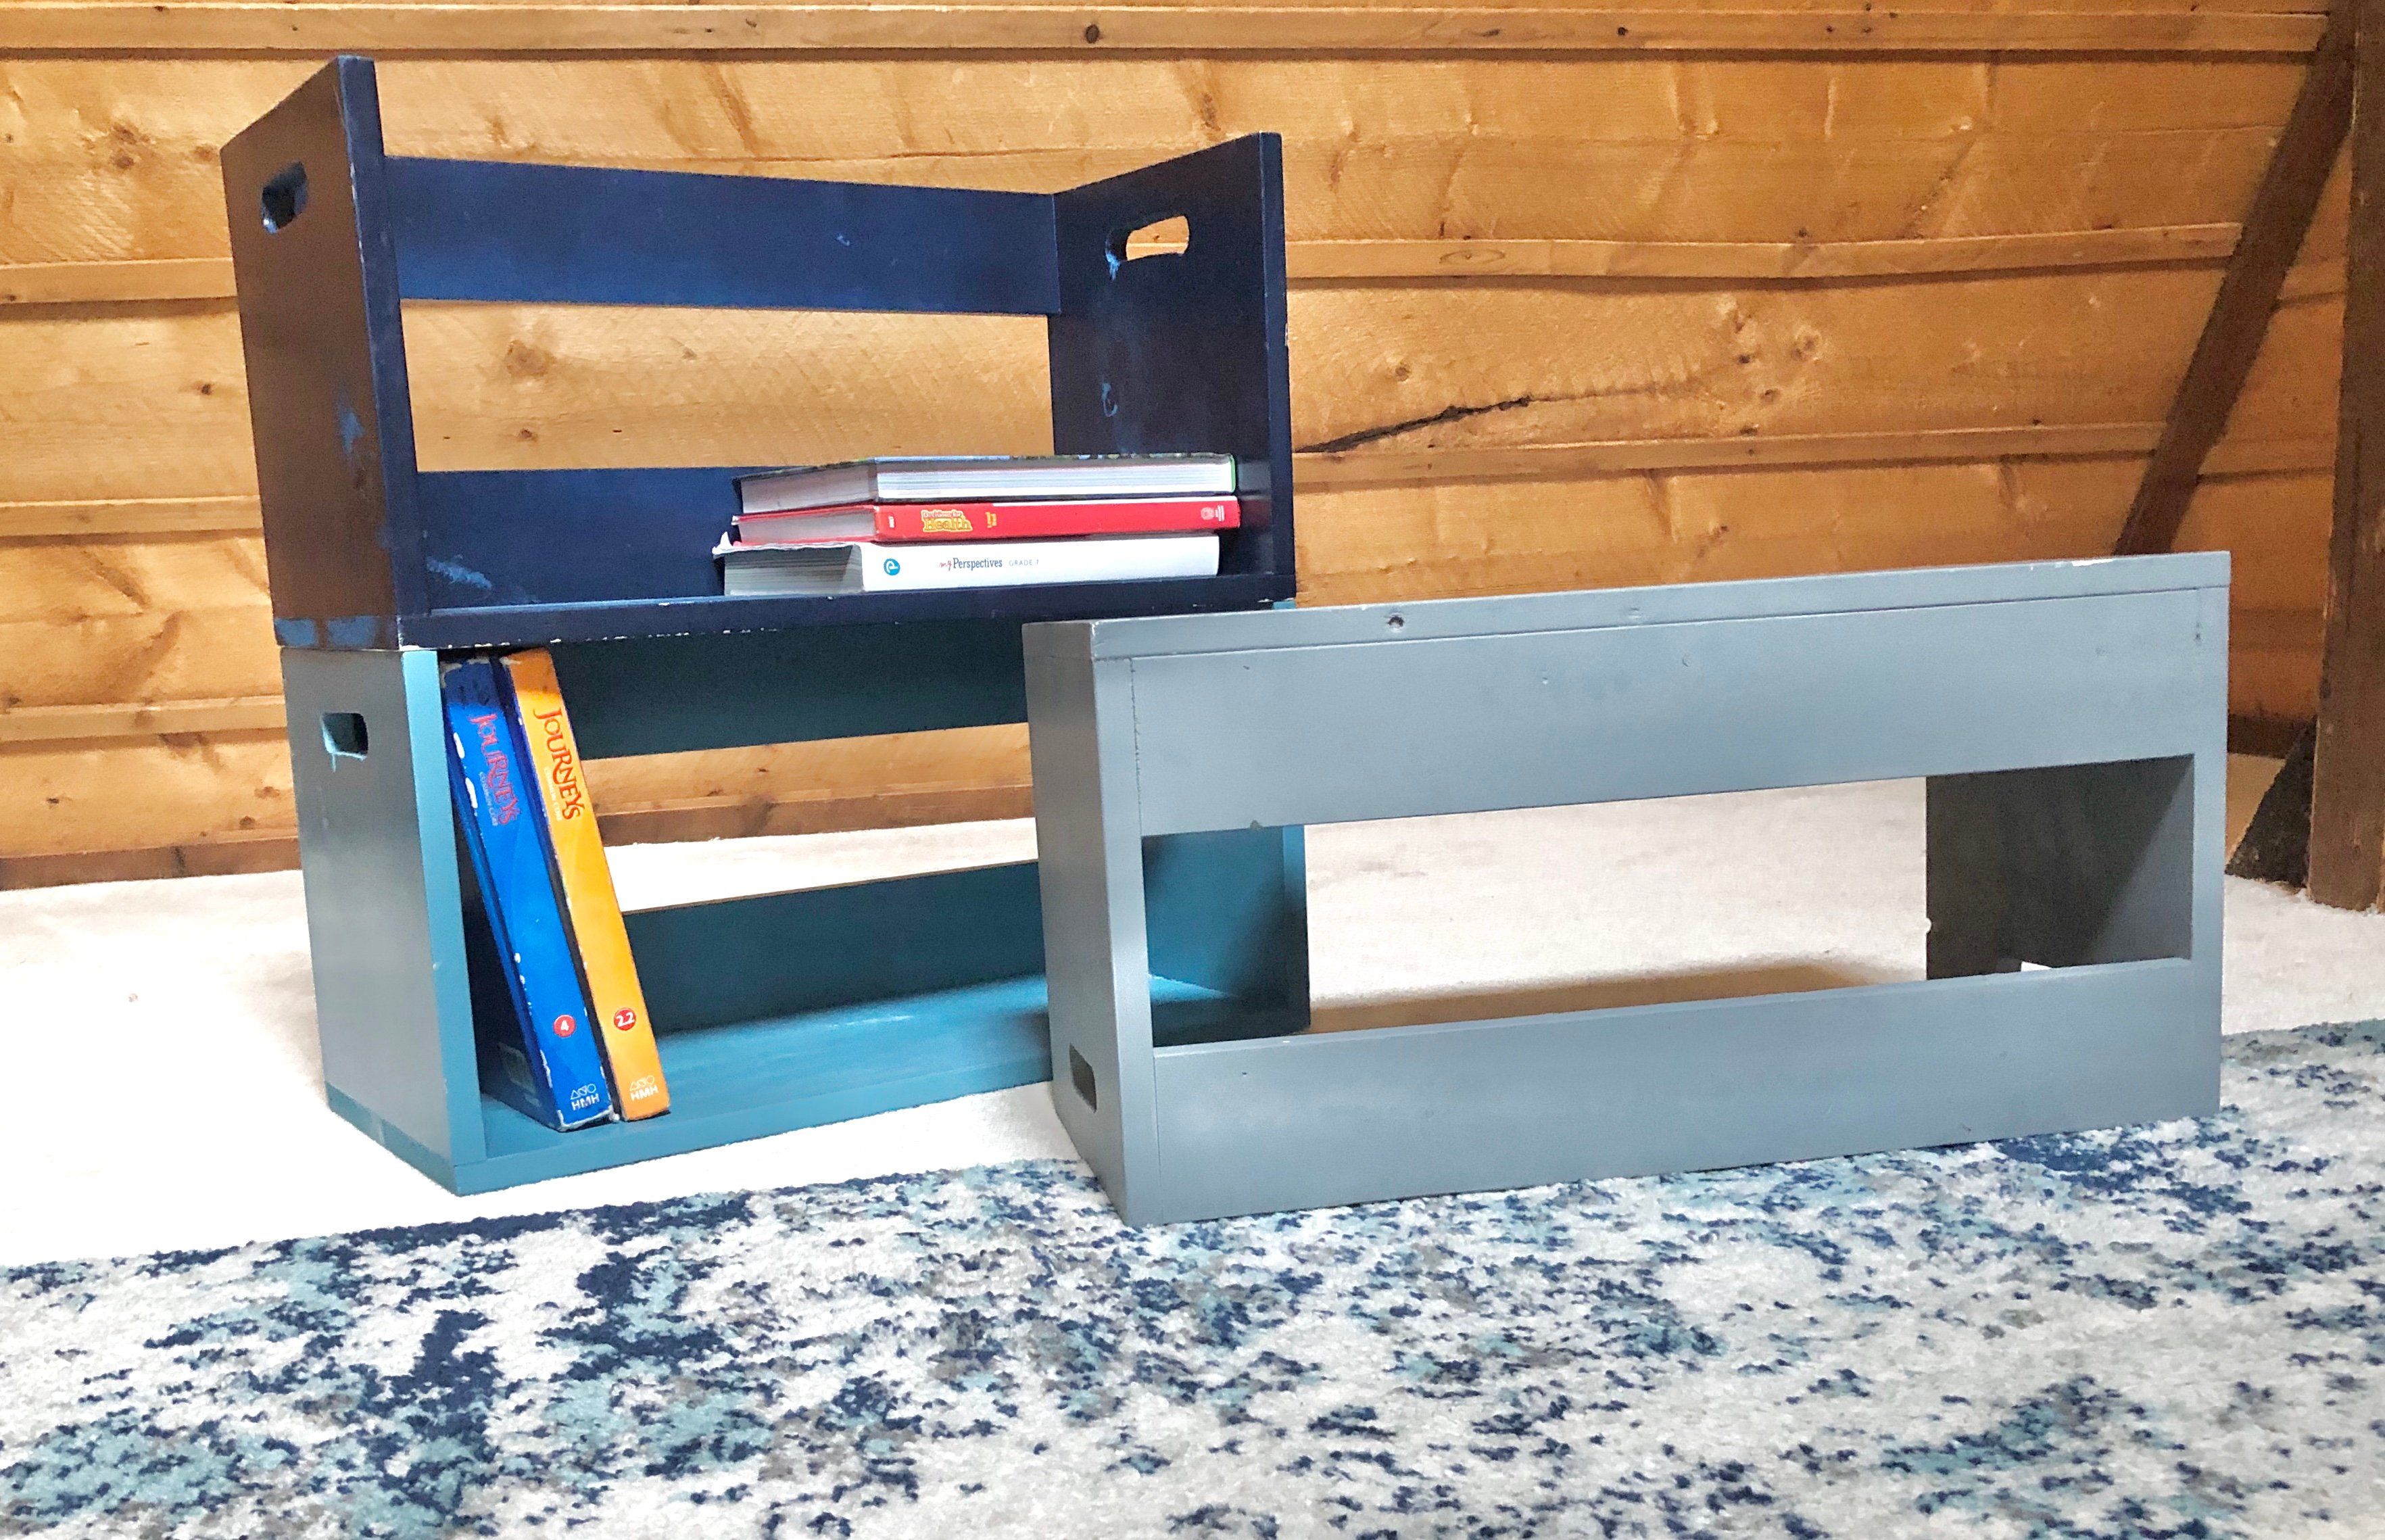
This was a very quick and easy build with barely any scraps left over. This is certainly a project that most any mom or dad could knock out in no time.
Here's the video of us building them:
I did change a few things up in the plans from the video, just to make it easier to build and easier to stack. The free plans follow. Please do share if you build, we love seeing your completed projects!
from Recent Project Plans https://ift.tt/NWSYiHk
U Shaped Table or Desk for School
design image is rendering
Why We Made this Plan
A favorite brag post on this blog has long been Jeff McClure's U shaped desk for his wife's kindergarten classroom.


From preschool teachers, to homeschooling parents, and even kindergarten teachers have asked for this plan.
We drew inspiration from Jeff's amazing design, but used 1x boards for the top as they tend to be smoother. We added a frame underneath to support the 1x boards.
Free Plans for U Shaped Desk
Thank you for using the plans, please send in photos when you build - we love seeing how your projects turn out!
from Recent Project Plans https://ift.tt/o7bKJt8
2026年6月23日星期二
Easy 6-Board Leopold Bench Free Plans with Cut List
from Recent Project Plans https://ift.tt/YfstNPD
Free DIY Around-the-Tree Bench Plans – Easy to Build and Customize
from Recent Project Plans https://ift.tt/eE7rKOR
2026年6月15日星期一
2026年6月9日星期二
Plywood and Lumber Storage System
Why I Built this Project
After years of not having a good plywood storage solution, and having to run to the hardware store every time I started a project,
Why We Love this PROJECT TITLE HERE
- Holds plywood of the ground and in a way that you can easily access it
- Holds lots of 8' long lumber
- You can store longer lumber at the top shelf
- You can build more dividers to go longer
- You can place shorter lumber pieces on top of the longer pieces
- Its fast and cheap to build
- Keeps everything off the floor, flat, and dry
How I Built this Project
Here's how this project is built -

You build three of these 2x4 things (for lack of better term). Each one only uses three 2x4x8 boards. Use 2-3/4" self tapping screws.

Then you attach those to the wall with screws. If you have baseboard, you'll need to either cut it out or work around it, or space the rack off the wall with spacers.
Free Plans to Build Your Own Lumber and Plywood Storage Rack
Ready to build this yourself? Here's the free plans, enjoy!
from Recent Project Plans https://ift.tt/NSqR3Qp
2026年5月12日星期二
Leaning Fishing Rod Rack
Why I Built this Project
We needed a simple solution for all the our fishing rods. We have many different lengths of fishing rods, from ice fishing rods to longer rods for bigger fish.I wanted to create a system that was compact and easy to use, fit all the different rods, without requiring expensive hardware or mounting on the wall.
I have been thinking on this for many weeks, and built a few prototypes. I discovered that placing the rods inside, with the handle extended down, created a self holding system with the fishing line pushing the rod out, holding the rods in place.
This system works well with rods with reels and lines. It may work with just rods or jut rods with reels, but not as well.
I ended up building two different versions - a tall version and a half height version.


Ultimately, I felt that a version in the middle of these two was the gather choice - three rungs high, but extend all the way to the ceiling so the rods could rest on something if they strayed right or left. This is done in the plans.
Why We Love this Fishing Rod Rack
- Holds many fishing rods of different sizes in a tiered design, so you get more storage in the same footprint
- Easy to set rods in place
- Great for different length rods
- Reels set on the inside to further protect
- Very easy to build and customize
- Leans against the wall - no holes in the wall
How I Built this Project
This was a very easy project to build - I used a compound miter saw to make all the board cuts.
Then I layed the legs out on a work surface (could be an even garage floor too)

Then lay out the 1x8 boards on top, and screw down with 1-3/4" self tapping star bit screws.

You could probably get away with a 1x6 board but I liked the 1x8s because it gives lots of room for the rod handle to land on the board.
Installation is simply leaning against the wall. Then just set the rods on it!
Watch! Build Video for This Project
VIDEO COMING SOON
Free Plans to Build Your Own Leaning Fishing Rod Rack
Ready to build this yourself? Here's the free plans, enjoy!
from Recent Project Plans https://ift.tt/9KmIZSc
2026年5月6日星期三
Easy DIY Floor Standing Headboard
Why I Built this Project
I wanted our guest room to feel like a fancy hotel room for our guests. So I built this headboard that is comfortable, easy to clean and creates a fabric texture to look more expensive, all on a super tight budget. I spent less than $100 on this huge headboard!
I also built the wood bed frame - the plans are free and here.
Why We Love this PROJECT TITLE HERE
- list features of why this project is so amazing here
How I Built this Project
(if applicable) photos showing how this project was built, so the reader can scroll through the photos without reading and understand how to build it
Watch! Build Video for This Project
if applicable, embed video here
Free Plans to Build Your Own DIY Floor Standing Upholstered Headboard
Ready to build this yourself? Here's the free plans, enjoy!
from Recent Project Plans https://ift.tt/auwhQ8T
2026年5月5日星期二
Modern Platform Bed Frame - Free Plans in All Sizes
Why I Built this Project
I needed a new guest room bed and wanted something that felt "hotel-lish" for our guest. I also never wanted to clean under the bed again. So I designed this bed with the enclosed base and hotel style look.
It was easy to build in the different pieces, move up to the room by myself and assemble. A king size bed is a big project. The way this bed comes together, it is do-able by one person.
Free Plans to Build Your Own Modern Platform Bed Frame (all sizes)
Ready to build this yourself? Here's the free plans, enjoy!
from Recent Project Plans https://ift.tt/TWouYMC
2026年4月27日星期一
Fence Picket Wood Gift Tote
Why I Built this Project
With Mother's Day coming up I wanted to create a unique way to give gifts for the mom's in my life. I saw this idea on Pinterest and thought it would be a great fence picket project, so this is what I came up with.
Why We Love this Wood Gift Tote
• Budget-friendly—made from fence picket scraps
• Great way to use up leftover wood
• Beginner-friendly build (simple cuts + basic tools)
• Quick project—perfect for last-minute gifting
• Uses minimal materials (just wood + rope!)
• Unique “handbag” design that instantly elevates any gift
• Doubles as the gift and the packaging
• Easy to customize size, shape, and finish
• Works for so many occasions (Mother’s Day, teacher gifts, housewarming, holidays)
• Reusable—becomes decor, storage, or a planter after gifting
• Lightweight and easy to carry with rope handles
• Perfect for styling—fill with flowers, treats, or themed goodies
How I Built this Project
Start by cutting and sanding your pieces. For the curve, make an outline of a round object and cut with a jigsaw. Use the first one as a template to trace before cutting the second one.


I then marked and drilled my holes and added the rope handles.

After that I nailed the end pieces in place.


Glue and nail the bottom piece. You can use a fence picket here, I opted for a scrap piece of plywood that I had on hand for a more low profile look.


Fill it with flowers or goodies!
Watch! Build Video for This Project
if applicable, embed video here
Free Plans to Build Your Own Fence Picket Gift Tote
Ready to build this yourself? Here's the free plans, enjoy!
from Recent Project Plans https://ift.tt/L9FvGsV
2026年4月14日星期二
Cedar Two-Tier Ladder Planter
Why I Built this Project
I wanted a small herb planter by my door that’s easy to reach without taking up much space. I didn’t need the full-size version, so this compact size is just right.
Why We Love this Two Tier Ladder Planter
- • Budget-friendly build using affordable, easy-to-find lumber
- • Easy to build with just basic tools
- • Simple design with straightforward cuts—great for beginners
- • Two tiers = more planting space without taking up extra footprint
- • Perfect for herbs, flowers, or even small garden starts
- • Easy to customize for your space—adjust the size, depth, or height
- • Finish it your way—paint, stain, or leave it natural for a cedar look
- • Adds instant charm to porches, patios, or entryways
- • Lightweight and easy to move around as needed
How I Built this Project
I started by cutting my 2x6 planter box ends.
 h
h
I then set them on their side, added glue and then nailed the fence pickets to the front and back of each end.


For the bottom piece, just set inside the box and gently tap into place. I put a couple of nails at each side to hold the bottom in place.

Once the boxes were done I built the legs. I just followed the cut list on the plan. Once I got my first leg cut I used it as a template to cut the second leg. Once both legs were cut I set them side by side and gave them a good sanding.


Once the legs are cut, finish the legs and boxes separately if you want a two-tone look. For assembly, mark the legs for placement, then screw the boxes in to maintain proper spacing. Keep each box flush with the back edge of the legs.


Watch! Build Video for This Project
Video coming soon!
Free Plans to Build Your Own Two Tier Leaning Planter
Ready to build this yourself? Here's the free plans, enjoy!
from Recent Project Plans https://ift.tt/7jnQch1
2026年4月3日星期五
2026年3月31日星期二
Craftsman Style Playhouse
Reader build features slightly taller (12") height for 5' doors
We love this playhouse because it is tall inside, so big kids and Mom's under 6 feet can play too.
We love that the windows add natural light.
We love that both doors open up and it feels so giant in there!
And we love how simple this playhouse was to build. Read on - once you get the four walls built on the ground, you just stand them, tie in with some roof rafters, and put plywood on top. It really is pretty simple!
PS - The deck plans are here.
from Recent Project Plans https://ift.tt/YIa4LhN
2026年3月26日星期四
If You Can't Find It, Build It // DIY Entryway Console Table
If you are unable to find what you need, consider building it yourself. In this video, I demonstrate how to use standard construction lumber to create a modern entryway table. If you want to build one, grab the free free plana here at https://ift.tt/B9MlAka **** Materials used in this project**** • (2) 2”x8”x8’ southern yellow pine https://ift.tt/2SmGfT6 • (1) 2”x12”x8’ southern yellow pine https://ift.tt/30PJ6SB • (2) Dowel rod https://ift.tt/PrG29NV • (4) Threaded inserts https://ift.tt/PcQMGdF • (4) Screws - 1/4 in.-20 x 2-1/2 in. Zinc Plated Hex Bolt https://ift.tt/r0YOkQ4 • (4) Washers • Paint used (Iron Ore – Emerald satin) • Pre-stain wood conditioner https://amzn.to/4swrePV • Stain (Golden Pecan 245) https://amzn.to/3uA3a61 • Leveling feet (optional) - https://amzn.to/4bGE1ai **** Tools used in this project **** Dowel Jig https://ift.tt/dl4DhSZ Miter saw https://amzn.to/4dGjx4T Circular saw Nail gun https://amzn.to/4t71mtU Hand plane https://amzn.to/4sFxmpe ********** Support my work ********** My Woodworking Plans: https://ift.tt/B9MlAka Help me make more Video: https://ift.tt/boiK83C YouTube: Subscribe & "RING the Bell": http://bit.ly/1PtWJEd Instagram: https://ift.tt/lVeFAS5 Pinterest: https://ift.tt/ZBLiE4Y
from DIY Creators https://www.youtube.com/watch?v=aMTRuqhSiGc
from DIY Creators https://www.youtube.com/watch?v=aMTRuqhSiGc
2026年3月23日星期一
Lightweight Instant Closet Rack or Entryway Organizer
Why I Built this Project
My oldest daughter is moving into her first tiny studio apartment! She can't hang anything on the walls, but needed a coat rack in the entryway. I built this for her, designed to be lightweight and easy to move, inexpensive so its not a forever commitment, but still cute and super functional!
Why We Love this Lightweight Coat Rack or Instant Closet!
- Lightweight - easy to move upstairs or between rooms
- Coat rack without holes in the wall
- Can work as a closet too
- Inexpensive and fast to build
- Wood look is cute and stylish
- Fun and easy project
- Can work in a bathroom too!
How I Built this Project
This was a fun and fast project that I built in about an hour to surprise my daughter. I used a compound miter saw to cut my boards, but you can use a circular saw or even a handsaw to make cuts.

I predrilled all the screw holes first (this is outlined in the plans exactly where to predrill)

Then I assembled the ladder part first. I used a scrap piece of 3/8" plywood to hold the shorter 1x2s up to attach so the shorter 1x2s are centered on the legs. I used glue at all joints.

Then I added the 1x12 shelves. You have to make sure these are attached square.

Then finally attached the third leg to the ends of the 1x12 and top 1x2.

I used Varathane Rustic Brown Aged Wood Accerator product - it is very beginner friendly and creates a neutral wood tone.

Heres completed in the shop, letting the wood stain dry.
I did contemplate adding hooks but this would increase the cost quite a bit. So we left without. Some S hooks on the ladder end could add some functionality to the ends, or even so hanging baskets.

All in all - a great project for an apartment or small room. It is on the smaller side, and is lightweight so it's easy to move around - but the lightweight does make it easy to knock over.
We love how it turned out and my daughter was very thankful and has already packed it off to her first apartment.
Watch! Build Video for This Project
Free Plans to Build Your Own Instant Coat Tree or Closet Organizer!
Ready to build this yourself? Here's the free plans, enjoy!
from Recent Project Plans https://ift.tt/AxtwTea
2026年3月12日星期四
Fence Picket Bench Planter
Why I Built this Project
Spring is my favorite season and I have been wanting to add some flowers to my front porch. I have been seeing this style planter everywhere and thought it was the perfect time to build one!
Why We Love this Fence Picket Bench Planter
- Beautiful and functional – Combines the look of a decorative bench with a built-in planter.
- Made from simple fence pickets – Uses affordable, easy-to-find materials.
- Beginner-friendly build – Straight cuts and simple assembly make it great for new DIYers.
- Budget friendly – A stylish garden feature without spending a lot on lumber.
- Adds instant color – Fill it with flowers to brighten a porch, patio, or garden path.
- Compact design – Perfect for small outdoor spaces.
- Great curb appeal – A charming handmade piece that stands out in the yard.
- Easy to customize – Paint, stain, or plant seasonal flowers to match your style.
How I Built this Project
I started by building the box. I decided to go with a 24" planter box, but it would be easy to modify these plans if you went bigger. (I would recommend cutting the dog ear back portions of the planter first and then making all of your straight cuts.) These illustrations are how I did it because I was figuring it out as I went. Lay the bottom boards down and marry them together with a ripped picket from what is leftover, or scrap 1x2's. I used glue and nails for this entire project.


Then add the 4 sides to the perimeter of the bottom.


Once the box was built, I laid out the two back outside dog-eared uprights, marked them 6" up and set the box on them. I ended up nailing from the inside and then flipping the project over to also nail from the outside.


Once those were attached I added the middle two back pickets. I used a straight edge to make sure they all lined up. Once again, nailing from inside the box and outside.


Then it was time to add the front legs. Measure 6" up and attach from the inside and outside.


Before adding the arms you will want to add the back support. I used a 1x2 scrap, but a ripped fence picket will also work here.

For the arms, I attached the front first and then used my level before shooting the nails to the back side.


Watch! Build Video for This Project
if applicable, embed video here
Free Plans to Build Your Own DIY Fence Picket Bench Planter
Ready to build this yourself? Here's the free plans, enjoy!
from Recent Project Plans https://ift.tt/FWDug3r
订阅:
博文 (Atom)