2025年10月22日星期三
DIY Wooden Christmas Tree Candle Holders – Free Woodworking Plans in Two Sizes
from Recent Project Plans https://ift.tt/l1FQDqa
Art Storage Shelf with Caddies
Hi everyone! Have you been missing the Handbuilt Holiday series that Jaime from That's My Letter and I put together in the weeks leading up to Christmas?
Well, you aren't alone. Jaime and I have been missing it too! So we thought we'd do a monthly gift project until the Holidays come around again this fall.
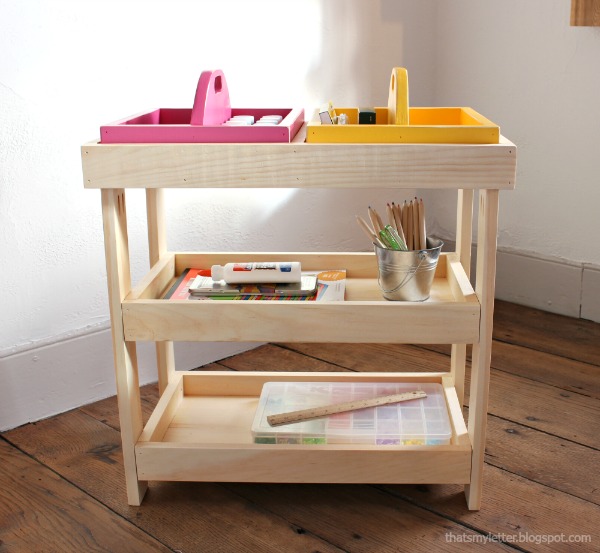
Since we've all got organizing on our minds, Jaime and I picked this little art supplie shelf as our first Handbuilt Holiday project of 2016.
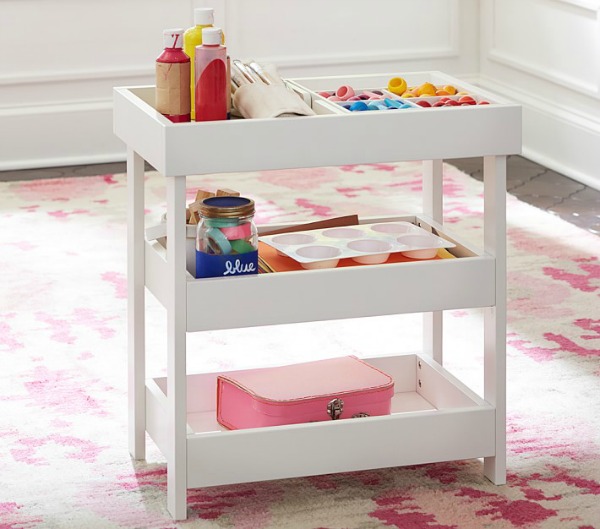
We were inspired by this simple art shelf from Pottery Barn Kids - only our little DIY version is solid wood and cost less than a quarter of the price.

And comes with removeable art caddies that fit on all the shelves!
I've got you covered with the free plans for the shelf below, but right now, please take a second to check out Jaime's build post and get the plans for the art caddies here.
CLICK HERE FOR JAIME'S BUILD POST AND ART CADDY PLANS
from Recent Project Plans https://ift.tt/17jX6i0
Standing Jewelry Holder - Free Woodworking Plan
Looking for a simple and stylish jewelry holder? This DIY wood jewelry holder is perfect for hanging earrings and necklaces, and has a tray underneath for rings and accessories. Made from scraps, it's practically free and with our free tutorial (below) and a few tools, you can make it too.

This jewelry holder plan is part of a holiday series that Jaime Costiglio and I put on each year called Handbuilt Holidays - where we team up to deliver you a new, free gift plan every Friday in the weeks leading up to Christmas.
CLICK HERE FOR MORE PHOTOS AND BUILD TUTORIAL
from Recent Project Plans https://ift.tt/3H60IzA
2025年10月21日星期二
Simple Build Bed Frame in All Mattress Sizes
Why I Built this Project
I wanted to build a solid twin bed for my nephew who is ready for a big boy bed. Ana came up with this plan and it ended up being perfect!
Why We Love this Simple Bed Frame with Headboard
- Clean, modern design with hidden fasteners for a polished look
- Strong and sturdy frame that doesn’t squeak or wobble
- Built completely from basic lumber—no fancy cuts or joinery needed
- Took only a few hours to build start to finish
- Easy to customize with different headboard panels or finishes
- Slat support means no box spring required
- Great weekend project for beginners or anyone short on time
- Budget-friendly and looks store-bought once finished
- Fits perfectly in small spaces, guest rooms, or kids’ rooms
- Super satisfying to build something practical and beautiful from scratch
How I Built this Project
I cut my boards according to the cut list and began assembly (I recommend sanding boards prior to assembly). I started by assembling the legs and side rails. I predrilled to prevent the wood from splitting.


Here is the bed with the added inside 2x2 cleats and the top piece on the headboard. Do you notice there are minimal fasteners showing?

For wider beds (queens, fulls) this center support is needed.

The slats then go on top of the cleats and center. You can see the center leg to support the bed in the middle in the below image.

Sanded and ready for stain!

Here's after the stain!


Watch! Build Video for This Project
BUILD VIDEO COMING SOON
Free Plans to Build Your Own Simple Bed Frame with Headboard
Ready to build this yourself? Here's the free plans, enjoy!
from Recent Project Plans https://ift.tt/p3ZWzfR
2025年10月19日星期日
3 Easy DIY Projects Every Beginner Should Build
I’m sharing 3 easy DIY projects every beginner should build to kickstart their woodworking journey! Whether you’re new to DIY or just looking to create something functional and fun, these beginner-friendly builds are perfect to help you gain confidence in your skills. Plus, I’ll show you how to make them with minimal tools. ☛ Check out Hyper Tough Tools @ Walmart or walmart.com Big thanks to Hyper Tough for sponsoring this video and providing tools designed for everyday makers and DIYers. Let’s get building! ▸ 20V Max Brushless Cordless Drill Driver with -http://bit.ly/4nixt7n ▸ 20V Max Compact Brushless 1/2-inch Impact Wrench - https://bit.ly/46hagMJ ▸ 20V Max Brushless 4.5-inch Cordless Angle Grinder - https://bit.ly/3VZYRuH ▸ 50-Piece T-Handle Driver and Drill Bit Set in Click Fit™ Case - https://bit.ly/4prnE8u ▸ 44-Piece Impact Rated Bit Set in Click Fit Case - https://tinyurl.com/5enj9c5n ▸ 2-Piece Locking Pliers Set- https://bit.ly/3KdVgGV ➡︎ Free Cut list for the shop projects: https://ift.tt/ibocwKA **Materials Used:** Workbench Materials List ■ (1) Workbench Brackets https://amzn.to/4ougAGZ ■ (1) 4x8x3/4 Plywood sheet (Workbench top) ■ (2) 4x4x8 Douglass Fir or pressure treated lumber (Workbench legs) ■ (7) 2x4x8 Lumber ■ (22) 2.5in Screws ■ (14) Figure 8 Hardware https://amzn.to/47kzoBC ■ Masking Tape https://amzn.to/3J6gciW Helping hand & Saw Guide ■ 1x2 lumber ■ Plywood sheet (any thickness) ■ (-) 3/4 inch screws ■ 4 x 4 lumber (cut off from the legs) ********** Support my work ********** My Woodworking Plans: https://ift.tt/IdJbe4F Help me make more Video: https://ift.tt/ZjJW7pV YouTube: Subscribe & "RING the Bell": http://bit.ly/1PtWJEd Instagram: https://ift.tt/Vfo4QqH Pinterest: https://ift.tt/s0fGEQi
from DIY Creators https://www.youtube.com/watch?v=tb2wQ8Ek294
from DIY Creators https://www.youtube.com/watch?v=tb2wQ8Ek294
2025年10月16日星期四
Scrap Wood Pumpkin Riser
Why I Built Pumpkin Riser
I had some scrap wood laying around, so I whipped up this pumpkin riser as a free little project. 🍂 I wanted a festive way to display cookies and treats, and this turned out to be the perfect solution!
Why We Love this Scrap Wood Pumpkin Riser
-
🍂 Budget-friendly – made from scrap wood, so it’s essentially free.
-
🎃 Festive & functional – doubles as seasonal décor and a treat display.
-
🪵 Beginner-friendly build – simple cuts and assembly make it easy to tackle.
-
♻️ Sustainable – a clever way to repurpose leftover wood.
-
✨ Customizable – stain, paint, or decorate to match your fall style.
-
🏡 Versatile use – perfect for cookies, candles, centerpieces, or small décor.
-
🕒 Quick project – can be finished in an afternoon.
How I Built this Project
I searched my scrap pile of 2 x material to find the right lengths for this project. I like that it's easy to customize!

I ripped the rounded edges with my table saw to make joining them more solid.

I ended up using pocket holes for this one, but read to the end to see how i built my second one without pocket holes!

Join the boards together. For pocket hole placement, keep in mind to keep them back from where you will be cutting out the pumpkin shape. Trace a pumpkin shape and cut it out using a jig saw. - It's a great project to practice those jig saw skills.

 Add feet, I just cut 1" pieces of 2x2 material.

AS PROMISED - If you don't want to use pocket holes, you will do everything the same, but you will just screw 1x2's to the back like this. Those will also work as the feet!

Use the same principal as the pocket holes and be sure to keep the 1x2's back a bit so you don't cut through them when cutting out the pumpkin shape. Use glue between the boards and on the 1x2 backs. I used 1.5" trim head screws to attach.


Watch! Build Video for This Project
if applicable, embed video here
Free Plans to Build Your Own Scrap Wood Pumpkin Riser
Ready to build this yourself? Here's the free plans, enjoy!
from Recent Project Plans https://ift.tt/9RdmFIN
2025年10月7日星期二
Ultimate Easy to Build Craft Table
Why I Built this Project
My daughter received a sewing machine and I got a cricut last Christmas. They have been sitting around not being used because there was no place for them, unless we cleared the kitchen table. I wanted to create a permanent home for them and encourage use. On top of those items, my daughter is also into doing nails, so why not make it a nail salon too!
Why We Love this Ultimate Craft Center
-
Multi-purpose design – doubles as both a work desk and a storage hub for sewing, crafting, and DIY projects.
-
Built-in machine space – keeps the sewing machine tucked in neatly but still ready to use at any time.
-
Open shelving – makes it easy to customize storage for larger "tools"
-
Large work surface – provides plenty of room for cutting fabric, assembling crafts, or spreading out projects.
-
Custom storage crates – the wooden pull-out crates add rustic style while holding fabric, yarn, or tools.
-
Dedicated tool spot – the bottom shelf perfectly fits a Cricut (or similar cutting machine), keeping it accessible yet out of the way.
-
Space-saving layout – compact but functional, ideal for a craft room, office corner, or multipurpose space.
-
Sturdy build – wood construction makes it durable for heavy use, whether sewing, painting, or woodworking.
-
Comfortable seating height – paired with a bar-height chair for ergonomic crafting.
-
Stylish look – two-tone finish (natural wood top + painted base) makes it attractive enough to fit into a modern home.
How I Built this Project
The first thing I did was buy the butcher block top and then customized from there. The dimensions are 30" x 48".

From there I went to work designing the towers in Ana's FREE DESIGN TOOL
Using the dimensions of the top, I had a basic layout in mind with the two open shelves on each side, but I wanted to add a small tower for the "nail salon items", so for that portion I used 1x8 boards. The design tool works with multiple dimensions, but took a little figuring for that portion because the minimum width of the tool is 12.5" and that needed to be 11.25", not a big deal, it still helped with spacing and layout, I just made notes on the printable pdf about that portion to reference while building it.
So I got to work on the 3 towers that would support the top, designed with custom spacing for the sewing machine, Cricut and storage crates. The design tool allows you to print your diagrams making it easier to work from. So I cut all of my pieces and prefinished the boards before assembly.
I love how it works to minimize scraps!
I used pocket holes for assembly and for the smaller 1x8 portion just screwed it into the side that it matched up with.


I set the top on to ensure everything worked properly, it did!

Once I had everything set, it was time to finish the top. I loved the natural color so just decided to use poly. I did a light sanding and added 3 coats of poly, sanded and wiped with tack cloth between sanding.


Before attaching the tabletop, I added bay supports to the top of each tower for something to attach the drawer slides to, then I set the top and attached the it by screwing up from the bottom from each tower.


After the top was attached it was time to start on the drawers, I had some 16" and 10" drawer slides on hand so I just used those, which worked out perfect! For the easiest way to install drawer slides, this is the method I used - Ana's Secret Drawer Slide Trick
Remember those bay supports? I used those to attach the drawer slides to.


After the drawers were installed I painted the drawer faces, added a drawer liner and hardware!


The wood crates were the final DIY touch. I like to build my crates out of fence pickets because they are inexpensive and easy to customize! Here is a simple crate tutorial to check out!


Watch! Build Video for This Project
Video coming soon
Free Plans to Build Your Own Ultimate Craft Station
Ready to build this yourself? Here's the free plans, enjoy!
from Recent Project Plans https://ift.tt/qEKdcG5
订阅:
评论 (Atom)