My daughter works at a coffee shop, and they just opened an eat-in area. We wanted to help, so we built these menu holders for all the tables. I spent about a dollar on each and made fifteen. If the owner had to buy each one for $20, they'd have spend $300! We are glad we could help out.
Why We Love these Menu Stands for Tabletops
Menus holders are designed to fit either full 8.5" x 11" cardstock, or cut in half either vertically or horizontally, so you can print menus at home
The menu holder stands are designed to stay upright by design, with the base weight heavier
You can stain or paint any color
So cute, would be fun to have even at home!
How I Built this Project
Here's the basic steps that I took to build my menu holders
I ran the full length 1x2s through the tablesaw to make the grooves. Then I cut the boards to the lengths needed in the cut list.
Then sand the boards smooth.
Marked the placement of the legs and added glue.
Attached the 1x3 base to the 1x2s.
Then just slid the menus in.
Watch! Build Video for This Project
VIDEO COMING SOON
Free Plans to Build Your Own Menu Stands!
Ready to build this yourself? Here's the free plans, enjoy!
I love the simplicity and comfort of a sturdy, well built wood bed frame. But bed frames can easily cost $500-$1000 or more! Why not build your own? For a fraction of this cost, you could have a beautiful, custom solid wood bed frame!
Our DIY Wood Bed Frame Benefits
Sturdy and solid for comfort and long term durability
Easy to adjust in size
Paint or stain any color
No box spring required
No bed skirt required
Video Tutorial for Building this Bed Frame
Here is a video tutorial of me building this bed frame.
Free Bed Plans Brought to You by Kreg Tool
This post is sponsored by Kreg. Honestly, this project wouldn’t be possible without the miracle tool that is the Kreg Jig. If you want perfect pocket holes every time, you need one of these in your toolbox!
Ready to build your own? The free step by step tutorial is below.
Thank you for using my plans, we appreciate the support and trust.
Looking for the BEST DIY-friendly way to upgrade your closet on a budget? My free modular closet system set of plans has you covered:
Fully customizable — mix and match six different modules to fit your space and style
Super beginner-friendly — all units built from easy-to-find 1x12 boards
Budget-friendly — way cheaper than buying! No need to spend thousands on a closet!
Simple to build and install — French cleat system makes hanging a breeze
Free plans with diagrams, cut lists, and step-by-step video tutorials
Works for small closets, big walk-ins, or anywhere you need organized storage
Designed to fit 11" cube storage bins!
It’s hands-down the easiest and most affordable way to get a custom closet look without the custom price tag. I love this method SO much that I've already built it 3 different times!
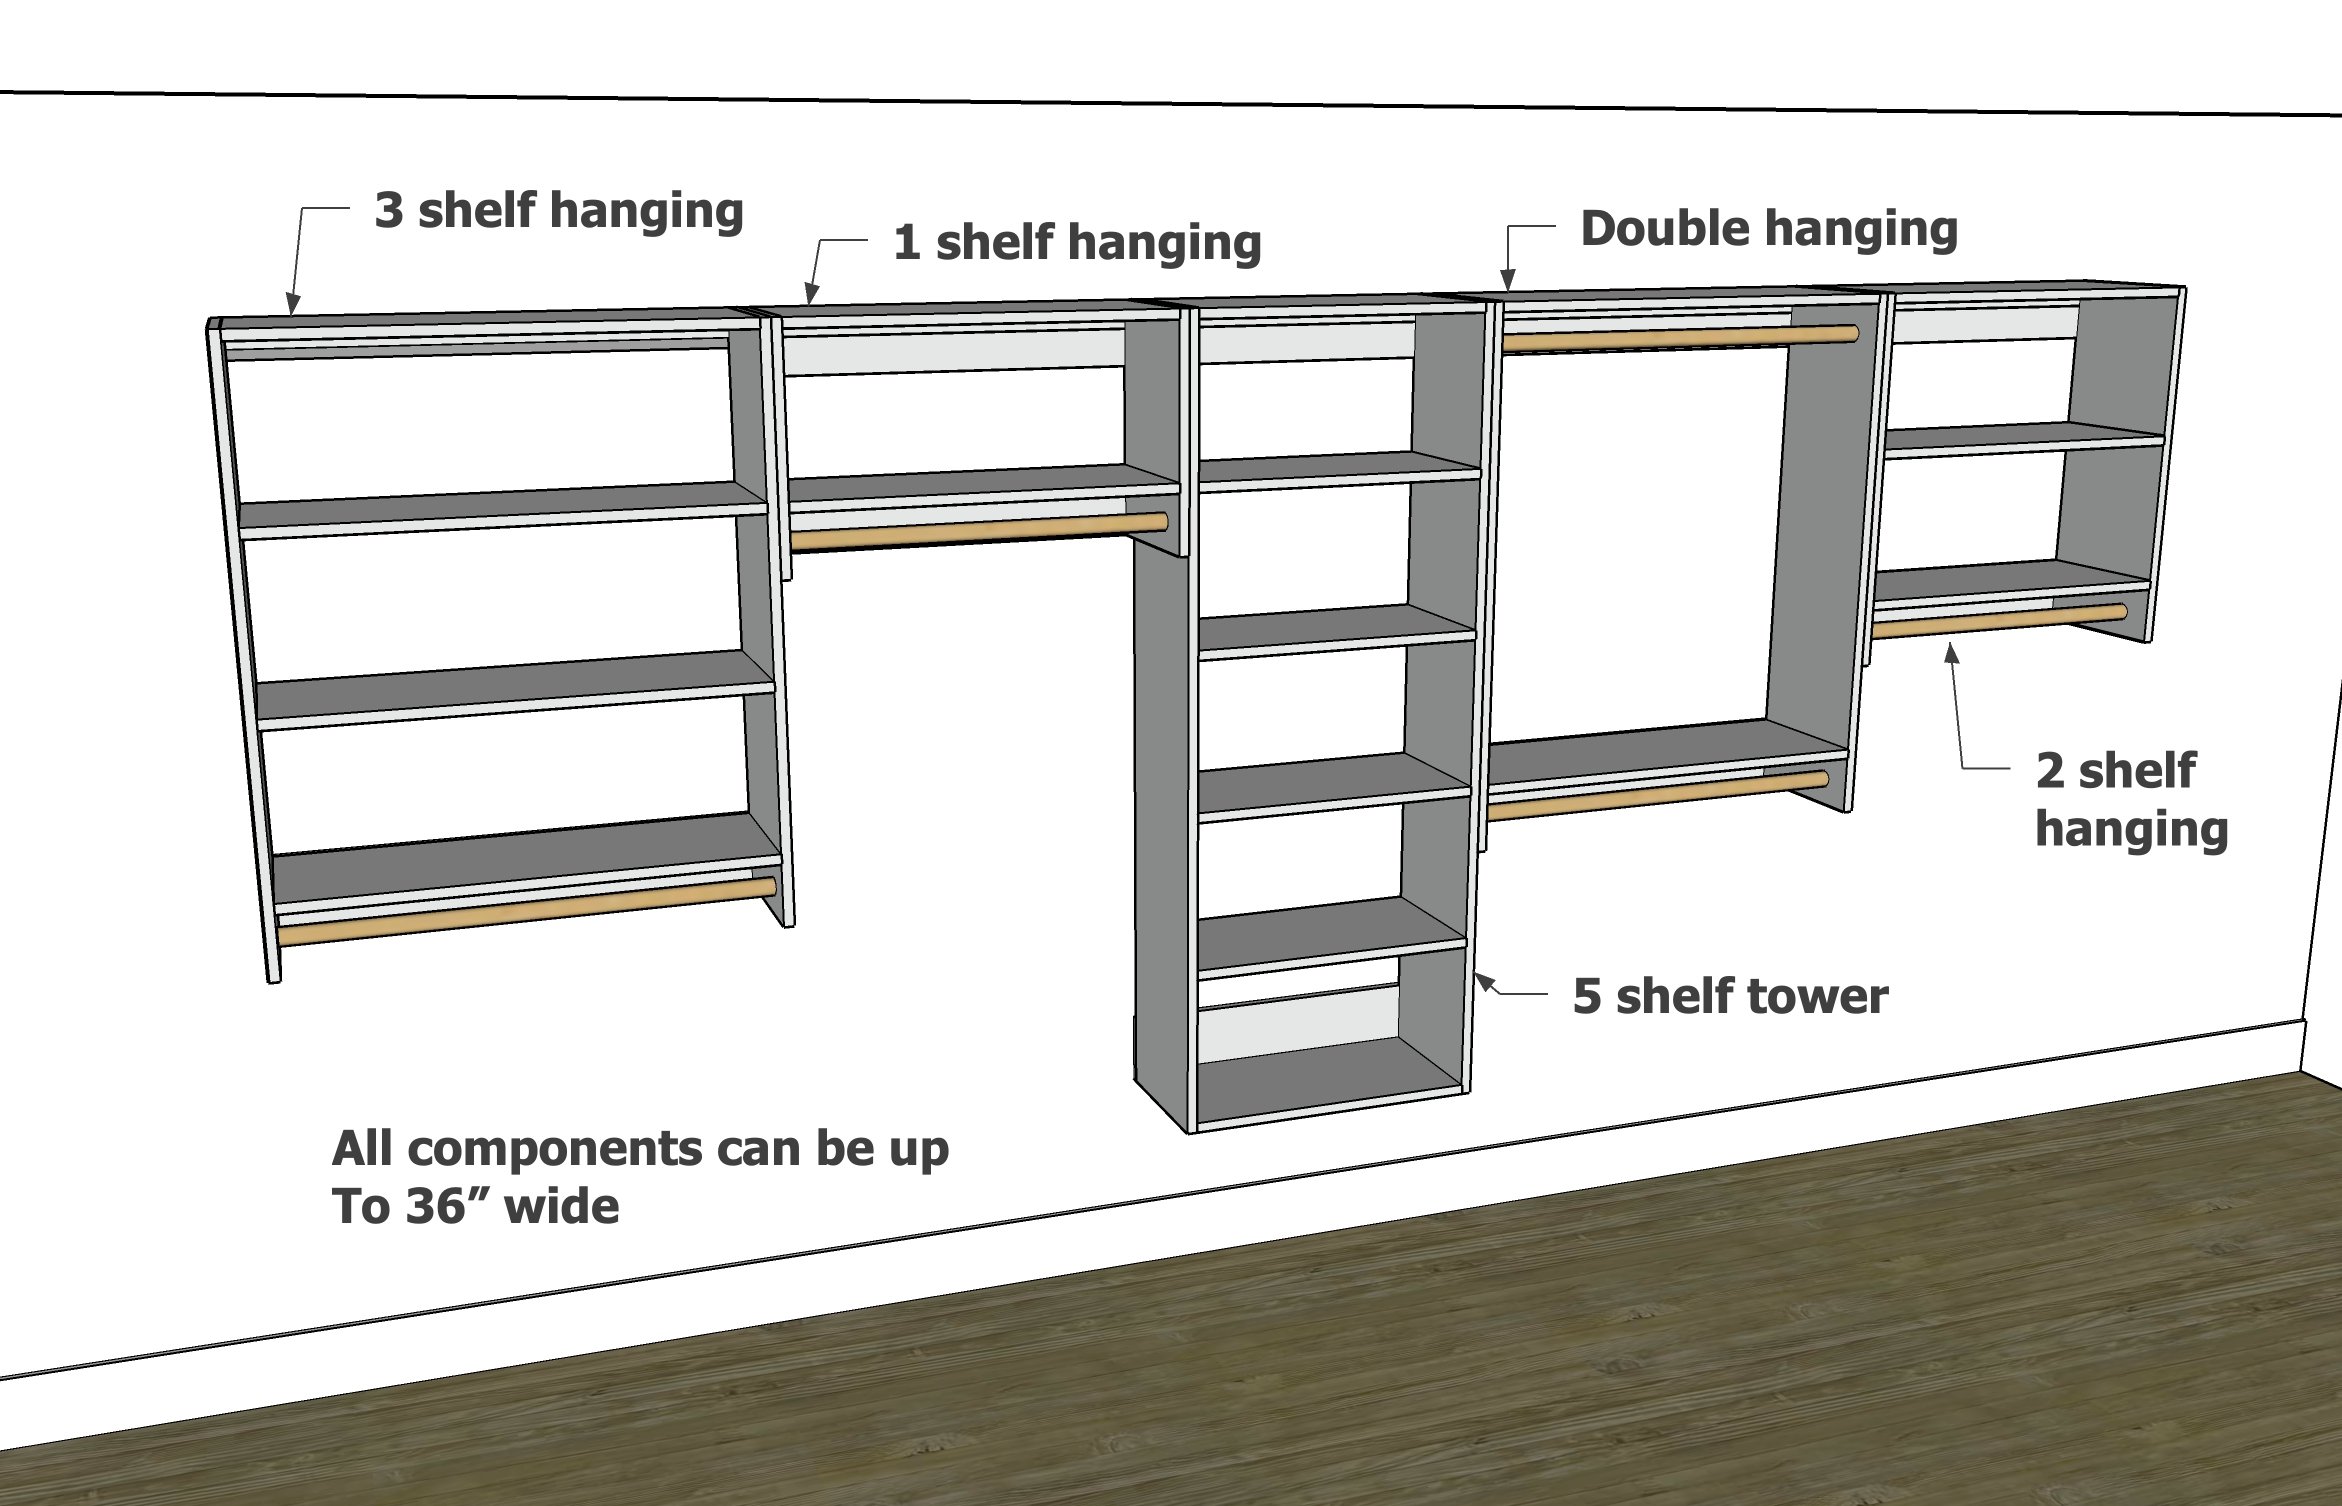
shown in closet double hanging and 3 shelf hanging closet components
shown with one 5 shelf tower and two 1 shelf hanging
Modular Closet Components
By using different organizers (that you can adjust in width), you can create the closet of your dreams! Here are the standard modular closet components.
All of the components are constructed with the same steps, the only difference is the length of the sides and the number of shelves.
Printable Configuration Guides
If you prefer to print and figure directly, we've made up printable diagrams to guide you through creating your own components for a modular closet.
Follow the construction steps below, but use the diagrams linked below to come up with your cut lists.
Filler Top Piece - Good for filling in between organizers at the top, full length hanging
Measuring & Planning Your Closet Components
Before you start cutting boards, take a few minutes to plan your closet layout. A little prep goes a long way!
Measure your closet carefully – Take note of the total width, height, and depth.
Leave 1" of wiggle room – Always subtract about an inch from the total width to make installation easier, especially if you’re building wall-to-wall.
Plan for hanging vs. shelving – Think about what you’ll be storing. Need double hanging for shirts and pants? Or more shelf space for bins and shoes? You can mix and match the units to fit your needs.
Stick to standard shelf sizes – Each shelf fits 11" deep storage cubes, so aim for widths like 24" or 36" to keep things simple and efficient.
Sketch your layout – A quick drawing (even on paper) helps visualize how the components will stack and fit in your space.
Taking time to plan ensures your closet not only looks great, but functions perfectly for your daily life!
Installing - We Thought of That Too
Hanging this closet system was designed into this plan, considering how can we make this easy on you too.
Just cut a 1x3 board to the full length of your closet, and attach it to the back wall to studs in the wall, with the bottom of the cleat at 72" (or as desired). Then just set the organizers on the 1x3, so the 1x6 back piece sits on top, and then screw the organizers to studs in the wall. This way you can hold the organizers in place, match them all up, and make sure everything is hung level!
Considerations Before Building
I absolutely love my closet organizers, but want to help you make the best decision for your closet space, so here's a few things to consider:
1x12 depth is not super deep, so folding adult pants or large sweaters on the narrower shelf depth may not fit well
The 1x12 depth is not ideal for adding drawers, as the drawers would be shallow. It would be better to add a floor standing dresser underneath a component
The sides are not completely enclosed, not a problem for a closet, but if freestanding, this could be visible
If you are looking for a fancy built in, this is not it. This is a practical and cost effective system!
Modular Closet Build Video
I have built this closet plan in full closet systems three times now. It is my go-to plan for easy to build closets (and easy to hang). In this video, I built using a French cleat hanging system (but it is not necessary to hang with the French cleat, you can use the 1x6 method as instructed in the plans).
Looking for the BEST DIY-friendly way to upgrade your closet on a budget? My free modular closet system set of plans has you covered:
Fully customizable — mix and match six different modules to fit your space and style
Super beginner-friendly — all units built from easy-to-find 1x12 boards
Budget-friendly — way cheaper than buying! No need to spend thousands on a closet!
Simple to build and install — French cleat system makes hanging a breeze
Free plans with diagrams, cut lists, and step-by-step video tutorials
Works for small closets, big walk-ins, or anywhere you need organized storage
Designed to fit 11" cube storage bins!
It’s hands-down the easiest and most affordable way to get a custom closet look without the custom price tag. I love this method SO much that I've already built it 3 different times!
shown in closet double hanging and 3 shelf hanging closet components
shown with one 5 shelf tower and two 1 shelf hanging
Modular Closet Components
By using different organizers (that you can adjust in width), you can create the closet of your dreams! Here are the standard modular closet components.
All of the components are constructed with the same steps, the only difference is the length of the sides and the number of shelves.
Printable Configuration Guides
If you prefer to print and figure directly, we've made up printable diagrams to guide you through creating your own components for a modular closet.
Follow the construction steps below, but use the diagrams linked below to come up with your cut lists.
Filler Top Piece - Good for filling in between organizers at the top, full length hanging
Measuring & Planning Your Closet Components
Before you start cutting boards, take a few minutes to plan your closet layout. A little prep goes a long way!
Measure your closet carefully – Take note of the total width, height, and depth.
Leave 1" of wiggle room – Always subtract about an inch from the total width to make installation easier, especially if you’re building wall-to-wall.
Plan for hanging vs. shelving – Think about what you’ll be storing. Need double hanging for shirts and pants? Or more shelf space for bins and shoes? You can mix and match the units to fit your needs.
Stick to standard shelf sizes – Each shelf fits 11" deep storage cubes, so aim for widths like 24" or 36" to keep things simple and efficient.
Sketch your layout – A quick drawing (even on paper) helps visualize how the components will stack and fit in your space.
Taking time to plan ensures your closet not only looks great, but functions perfectly for your daily life!
Installing - We Thought of That Too
Hanging this closet system was designed into this plan, considering how can we make this easy on you too.
Just cut a 1x3 board to the full length of your closet, and attach it to the back wall to studs in the wall, with the bottom of the cleat at 72" (or as desired). Then just set the organizers on the 1x3, so the 1x6 back piece sits on top, and then screw the organizers to studs in the wall. This way you can hold the organizers in place, match them all up, and make sure everything is hung level!
Considerations Before Building
I absolutely love my closet organizers, but want to help you make the best decision for your closet space, so here's a few things to consider:
1x12 depth is not super deep, so folding adult pants or large sweaters on the narrower shelf depth may not fit well
The 1x12 depth is not ideal for adding drawers, as the drawers would be shallow. It would be better to add a floor standing dresser underneath a component
The sides are not completely enclosed, not a problem for a closet, but if freestanding, this could be visible
If you are looking for a fancy built in, this is not it. This is a practical and cost effective system!
Modular Closet Build Video
I have built this closet plan in full closet systems three times now. It is my go-to plan for easy to build closets (and easy to hang). In this video, I built using a French cleat hanging system (but it is not necessary to hang with the French cleat, you can use the 1x6 method as instructed in the plans).
Watch how I install a shade canopy step by step. Easy and clear instructions to help you do it yourself. Thanks to Groundworks for sponsoring this video. Schedule your FREE inspection at https://ift.tt/TWJSPvs My Woodworking Plans: https://ift.tt/hoEIKuv New here? Subscribe to my YouTube channel & "RING the Bell": http://bit.ly/1PtWJEd Materials Used (Affiliate Links) : • I used products from Colour Tree https://amzn.to/3T62vlr • 22x24 Super Ring Shade - https://amzn.to/3ZrG11L • Poles - https://amzn.to/3ZrG11L • Super Ring Hardware Kit - https://amzn.to/4mW15ro • Winch Hardware Kit - https://amzn.to/4mW6kan • (-) bags of 80lb of concrete https://ift.tt/ZzW3fUo • (-) 2 by 8 pressure-treated lumber Lumber size for each form (2) 24in (2) 27in Notes: The concrete pad size is 24in by 24in by 36in deep, approx. Tools used (Affiliate Links) : • Concrete mixer (Mudmixer) https://amzn.to/3BhBJAU • Metal Screed https://ift.tt/slfcRyj • Float https://amzn.to/3ZtDULO • Finishing trowel https://amzn.to/3TyvgIe • Concrete Edger https://amzn.to/4djvaLC Shovel FAQ: Camera Gear 1. Camera - https://amzn.to/40jXNEv 2. Mic - https://amzn.to/2FOI0nA and https://amzn.to/3888i09 3. Lights https://amzn.to/3aeLVIg 4. Tripod https://amzn.to/2RoIx5f 5. Software Adobe Premiere Pro ********** Support my work ********** My Woodworking Plans: https://ift.tt/hoEIKuv If you'd like me to make more videos: https://ift.tt/FLwfgh3 YouTube: Subscribe & "RING the Bell": http://bit.ly/1PtWJEd Instagram: https://ift.tt/FTbxMqS Pinterest: https://ift.tt/Hog6tUX
from DIY Creators https://www.youtube.com/watch?v=cBKAYlAVqXo
Building your own 1x12 pine bookshelves is the perfect way to get affordable, custom-fit storage for any room in your home. These DIY bookshelves are easy to build—even for beginners—using simple pine boards and basic tools. With our free online bookshelf configurator, you can design the perfect size, get a custom cut list, and follow step-by-step diagrams and instructions.
Pine is a solid wood that’s strong, beautiful, and ready for your favorite paint or stain, so you get a finished piece that’s both durable and perfectly matches your style.
Our exclusive, beginner-friendly bookshelf plans make the process stress-free, with everything you need for success—free custom configurator, pro tips, printable diagrams, and real photos. Whether you’re looking for a low-cost storage solution, want to create a built-in look, or just enjoy the satisfaction of building it yourself, these pine bookshelf plans deliver big results without the hassle or high price tag. Design, build, and customize your own pine bookshelves today!
How to Use this Plan
We wanted you to be able to easily create a bookshelf in just about any size! So this plan uses a free bookshelf configuration tool, just input your desired dimensions and the configurator will give you a diagram and cut list.
Use the cut list to determine your materials needed.
Scroll further down for step by step instructions on how to build and finish your bookshelf.
Looking for a super fun weekend project that’s easy, budget-friendly, and guaranteed to bring joy to your backyard? These DIY lightweight cornhole boards are the perfect solution! Designed with beginners in mind, they use minimal tools, affordable materials, and simple construction techniques—making them a great build for anyone, even if you’re new to woodworking.
Lightweight and Easy to Handle
What makes these boards truly awesome is how lightweight and portable they are. Traditional cornhole boards can be heavy and hard to carry, but this design uses 1x3 framing and 1/2" plywood, which keeps things strong but much easier to move around. Take them to picnics, BBQs, tailgates, or just set them up in the backyard—no hassle!
Super Affordable to Build
You can build four full-size boards from a single sheet of plywood and a few furring strips—keeping your cost per board under $25. That’s way cheaper than buying a set, and way more satisfying to build with your own two hands.
Customize Your Way
This is where the fun really begins. These boards are a blank canvas for creativity!
Paint them your favorite team colors
Stain for a rustic or modern finish
Let the kids decorate with stencils or handprints
The smooth plywood top takes paint or finish beautifully, so you can totally make them your own.


