2025年4月28日星期一
2025年4月27日星期日
DIY Foldable Wood Bath Tray – Custom Fit for Any Tub


How I Built this Bath Tray
I used reclaimed wood boards and a smile hinge to build this bathtub table. All I did was measure the tub and determine how big I wanted to build the bath tray. Then I cut two 1x6 boards and one 1x2 board to the desired length. I nailed the 1x2 to one of the 1x6s. I stained all the boards and added a clear polyurethane to protect from moisture. Then I hinged the two 1x6 boards together.
Video Showing Building this Bath Tray
Here's a quick video showing the basic steps I did to build this bath tray.
Free Plans to Build Your Own Fold Up Bath Tray
Ready to build this yourself? Here's the free plans, enjoy!
from Recent Project Plans https://ift.tt/HJ1LPwR
2025年4月25日星期五
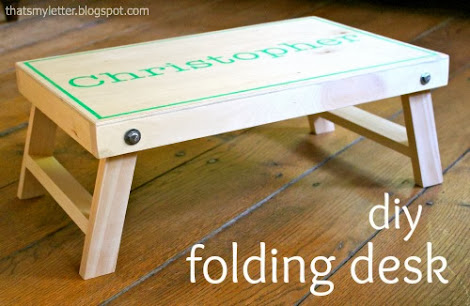
Folding Tray or Lap Desk Free Woodworking Plan
Folding Lap Desk – Breakfast, Work, TV & More
This folding table is built for real life. Whether you're working from bed, enjoying breakfast and coffee on a lazy morning, or giving the kids a spot for homework and crafts on the floor, this versatile lap desk fits right in. Lightweight but sturdy, it folds flat when you're done and sets up in seconds.
- Ideal for use as a bed tray, TV tray, or laptop desk
- Doubles as a kids’ floor table for art and schoolwork
- Clean, modern design fits any room
- Easy DIY build from scrap wood (1x2 legs + ¼" plywood top)
- Lightweight, foldable, and easy to store
Simple, functional, and endlessly useful—this is the table you didn’t know you needed.
Why We Built this Folding Lap Tray Desk
This little tray table, lap desk can be used in a variety of ways! I teamed up with my friend Jaime Costiglio to make these plans for kids to use a floor desks.
It's a little lap desk,
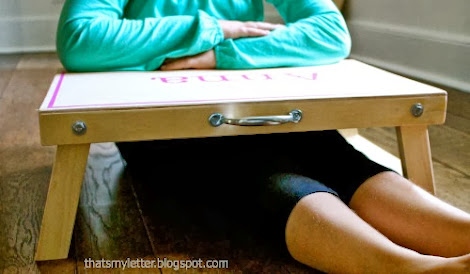
Perfect for creativity, playing school, family movie night, or tea parties in bed.

Make sure you check out Jaime's building post here for more photos and build photos.
from Recent Project Plans https://ift.tt/Bkd2XPn
2025年4月21日星期一
DIY Dovetail Beam Console Table – Free Plans
Why I Built this Project
I have a pretty boring space in an entryway that needed something BIG and BOLD but I didn't want to spend thousands buying a console table... So I decided to build my own inspired by the trendy bulky accent tables that are the obsession right now. I know this style furniture is a fleeting fashion statement right now, so instead of spending $1900 on buying or $500 using hardwood, I built THIS CONSOLE table with 7 1x8 boards, about $150 total to build.


Why I Love this Dovetail Beam Console Table
- Bold beam style adds style to a space
- Lightweight and easy to move
- Create that timber look without the timber house
- Just seven 1x8 boards to build
- Built by myself in three hours
- Finish in any color stain of choice
- Build the entire collection with free plans from Ana White
How I Built this Project
I started by making miter cuts for building the top and side panels. I set my saw to a 45 degree bevel and cut the miter cuts.

For the main joinery, I am using Kreg Pocket Holes. I have the Kreg Foreman and love it! Makes joinery fast and easy!

The top and the two sides are 1x8s joined together edge to edge, or a flat joint. I use a vertical method for minimal clamps and more control over both sides of the joint.

Once the panels are joined together, then I attached the top to the two outside leg panels. I added some blocking in to reinforce this joint.

Then, I cut the leg fronts and attach with 1-1/4" brad nails and wood glue, making sure all outside edges are flush (this is important, as this squares up the top and side joints).

Here's the two front legs added.

Then I cut to fit the front board and attached it to the top with brad nails and glue.

On the inside, I also attached with pocket hole screws.

Then I built the two inside panels using my Kreg Jig, and attached the panels inside the legs with 1-1/4" brad nails and glue. I also used pocket holes to attach the inside leg panels to the underside of the tabletop.

I then filled holes with wood filler and sanded the entire project, working in the direction of the wood grain.

Now for the dovetail look - I marked out with a pencil, and then used a small chisel along a straight edge to create a groove where a joint would be.

Then I used the chisel to make lines to look like the wood grain is an end grain. This will also accept more stain and be a darker color.

Then I applied Varathane Hazelnut stain to the entire project. See how the color is darker where I used the chisel?

Watch! Build Video for This Project
Video coming soon
Matching Coffee Table? End Table Plans? Yes, We Have Them! Build the Entire Collection
I loved this plan so much, I designed plans for the entire collection! If you were to buy the console table, coffee table, and two end tables, you could spend as much as $6000!!! This is crazy, especially for a trendy set that will go out of style in 10-20 years. You can build the entire set for under $1000! Here's the entire collection as a premium bundle.
Recommended: Get the Premium PDF Plan Bundle

Want all the Dovetail Beam accent table furniture plans in one place? No ads, premium formatting, easy to access, save and print.
Free Plans to Build Your Own Dovetail Beam Console Table
Ready to build this yourself? Here's the free plans, enjoy!
from Recent Project Plans https://ift.tt/a4g3QvE
DIY Dovetail Beam Console Table – Free Plans + Video Tutorial
Why I Built this Project
I have a pretty boring space in an entryway that needed something BIG and BOLD but I didn't want to spend thousands buying a console table... So I decided to build my own inspired by the trendy bulky accent tables that are the obsession right now. I know this style furniture is a fleeting fashion statement right now, so instead of spending $1900 on buying or $500 using hardwood, I built THIS CONSOLE table with 7 1x8 boards, about $150 total to build.
Why I Love this Dovetail Beam Console Table
- Bold beam style adds style to a space
- Lightweight and easy to move
- Create that timber look without the timber house
- Just seven 1x8 boards to build
- Built by myself in three hours
- Finish in any color stain of choice
- Build the entire collection with free plans from Ana White
How I Built this Project
I started by making miter cuts for building the top and side panels. I set my saw to a 45 degree bevel and cut the miter cuts.
For the main joinery, I am using Kreg Pocket Holes. I have the Kreg Foreman and love it! Makes joinery fast and easy!
The top and the two sides are 1x8s joined together edge to edge, or a flat joint. I use a vertical method for minimal clamps and more control over both sides of the joint.
Once the panels are joined together, then I attached the top to the two outside leg panels. I added some blocking in to reinforce this joint.
Then, I cut the leg fronts and attach with 1-1/4" brad nails and wood glue, making sure all outside edges are flush (this is important, as this squares up the top and side joints).
Here's the two front legs added.
Then I cut to fit the front board and attached it to the top with brad nails and glue.
On the inside, I also attached with pocket hole screws.
Then I built the two inside panels using my Kreg Jig, and attached the panels inside the legs with 1-1/4" brad nails and glue. I also used pocket holes to attach the inside leg panels to the underside of the tabletop.
I then filled holes with wood filler and sanded the entire project, working in the direction of the wood grain.
Now for the dovetail look - I marked out with a pencil, and then used a small chisel along a straight edge to create a groove where a joint would be.
Then I used the chisel to make lines to look like the wood grain is an end grain. This will also accept more stain and be a darker color.
Then I applied Varathane Hazelnut stain to the entire project. See how the color is darker where I used the chisel?
Watch! Build Video for This Project
Video coming soon
Free Plans to Build Your Own Dovetail Beam Console Table
Ready to build this yourself? Here's the free plans, enjoy!
from Recent Project Plans https://ift.tt/1AhRptE
2025年4月16日星期三
Free Bunny Basket Tote Woodworking Plan
How I Built this Bunny Shaped Wood Toolbox
This is a fun project! Here's how I built it:

I did not buy ANY supplies for this project - the ends are made of 1/2" thick plywood scraps. I used the 1/2" plywood because it's lighter weight than 3/4", but still strong enough for those bunny ears to not just bust right off (like 1/4" might). The sides are cedar fence picket pieces - I used them because its what I had on hand, but a 1x6 or plywood scrap would do. The bottom is then just 1/4" plywood scraps. And the handle is a broken shovel handle.
I started this project by taking the 1/2" plywood pieces, and cutting in a rectangle to the size of the bunny face.

Then I used a paint can to trace the round head and free hand drew the ears - they are not the same. If you would like to use a perfect pattern I made one for you here.

Now the fun part - jigsawing it out! I got a little off on my lines, but since my lines are freehand anyway, what's the difference between free jigsawing, right?
NOTE: I was okay with my cuts not being super smooth since I'm using scrap wood and mixed materials, but try a laminate blade for cutting with a jigsaw to prevent plywood from splintering off as you cut.

Since I'm just stapling the whole project together (I used 1" staples), glue is essential. I was pretty generous with the glue. I used Elmer's Pro Bond Advanced - my kids can be pretty rough on their stuff, I need all the help I can get with a glue.

And then just stapled the ends to the sides. Sorry for the blurry photo. It's not easy to take a selfie while nailing.

Then more glue, more staples, to finish off the back side. Haha, back side.

And then I added the bottom with lots more glue and 1" staples.
For the finish, my daughter's favorite color is turquoise, but I didn't want a paint. So I went with this beautiful stain by Varathane in Vintage Aqua

Starting with the inside, I stained outward with a foam brush, wiping afterwards with a paper towel.

This is why you use stain. Because you can still see the wood grain.
Isn't this color gorgeous?
Before I forget - the handle is an old shovel handle that was broken. I just cut it to fit and glued and stapled it in place.

Now for the tail. I made up a pom pom out of yarn, and just used craft glue to attach it to the back of the project.

You gotta have a fluffy tail on a bunny!

All done ...
So I thought. I made this Easter basket for my daughter,

Looks like I'll be making a smaller version too.
If you love this, please share and pin!

Have an awesome weekend! Bust out some bunny baskets!
XO Ana
from Recent Project Plans https://ift.tt/kvOAqLx
订阅:
评论 (Atom)