2025年12月29日星期一
2025年12月27日星期六
New! Ad-Free PDF Plans Now Available on Etsy / Shop.Ana-White.com
from Recent Project Plans https://ift.tt/s2MY6Uv
2025年12月24日星期三
Under Cabinet LED like a pro (no visible wires)
In this video, I show you exactly how to install under-cabinet LED lighting with a professional, clean finish—meaning zero visible wires. Whether you are remodeling your kitchen or just want a quick weekend upgrade, this step-by-step guide covers a clean install of under cabinet LED light strip. Material used • 12-volt LED strip https://amzn.to/4pUF9xW • LED Transformer: https://amzn.to/49qrWXM • LED extension wires https://amzn.to/4qjKrCQ • 14/2 Electrical wire https://amzn.to/4pUF9xW • Screwless plates https://amzn.to/3KdjSzT • Decora Wall switch https://amzn.to/4jakUJT • Electrical Workbox https://amzn.to/4jiYGWs • B-Connectors https://amzn.to/45dKUOO
from DIY Creators https://www.youtube.com/watch?v=KX32w8fOUII
from DIY Creators https://www.youtube.com/watch?v=KX32w8fOUII
2025年12月22日星期一
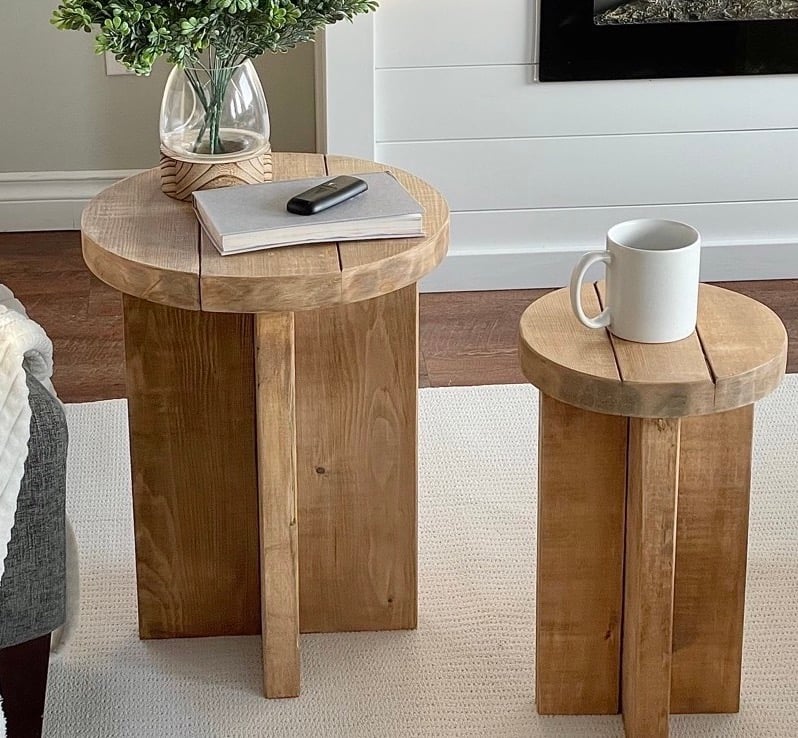
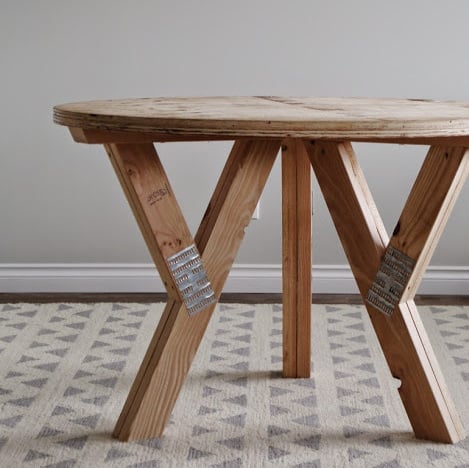
2x6 Angled Leg Pedestal Base (Any Size)
Why I Built this Project
We needed a card table. I had been hoarding a 48" round table base. I had a 2x6 on hand and used it to make this table in a pinch. Turned out pretty great!


Watch! Build Video for This Project
from Recent Project Plans https://ift.tt/6s7TZjW
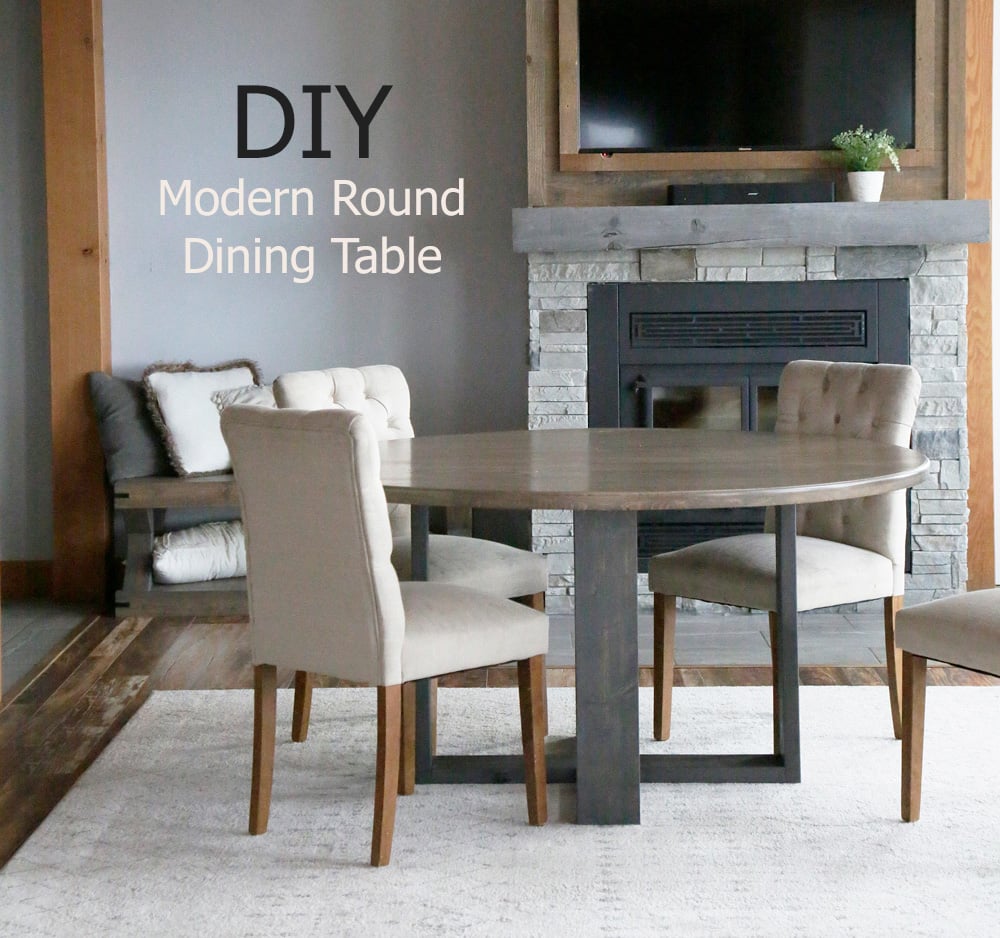
Round Tabletop Configurator and Free Plans with Video
We switched over to a round dining table a couple of years ago, and we have LOVED it. Not only does it feel cozy and comfortable with just our family of five, but it's easy to squeeze in 8-10 around it for gatherings. It is truly so versatile!
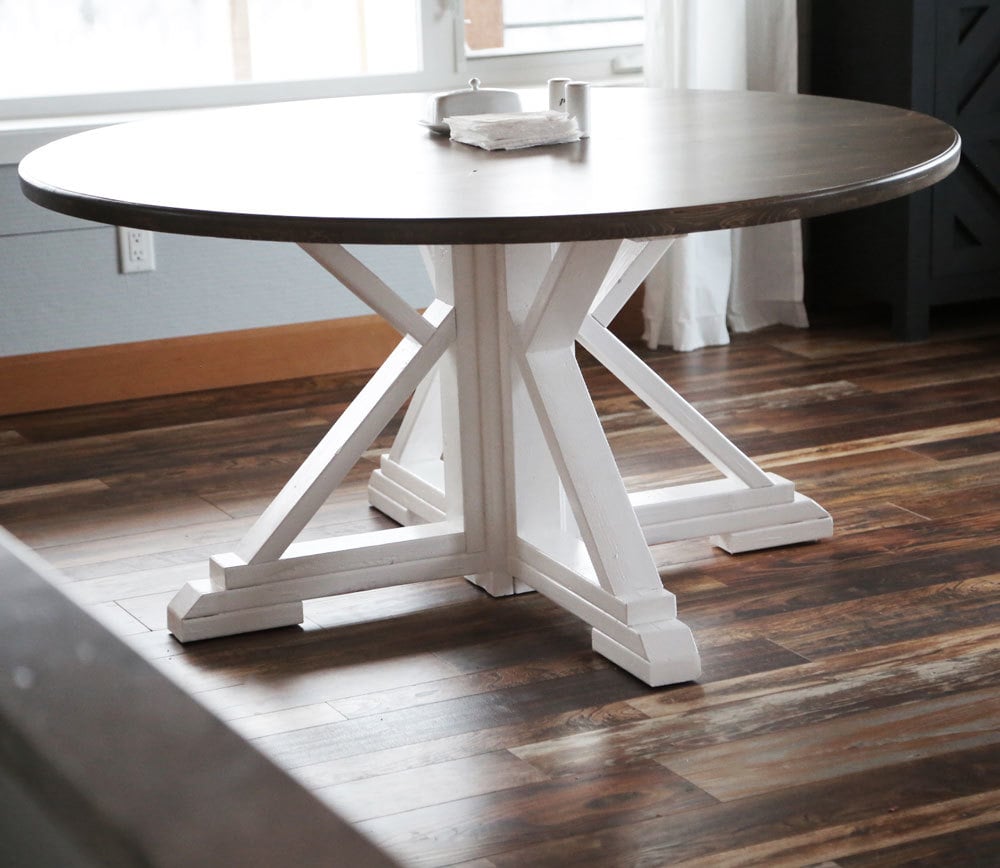
We built our own round table top, and it has held up extremely well over the last several of years, despite heavy use from a family that lives, works and homeschools on this very table. The photo in this post was taken after FIVE YEARS of use - it still looks brand new!
My method of building round table tops has held up well, and I'm confident to recommend it.
Video Tutorial - Watch Us Build This Round Tabletop
Here's how to build your own round table top.
How to Make the Circle Jig for Cutting Circles with a Circular Saw
Want to make the jig for cutting circles with a circular saw? Here's the free plans and video tutorial.
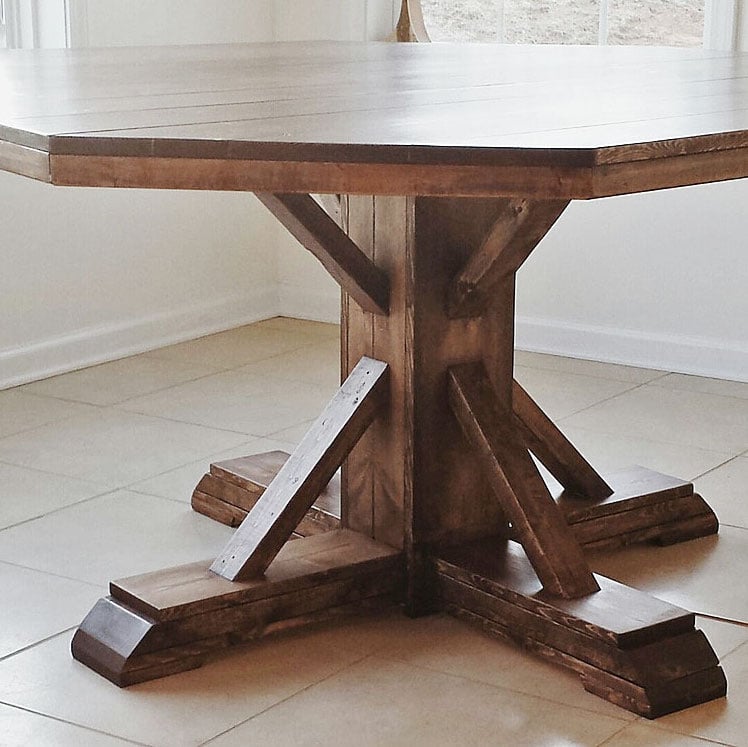
Free Plans for Round Dining Table Bases to Match
This post is for the tabletop. You can get creative with a base, or use one of my free patterns. I have many dining table base plans - I keep the top and switch out the base when I want to update my dining room.
Click on any of the base images below to get the free plans.
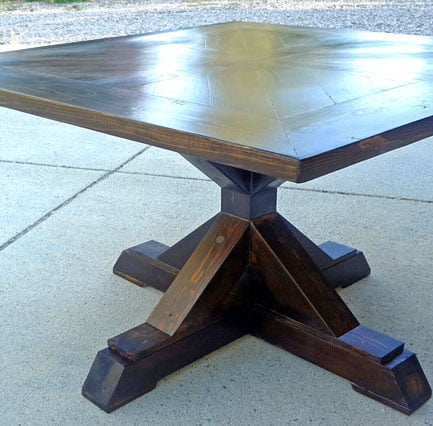
How Big Does the Base Need to Be?
Generally speaking, the dining table base should be at least half the diameter of the table top.
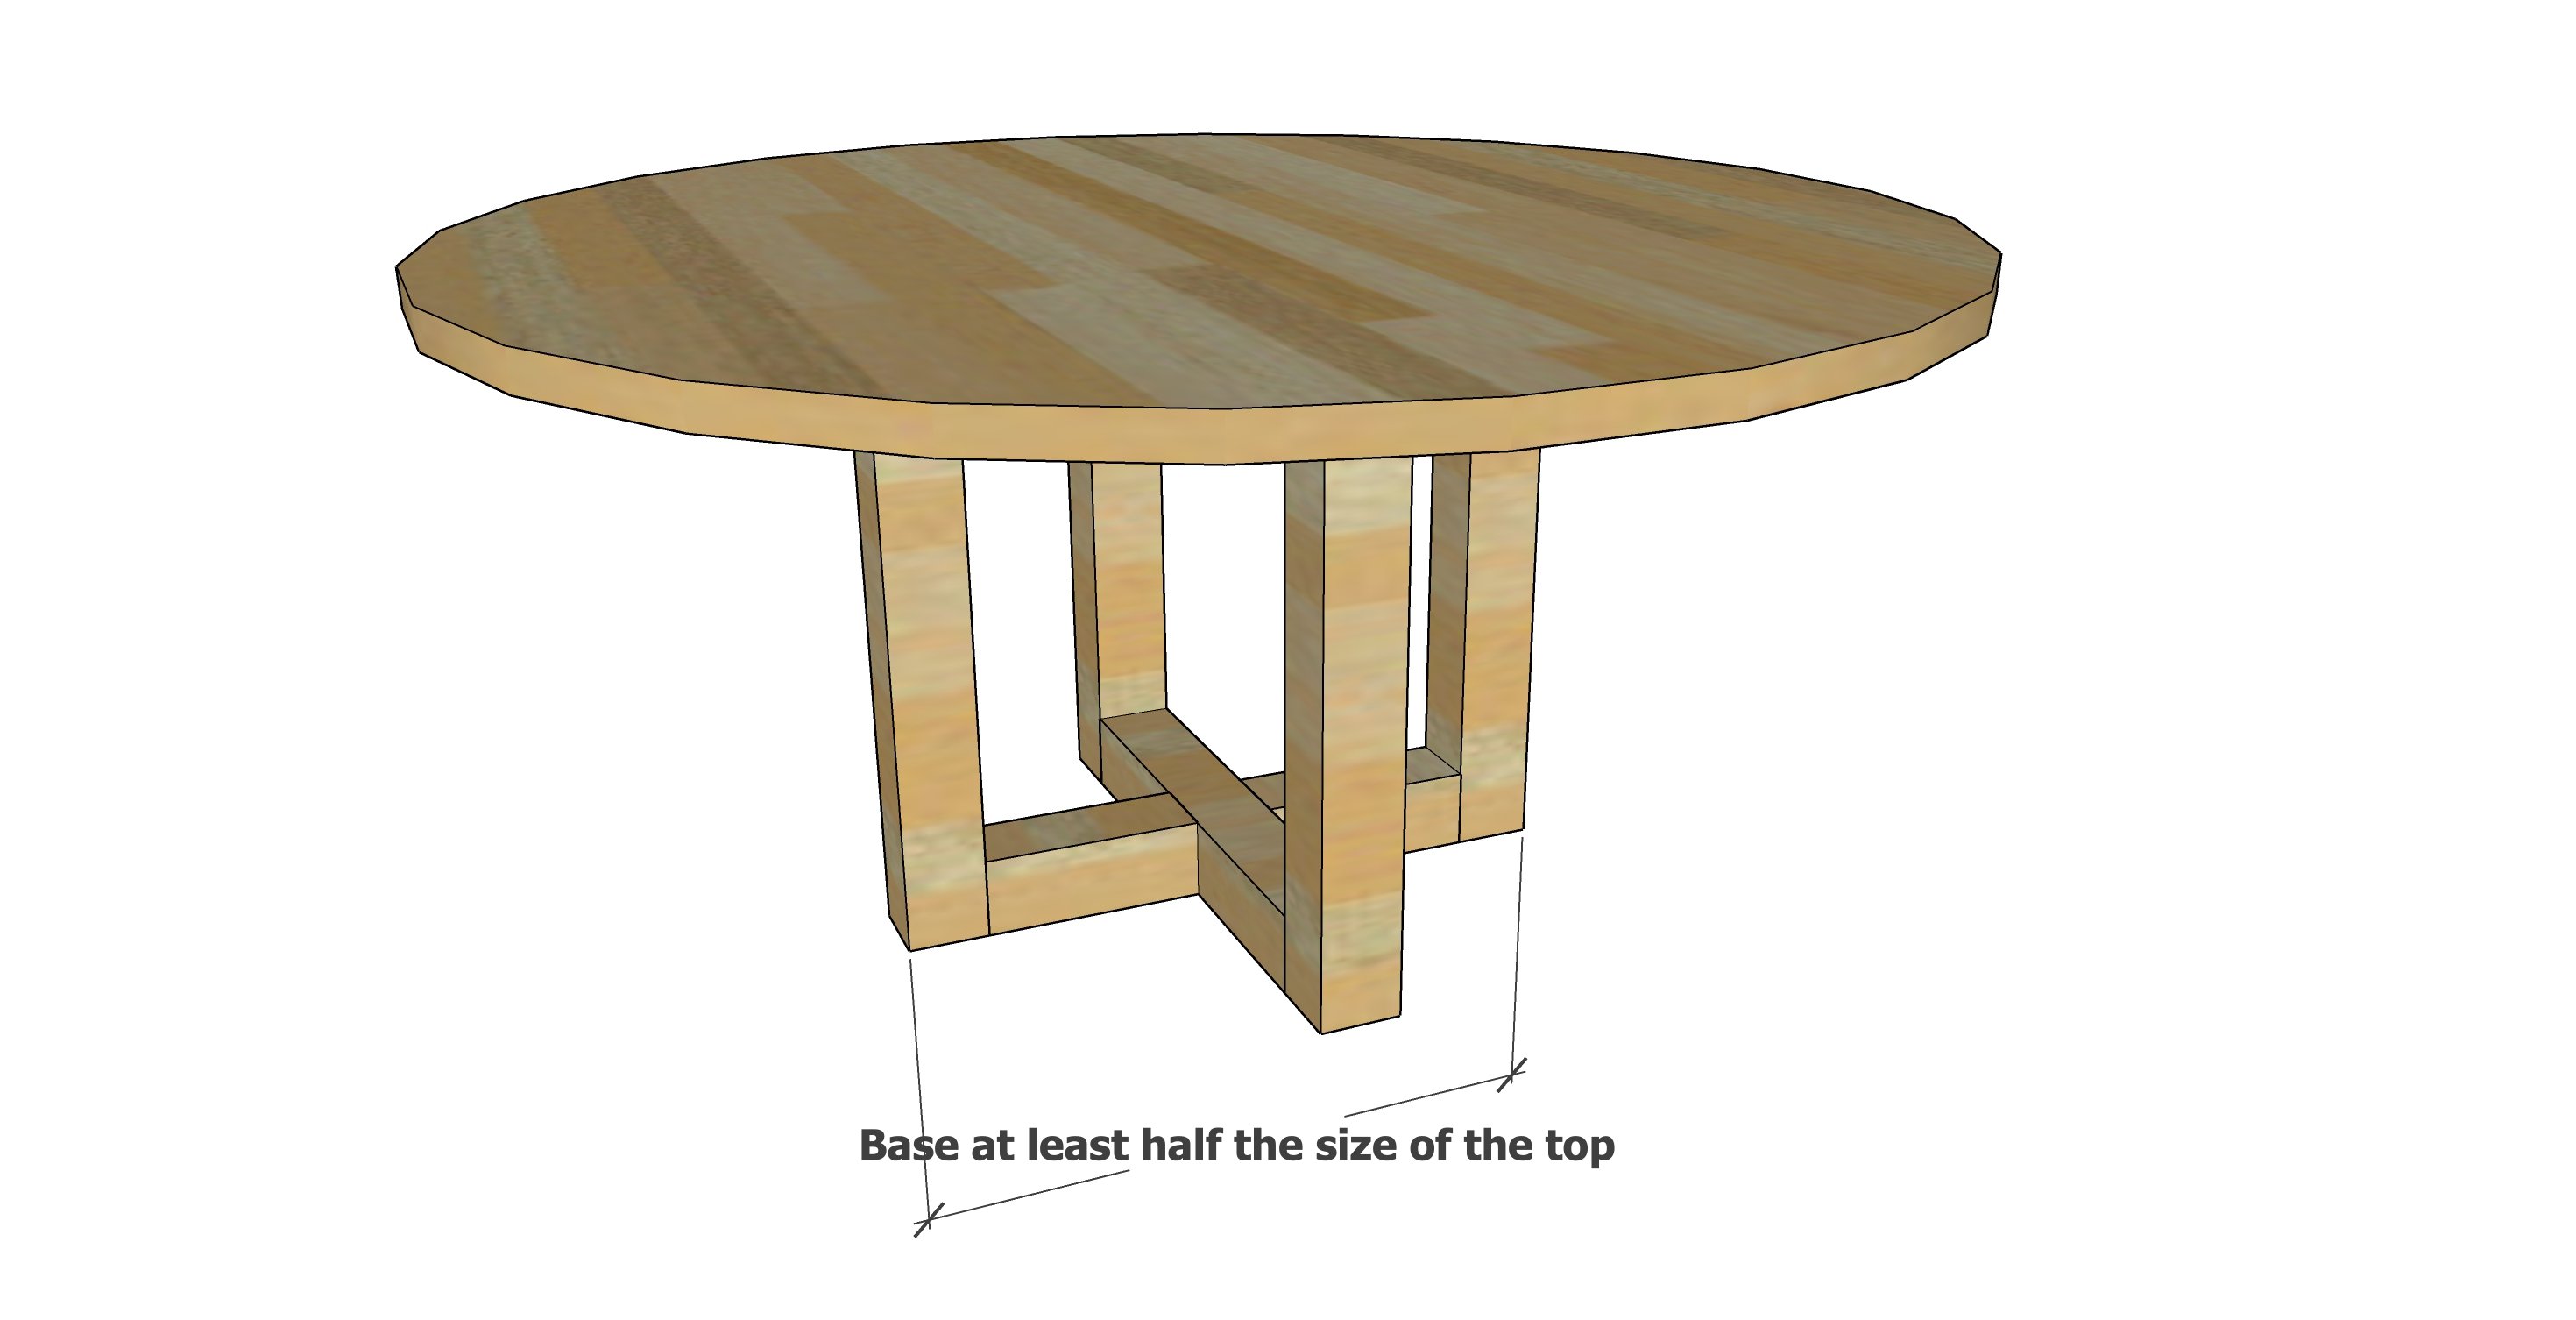
So for a 60" top, the base needs to be a minimum of 30" in spread to keep the table from tipping on the base.
What Size Round Table Top Should I Choose?
Not sure what size table to choose? Consider the size of your space and the number of seats you will need when determining the perfect size round table to build.
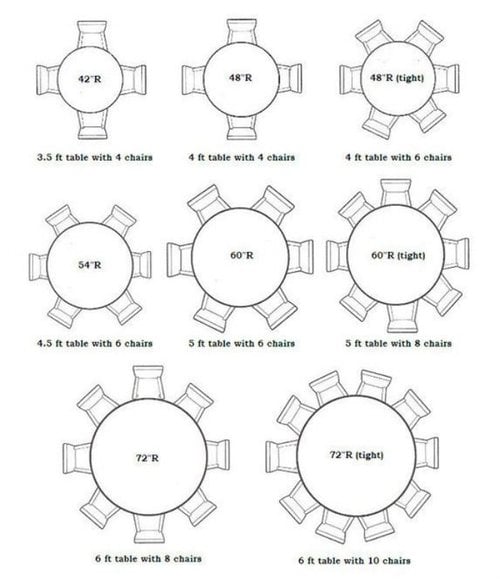
- You'll need extra room around the table for chairs and to move around the table.
- You can save space with a built in bench or banquette.
- Big table tops get really big in the center - it can be hard to reach the middle or pass the peas. I have a 60" tabletop and it's pretty big, I wouldn't recommend any bigger if you play board games on the table top.
Patterns for Different Sized Round Table Tops
Once you've determined the perfect size round table top to build, here's my free patterns to make it easy to build!
Use the pattern to determine your shopping and cut lists. Scroll all the way down for the step by step process for building your own round table tops.
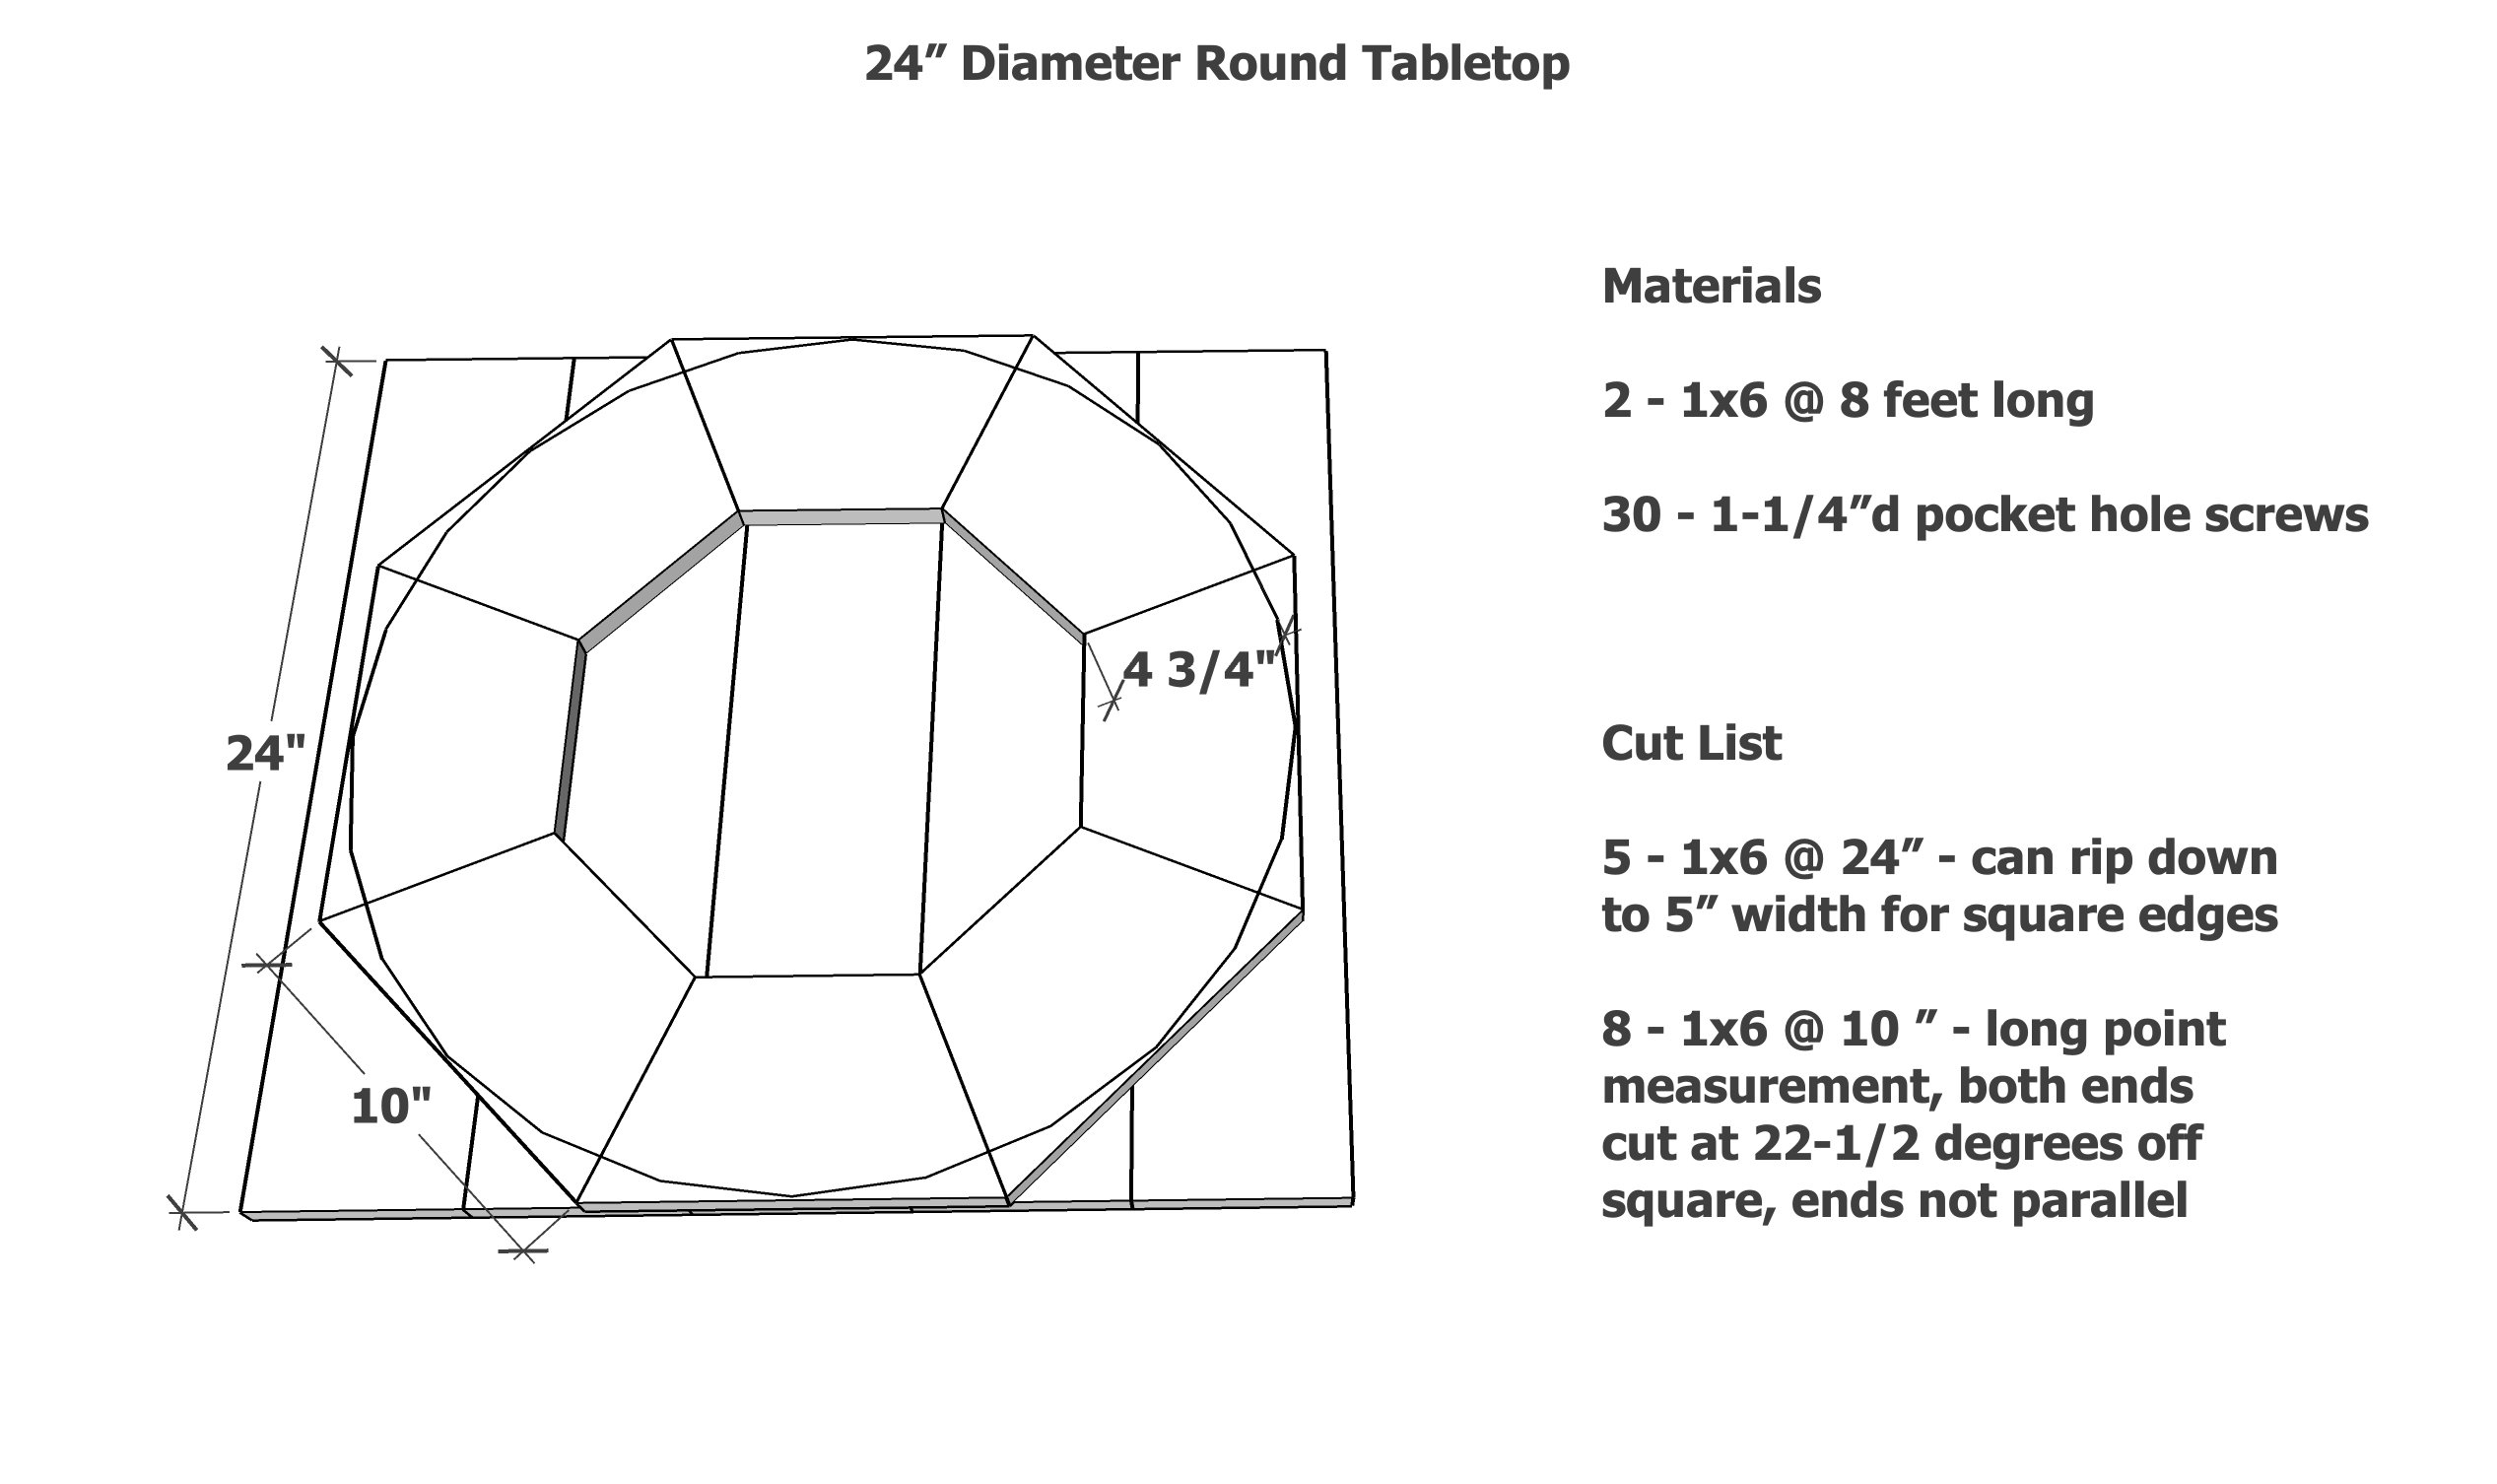
24 Round Table Top Free Pattern
The 24 round table top is great as a bistro table, end table top, or small coffee table or even a nightstand.
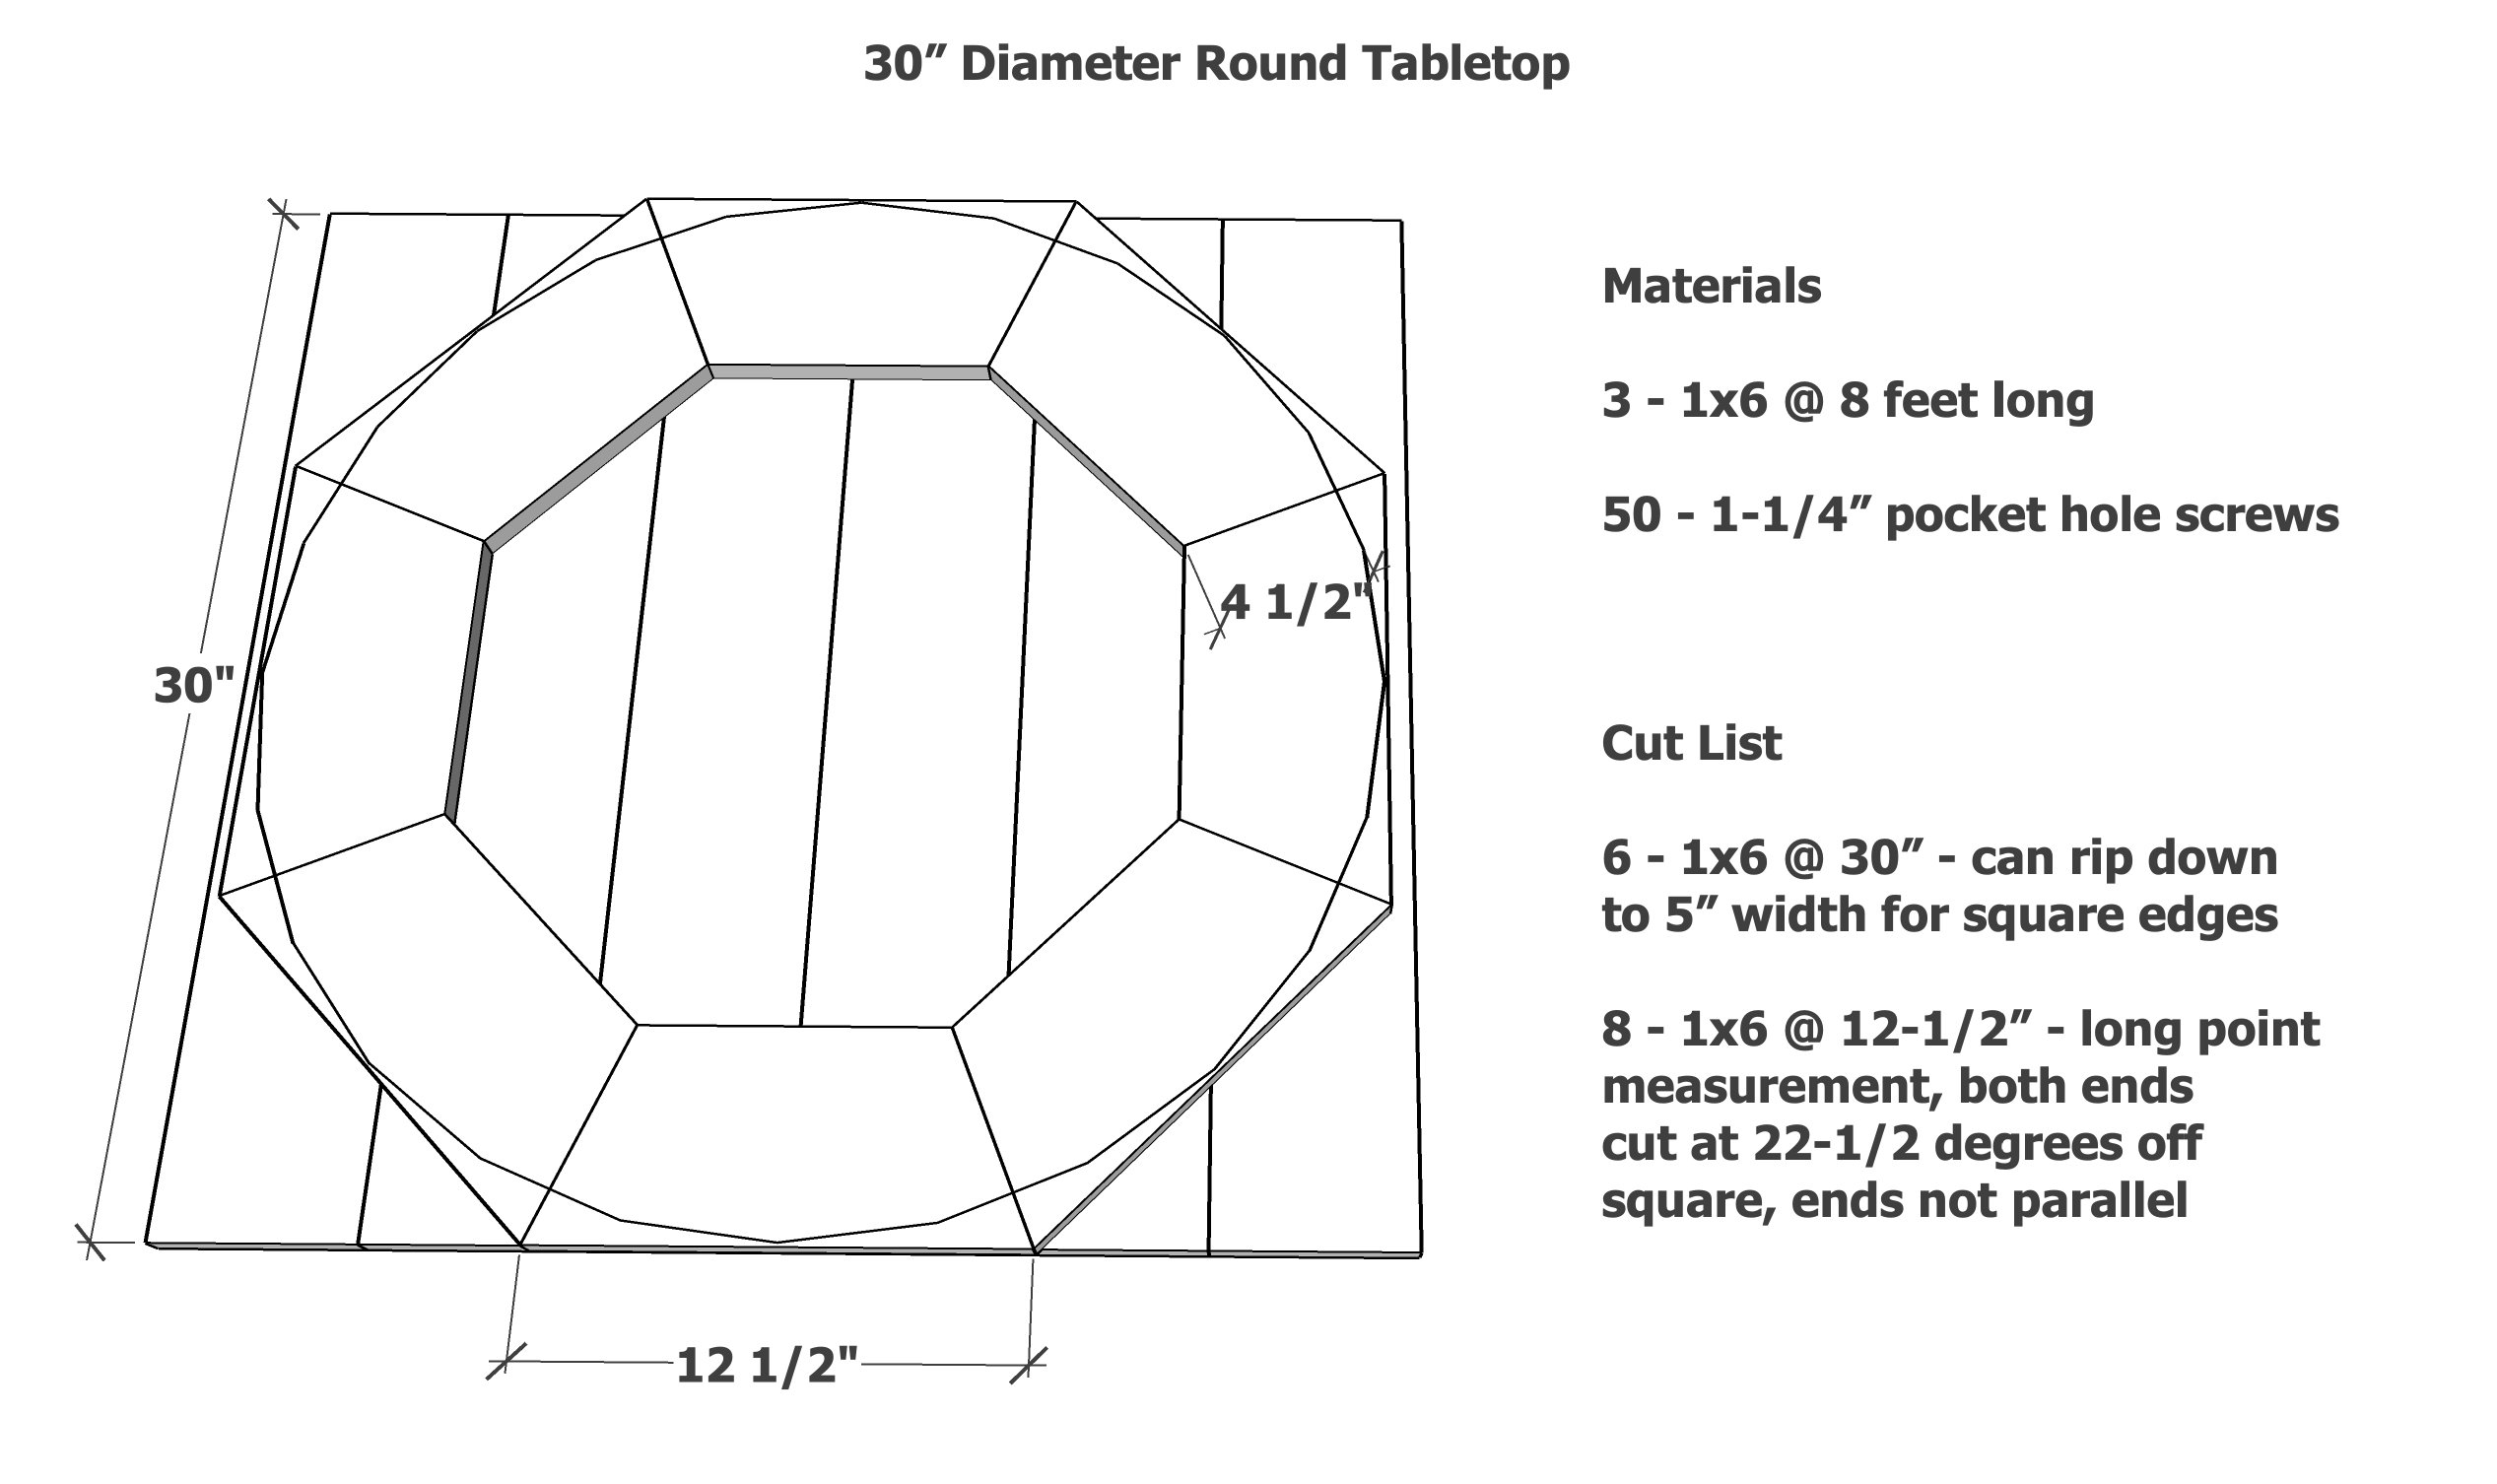
30 Round Table Top Free Pattern
The 30" is still a bistro size - I do love this size though! It is so cozy. Try pairing two together with a long banquette for a restaurant feel at home, or with a banquette and two chairs in a breakfast nook. 30" is also a great size for a small coffee table paired with a sectional, or a kids play table.
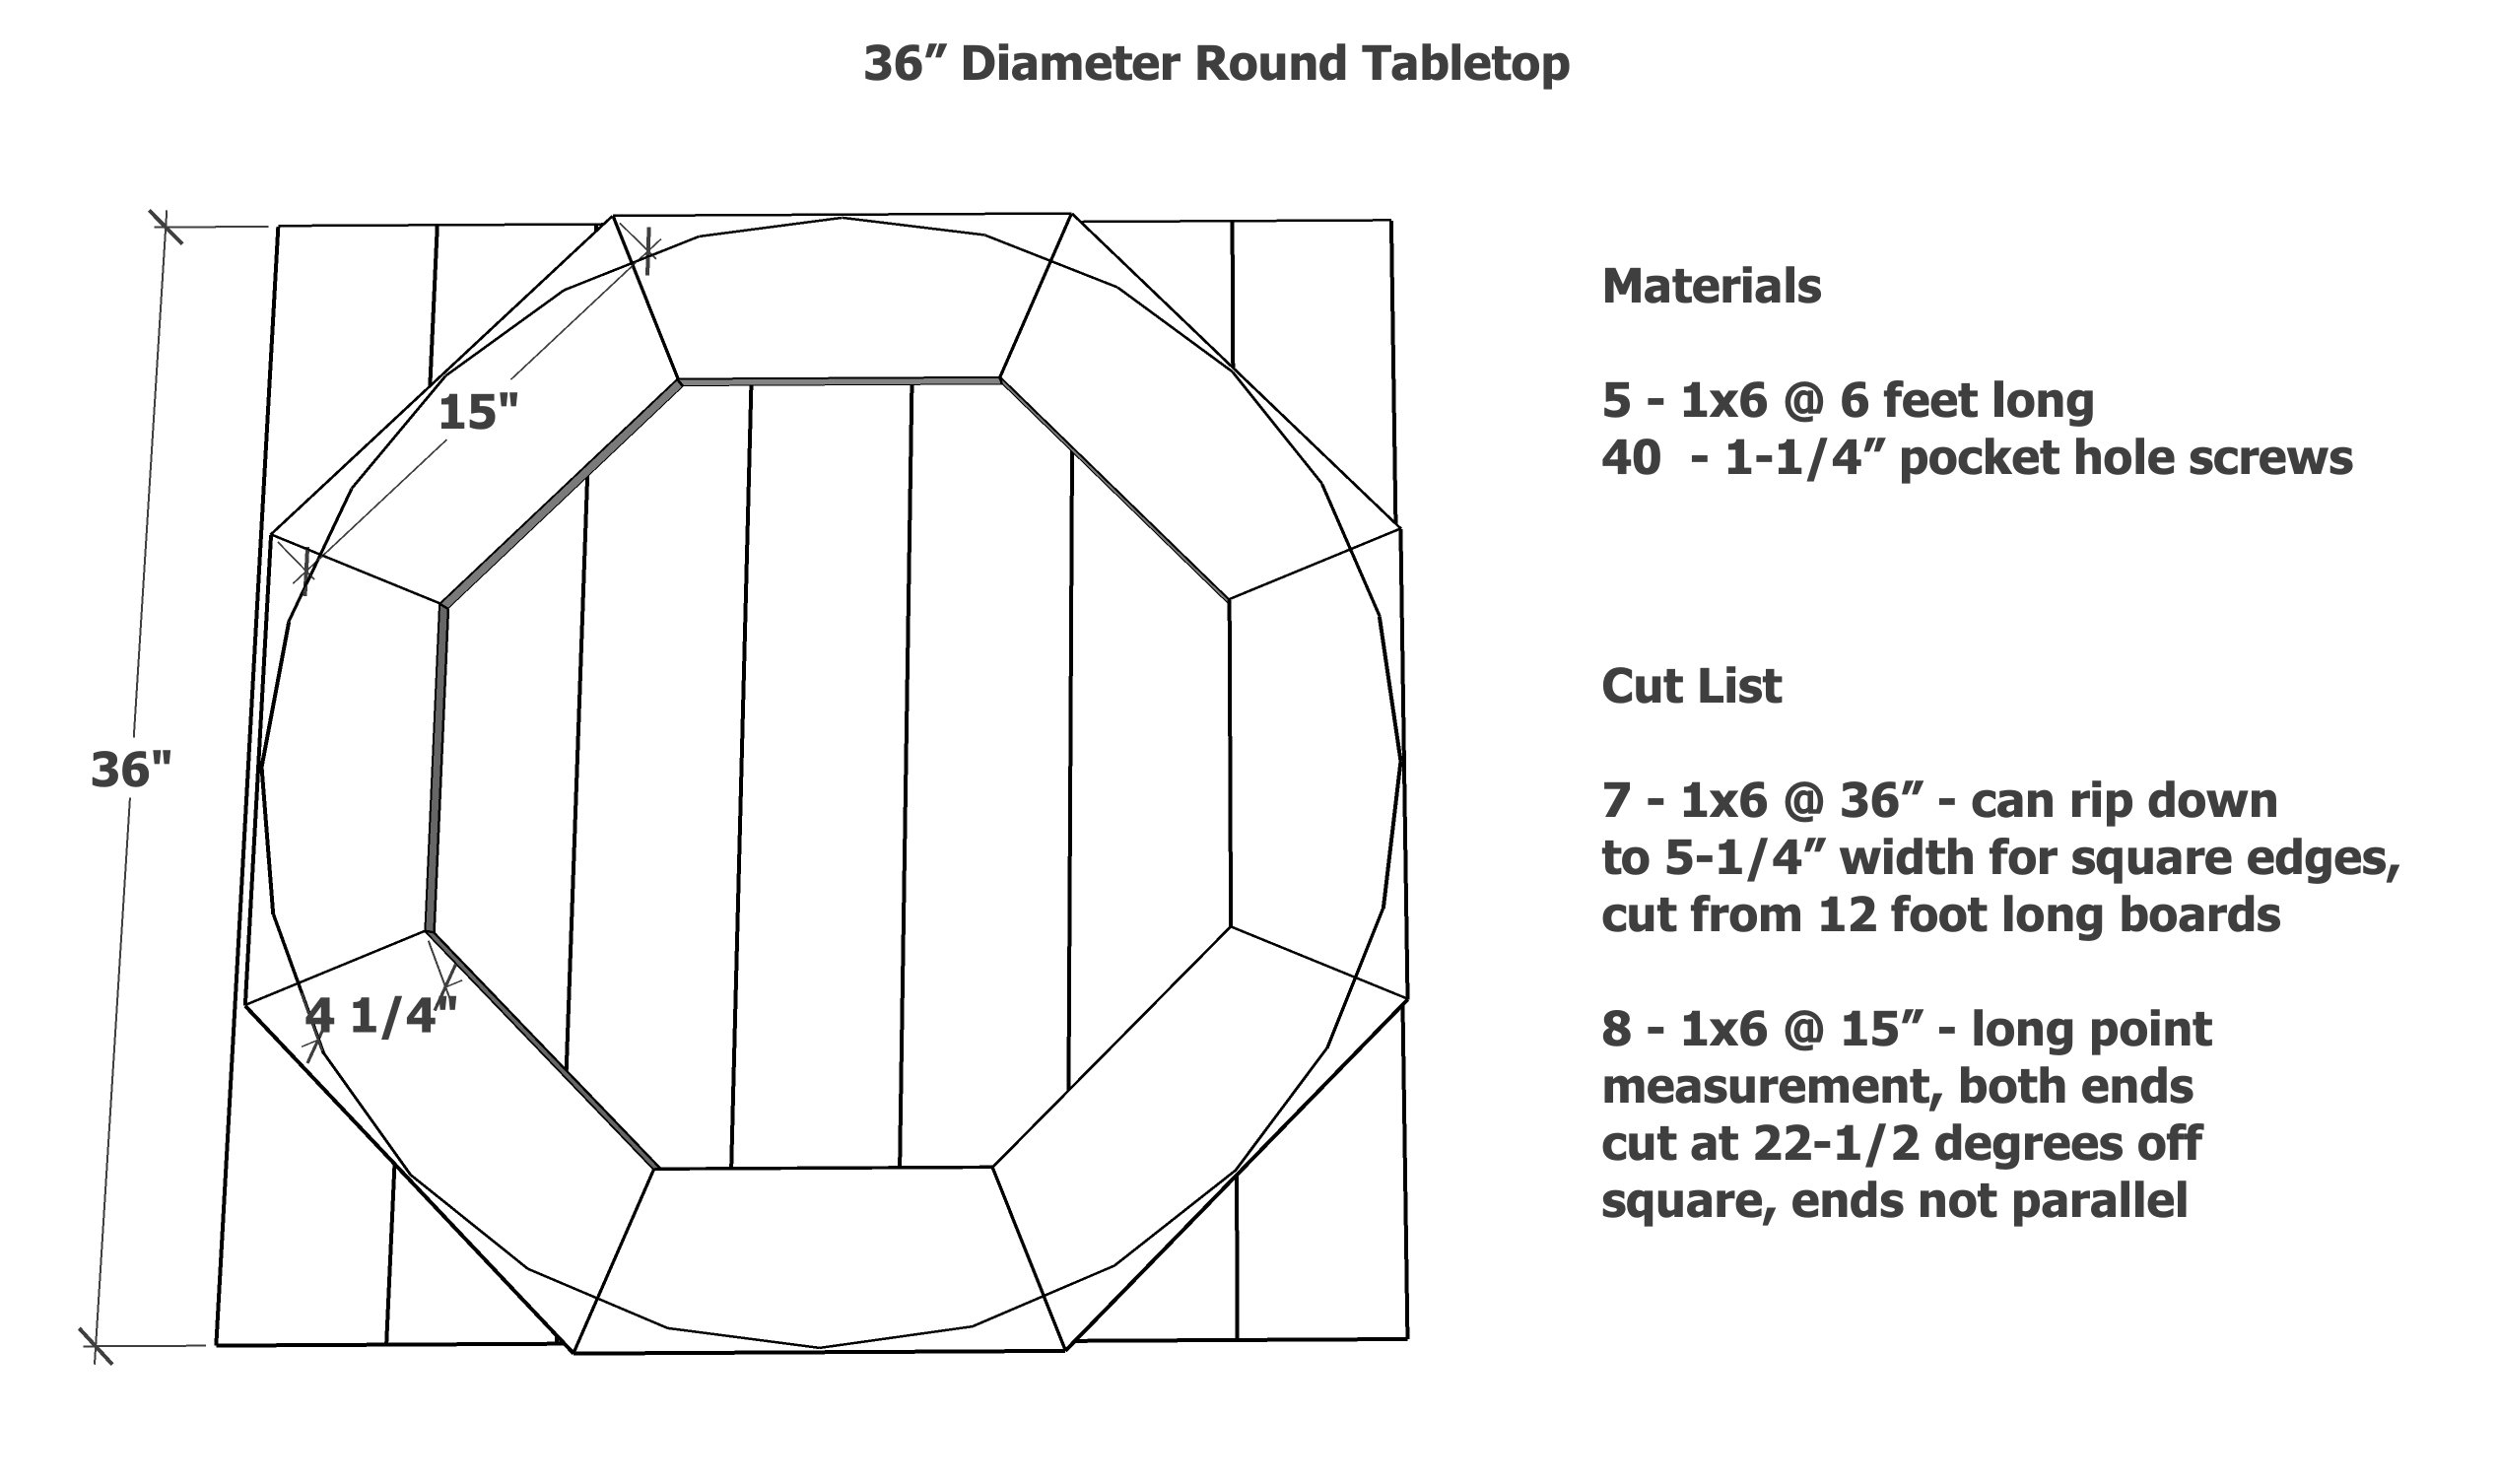
36 Round Table Top Free Pattern
A 36 round table top create quite a bit more space than the 30" - but still on the small size. We love the 36" as a coffee table, bistro table, high top table, paired with a banquette in a breakfast nook, or as a kids activity table.
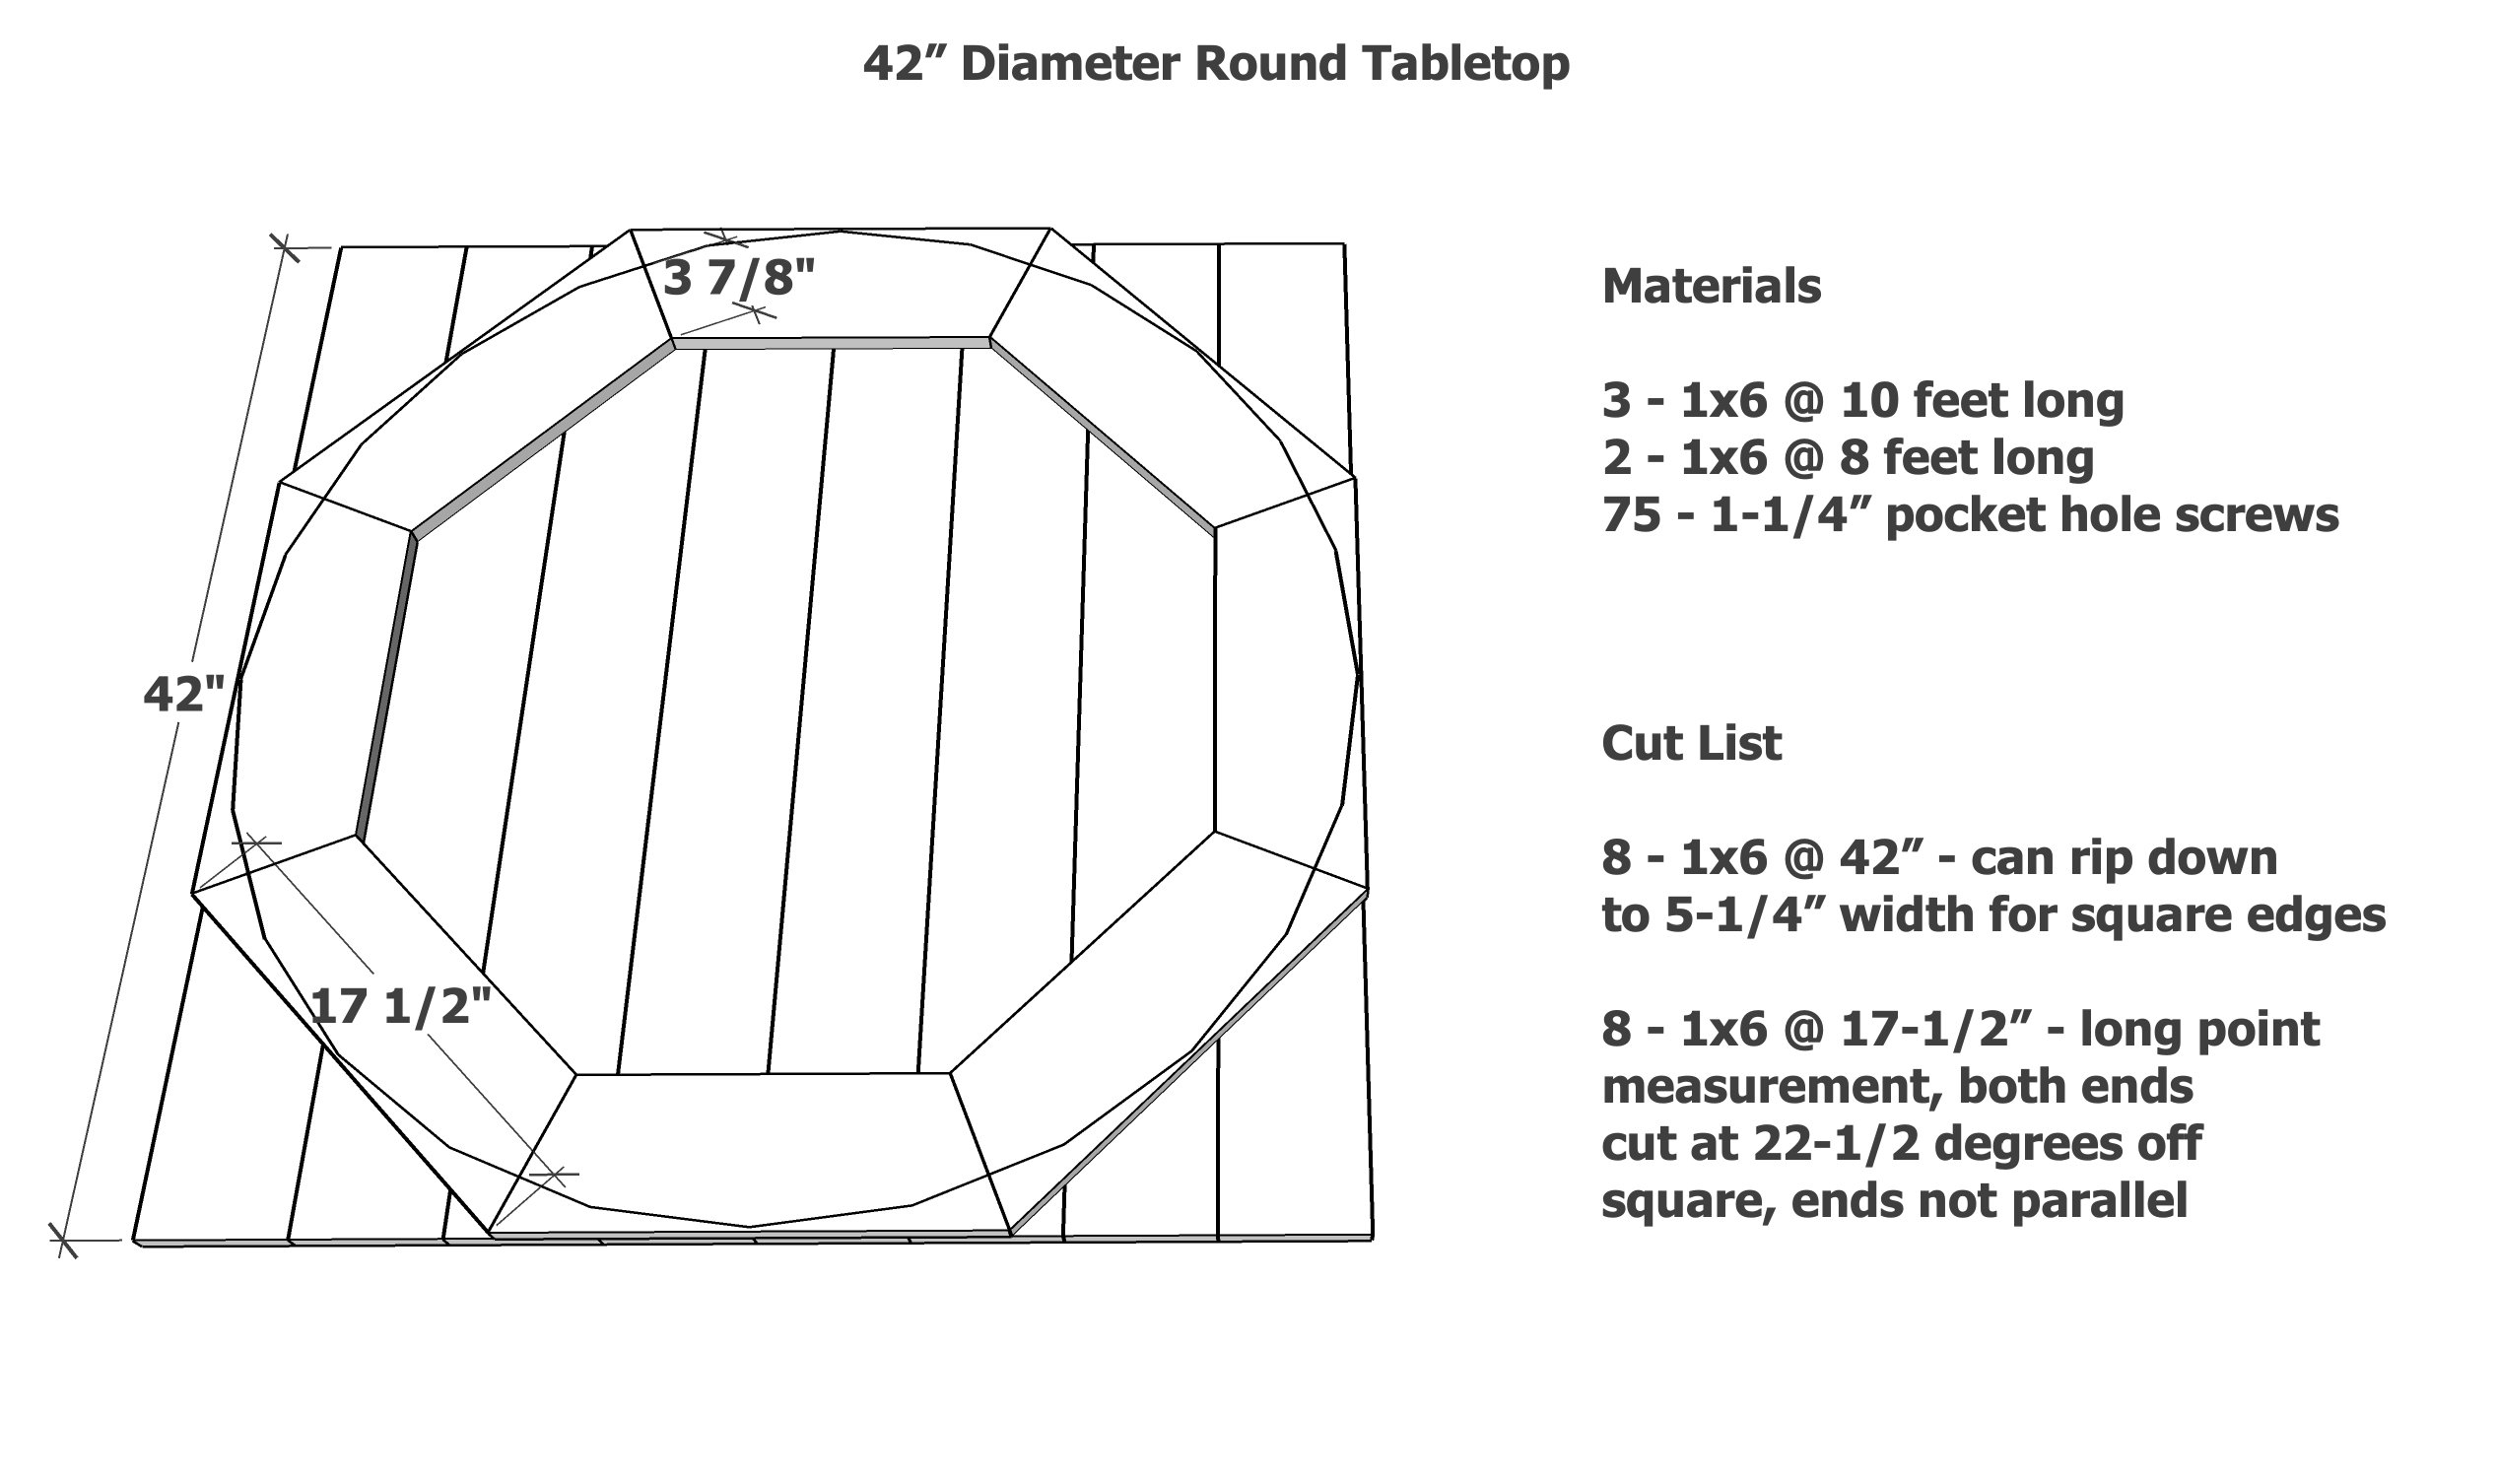
42 Round Table Top Free Pattern
The 42 round table top is big enough to seat a small family and is perfect in a breakfast nook. If you are looking for a larger round coffee table, the 42 round table top is a great choice.
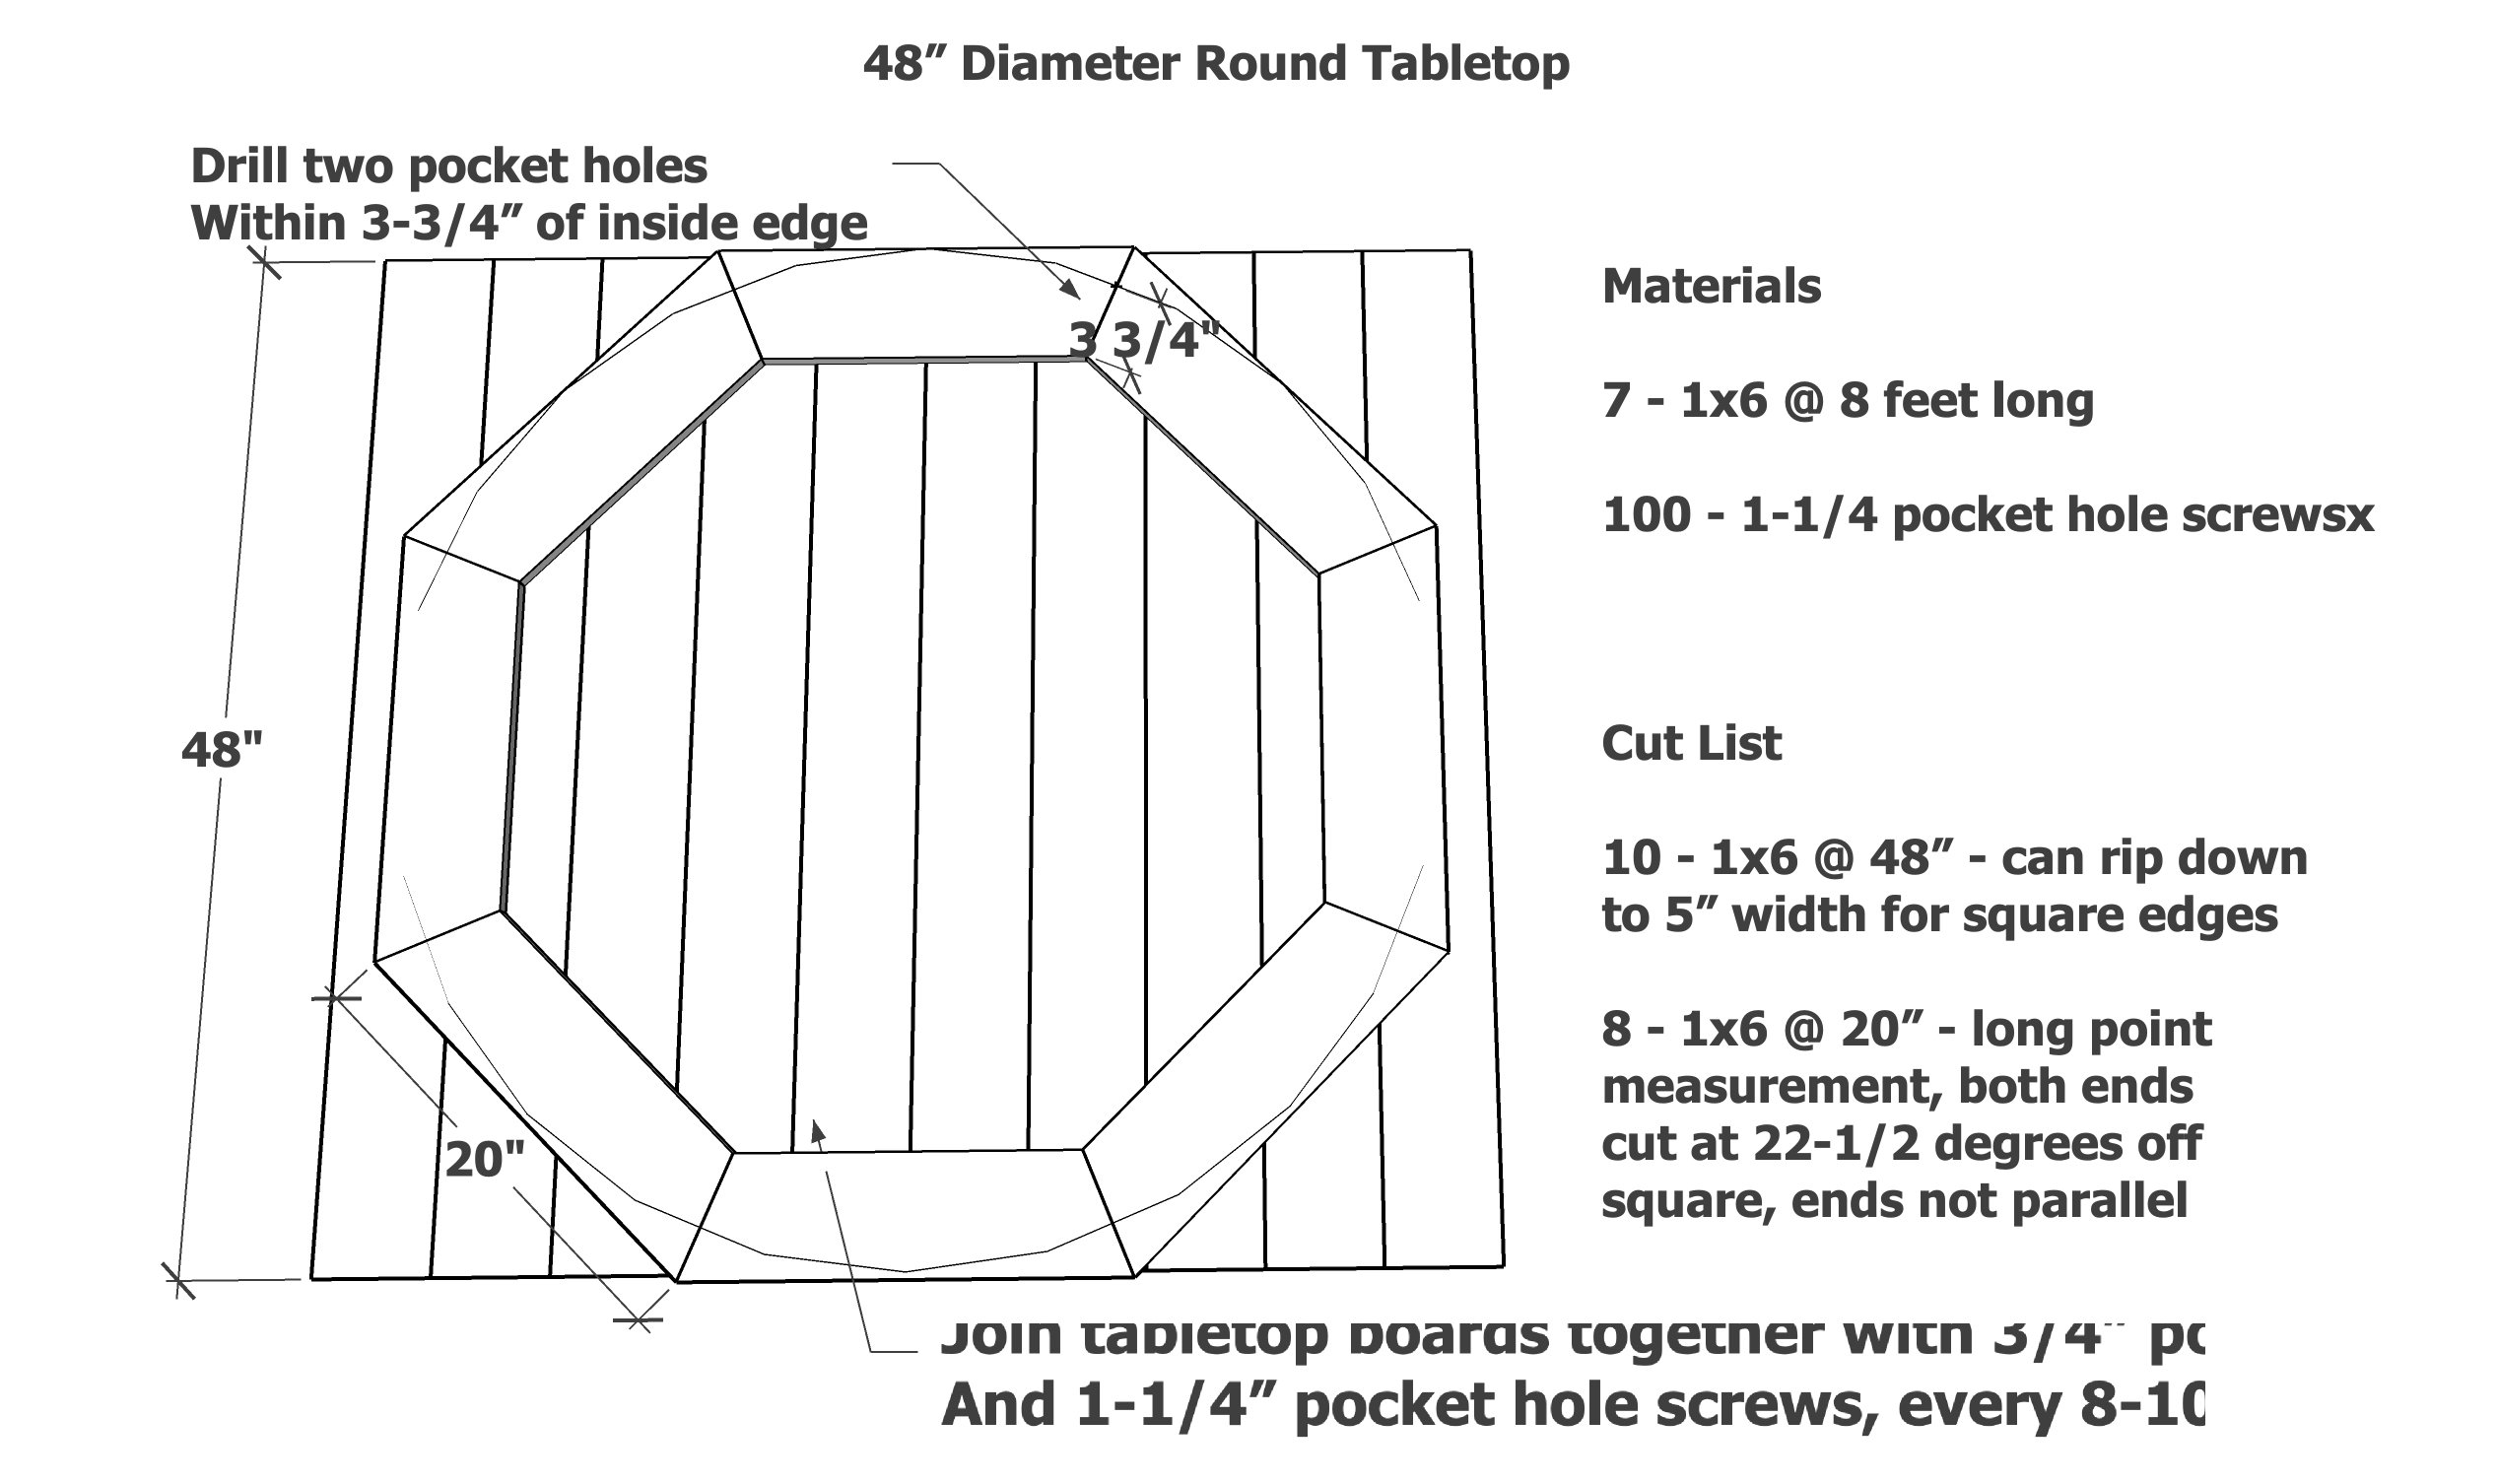
48 Round Table Top Free Pattern
A 48 round table top is a standard tabletop size for a small family. We love this as a main table in a breakfast area, or even in a smaller dining room.
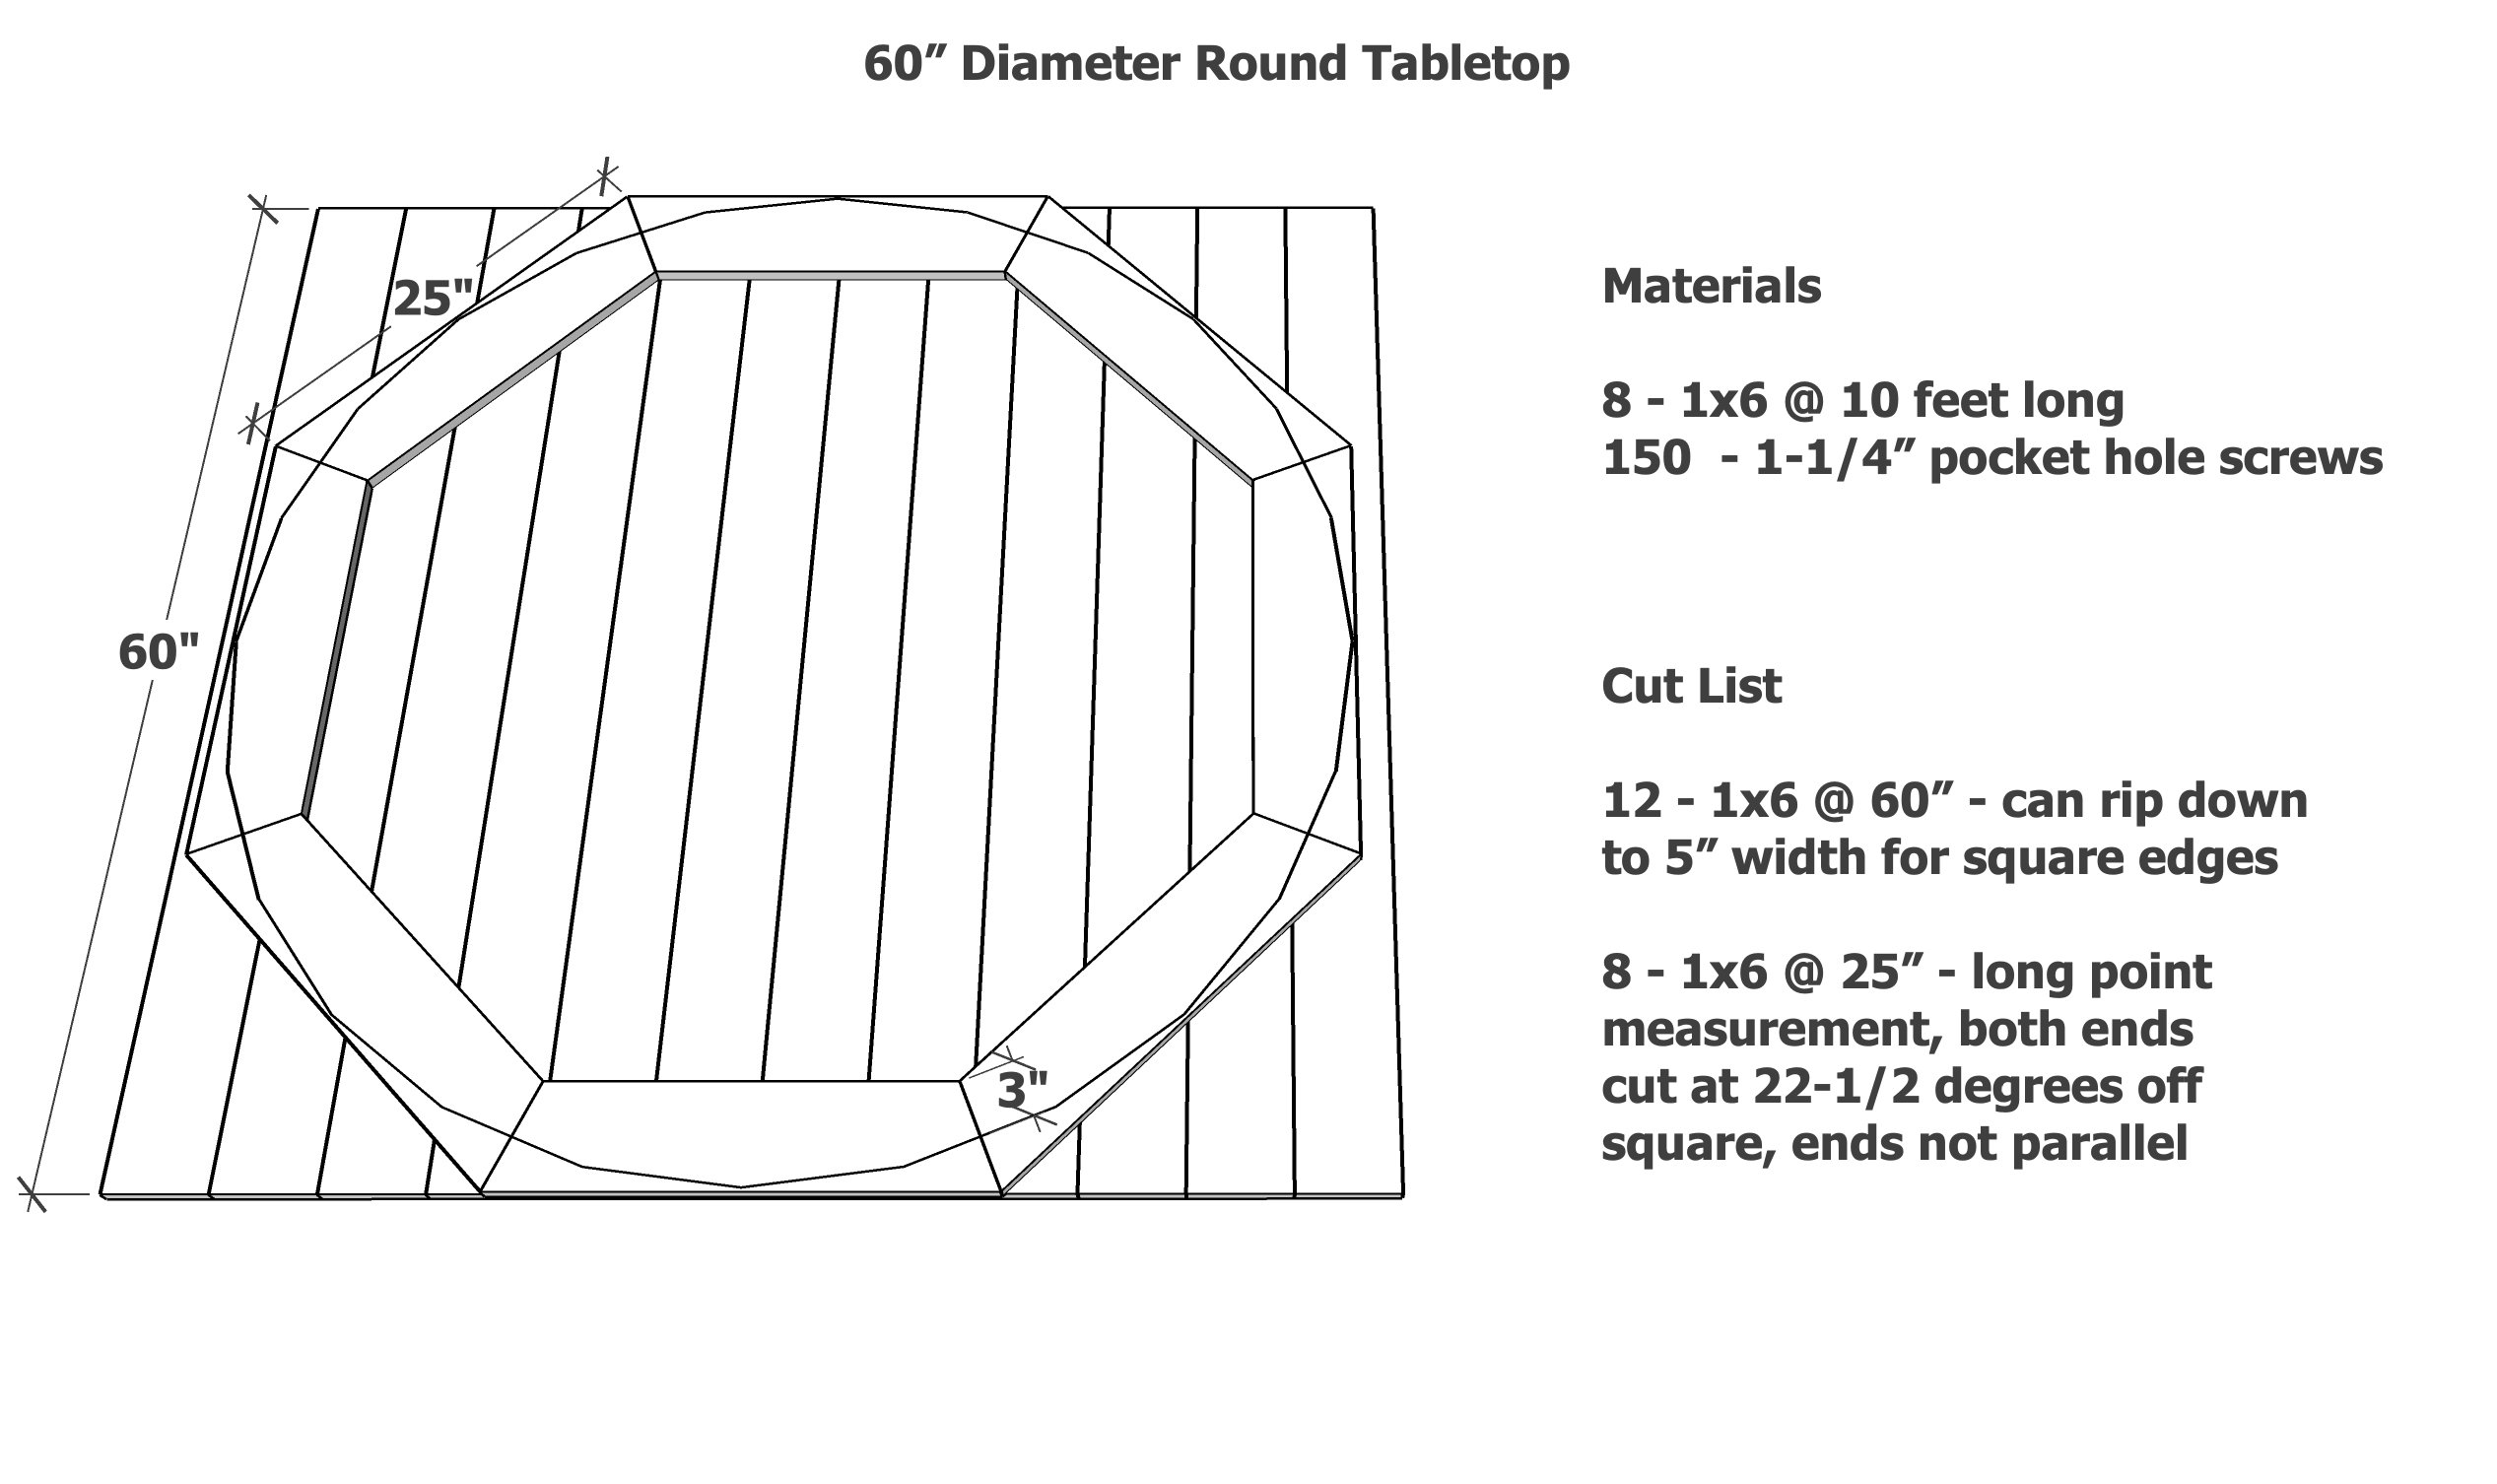
60 Round Table Top Free Pattern
I have the 60 round table top. It is still a good size, and adds the benefit of being able to expand to 8 seats when needed. I have this size and keep a few extra chairs around for when guests join us for meals. The downside when getting this big is it becomes harder to wipe clean, harder to vacuum underneath, and it's on the big size for card games and board games.
72 Round Table Top Free Pattern
If you have a large, square formal dining room, a 72" table would be amazing. I would not recommend going this grand in a breakfast nook or informal dining space, as it may loose the cozy factor - but for large spaces, this would be a dream size.
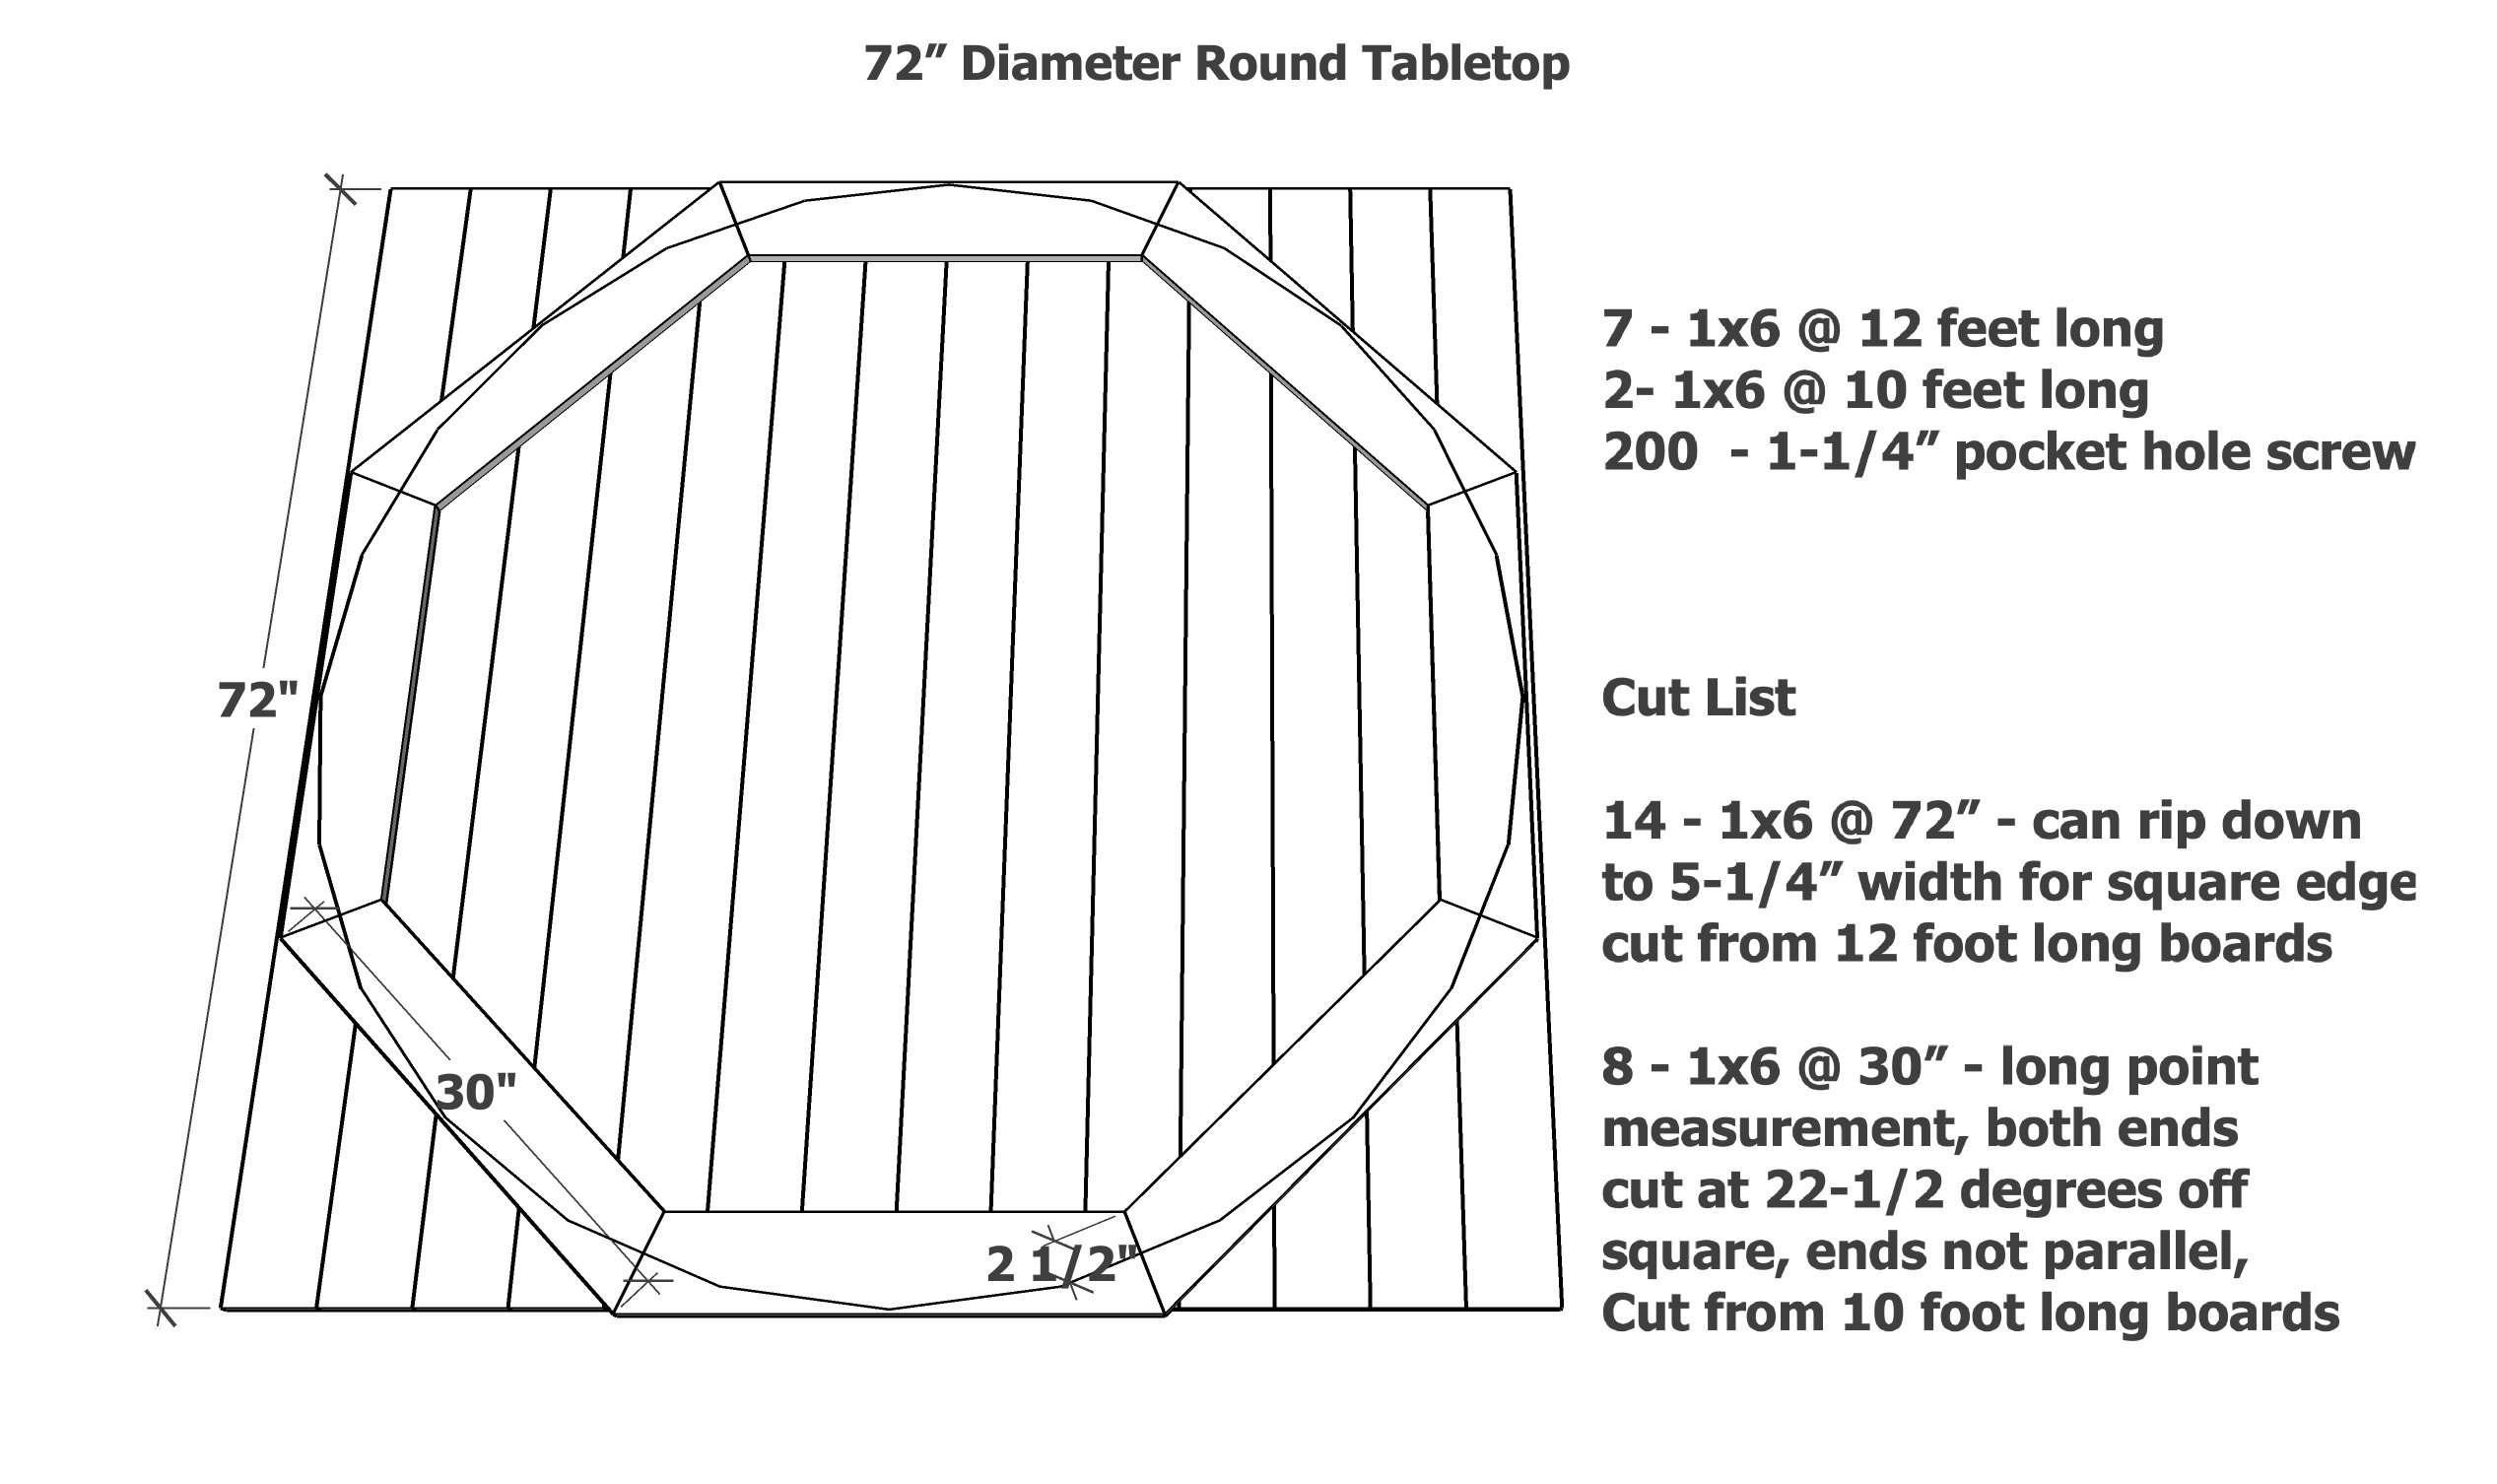
Figuring Length of Octagon Long Point Cuts for Any Diameter
I put together patterns for the most standard sized round table tops. But what happens if you want a custom size? Here's how you can figure how long to cut the octagon pieces underneath.
Multiple the desired diameter of your table x .41666667 = long point to long point measurement, both ends are cut at 22-1/2 degrees off square
Then you can cut and build the octagon base, and then use it to cut and build the tabletop boards.
Step-By-Step, How to Build a Round Table Top
Use the free patterns in different sizes to determine your materials needed and your cut list. Then follow the steps below to build your own round table top.
from Recent Project Plans https://ift.tt/jH483eU
2025年12月17日星期三
The Gift That Gives Forever: My Beginner Woodworking Bundle
from Recent Project Plans https://ift.tt/dDzhaBE
2025年12月16日星期二
Ultimate 18" or American Girl Dollhouse Free Plans
American Girl or 18 Dolls are big dolls, and the dollhouses can be HUGE - which is great if you have the space.
But in a small space or a tight bedroom, here's an option for an American Girl Dollhouse that takes up much less space.

My daughter was more into playing with the dolls, and taking the matching playsets out, than playing in the dollhouse. The dollhouse was almost more for storage and display than play.
So creating a shallow dollhouse not only takes up much less space, but it works better for the way our child uses it.
You can still fit some projects in the dollhouse -
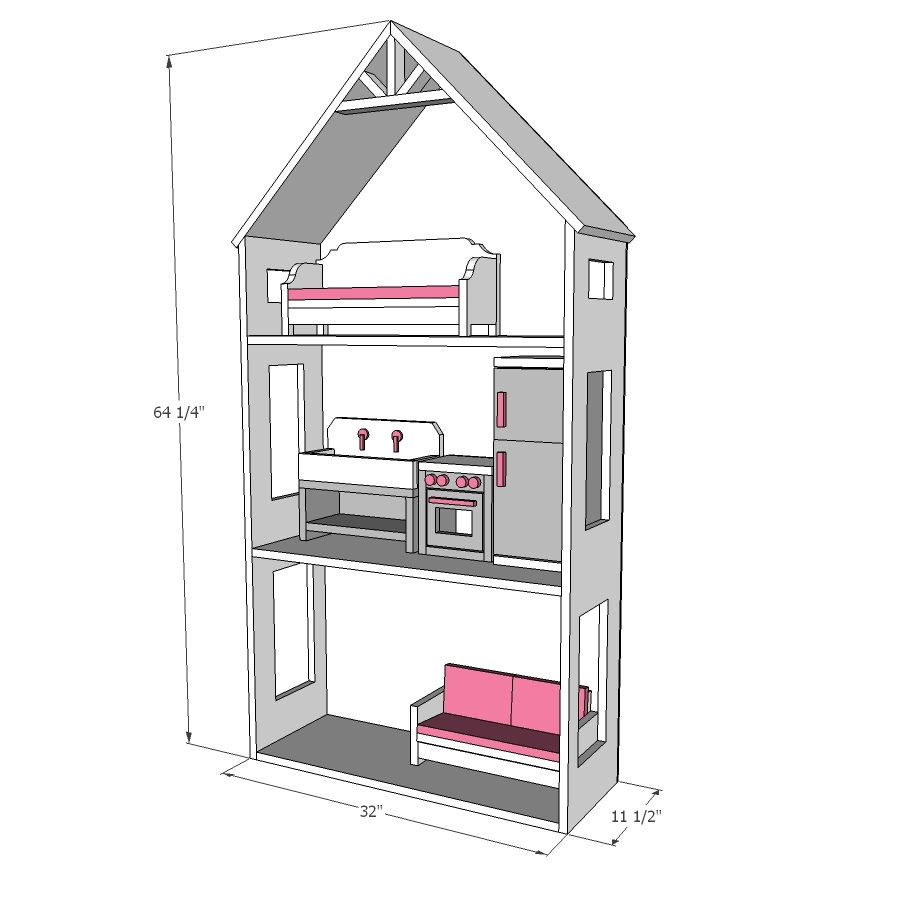
This dollhouse is only about five feet four inches tall, and 32" wide.
We LOVE that this dollhouse is built with 1x12 boards - so easy to build!!

Unlike a traditional style dollhouse where you set up rooms, this one isn't big enough to do that, as the rooms are only 11-1/4" deep.
But I love how the furniture and dolls are on display. I can just imagine the girls taking the furniture out, playing with it on the floor. It makes a beautiful display, and the shelves are all at height that the girls could easily reach and play with.

This project is so simple to make - just a 1x12 bookshelf really - but the truss detail at the top really makes it cute.

Build the Furniture Too!
The furniture in this dollhouse is all DIY!
I added the plans here so you can make everything in the photos.
from Recent Project Plans https://ift.tt/fL1CQTK
2025年12月14日星期日
I Gave This Outdated Linen Closet a Total Makeover
This linen closet was completely empty and unused, and it had clearly been overlooked for years. There was no door installed, only wire frame shelving, and the space felt bland and unfinished. I decided to finally give it the attention it needed. In this video, I’m showing how I updated this outdated linen closet by adding proper shelving, built‑in lighting, and a pull‑out hamper to make the space functional and visually pleasing. The goal was to turn an unused area into a practical storage space that actually works for everyday life. If you’re dealing with an old or builder‑grade linen closet, this transformation shows how a few thoughtful updates can make a big difference — without overcomplicating the process. Other videos in this Series: ➡︎ Bathroom update video (First Video) https://youtu.be/Y8kEGe_bjEQ ➡︎ Mirror frame Video https://youtu.be/eeE4qoQOurQ ➡︎ Partition wall (This video) https://youtu.be/ZlrhXfU7ZaM ➡︎ Under cabinet light (Editing - coming soon) Materials (affiliate links) ➡︎ Under Cabinet LED Puck Light: https://amzn.to/49aOH1J ➡︎ Power supply used for the lights: https://amzn.to/4iZpaft ➡︎ 12in cabinet handle ➡︎ 2 by 4 lumber https://ift.tt/h1MHdTu ➡︎ 1/5 plywood sheet ➡︎ Drawer slides https://amzn.to/4oPwkUz Tools used (affiliate links) • Miter saw https://ift.tt/97Xt420 • Blue Pocket hole jig https://amzn.to/3MxChrT • Drill • Sander ********** Support my work ********** My Woodworking Plans: https://ift.tt/xmBYZuh Help me make more Video: https://ift.tt/zESvciT YouTube: Subscribe & "RING the Bell": http://bit.ly/1PtWJEd Instagram: https://ift.tt/f1eMvd4 Pinterest: https://ift.tt/psB85Lg
from DIY Creators https://www.youtube.com/watch?v=err4gLBPV4E
from DIY Creators https://www.youtube.com/watch?v=err4gLBPV4E
2025年12月8日星期一
Building a Partition Wall (The Easy Way)
DIY partition wall: step-by-step, affordable, and customizable—perfect for splitting a bathroom or other spaces. Other videos in this Series: ➡︎ Bathroom update video (First Video) https://youtu.be/Y8kEGe_bjEQ ➡︎ Mirror frame Video https://youtu.be/eeE4qoQOurQ ➡︎ Partition wall (This video) https://youtu.be/ZlrhXfU7ZaM ➡︎ Under cabinet light (Editing - coming soon) ➡︎ Linen closet (Editing - coming soon) Materials I Used: • 1x2 Lumber https://ift.tt/6M0urCj • 2in wood Screws https://amzn.to/3Y36wJL • Golden oak stain https://ift.tt/aBxWk0p Tools used • Miter saw https://ift.tt/qLm0kIP • Blue Pocket hole jig https://amzn.to/3MxChrT • Drill ********** Support my work ********** My Woodworking Plans: https://ift.tt/OXSDjT2 Help me make more Video: https://ift.tt/QT2JdEh YouTube: Subscribe & "RING the Bell": http://bit.ly/1PtWJEd Instagram: https://ift.tt/pO4VGEH Pinterest: https://ift.tt/FJHnokC
from DIY Creators https://www.youtube.com/watch?v=ZlrhXfU7ZaM
from DIY Creators https://www.youtube.com/watch?v=ZlrhXfU7ZaM
2025年12月7日星期日
Easy 1x4 Christmas Tree Tray – Free DIY Plans
Why I Built this Project
My family was invited to our friends house for a Christmas get together. I wanted a nice way to display some goodies. Ana came up with this plan and I thought it fit the occasion. I was surprised at how easy the plan was and how quickly it came together!
Why We Love this 1x4 Christmas Tree Tray
-
Seasonal décor – Makes a great rustic holiday decoration for walls, mantels, entryways, and tabletops.
-
Personalization – You can choose the wood species, stain, and finish to match your style.
-
Gift idea – A handcrafted wooden tree silhouette is a thoughtful and unique holiday gift.
-
Woodworking practice – Offers practice with cutting angles, assembling frames, and making clean joints.
-
Scrap-wood friendly – Uses small pieces, making it a great way to use leftover lumber.
-
Layered/3D effect – The stepped tree shape adds depth and interest beyond a flat cutout.
-
Reusable decoration – A durable wooden piece you can enjoy year after year.
-
Minimalist rustic style – Fits farmhouse, cabin, modern rustic, and natural décor themes.
-
Customizable finish – Paint, stain, whitewash, or leave natural for different looks.
-
Fun DIY craft – Quick, satisfying project that looks professionally made.
-
Perfect for displaying holiday treats – The recessed tree outline can hold small wrapped candies, cookies, or festive snacks for a functional holiday display.
-
Simple construction – Built using basic 1x4 lumber, a saw, and a nailer—accessible even for beginners.
-
Free step-by-step plans – Comes with easy-to-follow instructions so anyone can build it confidently.
-
Available in two sizes – Choose the size that best fits your holiday décor or build both for a matching set.
How I Built this Project
Start by measuring and cutting each piece. Make sure you are using a longer board to cut the smaller pieces to keep you hand away from the saw.

Each side of the tree will be the same cuts.


Next measure for the 1x2 side pieces and attach with glue and nails. I added glue in between the tree pieces before adding the side.


For the top and bottom I lined up the top where the tree meets, took that measurement and cut to fit. I used the same measurement for the bottom to keep it all square.

Once the top and bottom were attached I cut a 1/4" plywood backing to fit. I glued and nailed it to the back.


Watch! Build Video for This Project
if applicable, embed video here
Free Plans to Build Your Own 1x4 Christmas Tree Tray
Ready to build this yourself? Here's the free plans, enjoy!
from Recent Project Plans https://ift.tt/w2yprJG
2025年12月2日星期二
How to Upgrade a Plain Mirror: $40 DIY Frame Hack
In this video, I’ll show you how to create a stylish mirror frame for just $40 using simple supplies and easy steps. Whether you’re updating your bathroom, bedroom, or hallway, this budget-friendly DIY hack instantly adds character and charm to any space. Check out my Woodworking Plans: https://ift.tt/4Z8FKwA ➡︎ Bathroom update Video https://youtu.be/Y8kEGe_bjEQ ➡︎ Partition wall (Editing - coming soon) ➡︎ Under cabinet light (Editing - coming soon) ➡︎ Linen closet (Editing - coming soon) Materials I Used: • 1x2 Lumber https://ift.tt/VYmx2O8 • Matte Black Spray paint https://ift.tt/cVMeo8x • Wood glue https://amzn.to/49Y2qdj • 2in wood Screws https://amzn.to/3Y36wJL • Liquid nail https://ift.tt/v80NtaQ • Masking Tape https://amzn.to/3XslCs7 Tools used • Miter saw https://ift.tt/gLPn8s9 • Miter box https://amzn.to/4pOPOKe • Sandpaper • Drill • Drill bit https://amzn.to/48N9bNR • Red corner clamps https://amzn.to/4axNnXI #DIYMirrorFrame #BudgetHomeDecor #BathroomMakeover
from DIY Creators https://www.youtube.com/watch?v=eeE4qoQOurQ
from DIY Creators https://www.youtube.com/watch?v=eeE4qoQOurQ
2025年11月26日星期三
Pine Wood Library Book Cart - Free Plans
We Built It! Here's How it Turned Out!

from Recent Project Plans https://ift.tt/pzx80Qd
2025年11月25日星期二
Quick-Build Wine Bottle & Glass Holder – Free Plans
Why I Built this Project
This year I am on a tight budget for giving, so when Ana came up with these plans to add to our best hostess gifts collection, I jumped right on it and made multiple presents for under $10 each. I bought the wine glasses and rope at Dollar Tree, making it even more affordable!
Why We Love this DIY Wine Crate
-
Built on a budget, with only about $10 in materials
-
Makes a thoughtful and personalized DIY gift
-
Perfect for picnics, outdoor concerts, and park outings
-
Adds rustic charm with its handcrafted look
-
Quick and simple project that’s easy to build
-
Great way to use scrap or reclaimed wood
-
Functional design that securely carries a bottle and glasses
-
Fun opportunity to practice woodworking skills
-
Brings a touch of homemade hospitality to any wine night
-
Crafted with care to create something both beautiful and useful
How I Built this Project
Cut material according to the cut list.

Drill your holes in the center uprights and cut out the dog ears with a jig saw. I clamped the boards together to drill the hole. You want to use a bit that is the same size as your rope.


Start assembly by attaching bottom and sides and then add the center uprights. I built a few of these and after the first one I pre-finished prior to assembly. That seemed to be the best option. I used glue and nails for assembly throughout the project!


I recommend fitting the wine glasses and bottle of wine here to ensure correct spacing, also notice there are 2 sizes if you have a larger wine bottle or glasses. For the smaller size I marked 4" in from each side and the larger was 5" in. Now just add the 1x2 slats. Be sure to measure the same distances to keep everything straight when attaching to the uprights.

Then just add the rope and it's done!

Watch! Build Video for This Project
Video coming soon!
Free Plans to Build Your Own Wine and Stemware Crate
Ready to build this yourself? Here's the free plans, enjoy!
from Recent Project Plans https://ift.tt/iv2EQXg
Watch Me Transform This Bathroom with a Simple Facelift – Huge Difference!
I’m thrilled to show you the updates in my bathroom. I began this project without a clear vision of how it would turn out. I wasn’t prepared for a full renovation given the starting point. But now, I couldn’t be more pleased with how it looks, enjoy! Thanks to Aven for sponsoring this video! Put your home equity to work with Aven! Get a free offer in just 3 minutes with no hard credit check at https://ift.tt/cg9bfD2 Check out my My Woodworking Plans: https://ift.tt/sMVwWRU Upcoming Videos (Links with be here) ➡︎ Mirror frame (Editing - coming soon) ➡︎ Partition wall (Editing - coming soon) ➡︎ Under cabinet light (Editing - coming soon) ➡︎ Linen closet (Editing - coming soon) Tools used: ▸ PVC Cuttering https://amzn.to/44wKHG1 ▸ Circular Saw https://amzn.to/3Xl6soq ▸ Ridgid Drill https://ift.tt/G6s7BtH ▸ Electric Drywall sander https://amzn.to/48dip4r ***** Materials Used in the video ***** Flooring ▪︎ Dusk Cherry Flooring https://ift.tt/zBpTqH6 ▪︎ Dusk Cherry Transition https://ift.tt/91qpDBc Shower Parts used ▪︎ Shower faucet trim kit https://amzn.to/4pp3LhC ▪︎ Body dispenser https://amzn.to/3XJWDR0 ▪︎ Shower mat https://amzn.to/4pukpfY Tub kit ▪︎ Tub Faucet kit https://amzn.to/3JOaUsP ▪︎ Tub Overflow faceplate https://amzn.to/4pdTPIh Bathroom Vanity and faucet ▪︎ LED Black Vanity Lighting https://amzn.to/4pp4E9Y ▪︎ Bathroom vanity faucet https://amzn.to/4reNrlh ▪︎ Adjustable handle https://amzn.to/3LYcFEo ▪︎ Paint used: Sherwin-Williams 6073 (Perfect Greige) ▪︎ Bathroom Sink Faucets https://amzn.to/4afftab Bathroom Decor and accessories ▪︎ Bathroom Accessories Hardware Set 5-Piece https://amzn.to/3WUcb4a ▪︎ 6 Pieces Soap Dispenser https://amzn.to/49AMYDF ▪︎ Decor Artificial Eucalyptus Stems https://amzn.to/4rjFxHp ▪︎ Shampoo and Conditioner Dispenser https://amzn.to/48vCILT ▪︎ Shower Mat https://amzn.to/48ntxvR ▪︎ Diffuser set https://amzn.to/3M6NXBD ▪︎ Shower Squeegee https://amzn.to/3XPt7JD ▪︎ Small Bathroom Trash Can https://amzn.to/44xSzai ▪︎ Bamboo Toothbrushes https://amzn.to/3LSvQ2v Electrical parts ▪︎ GFCI Outlets 15 Amp https://amzn.to/4pilcjU ▪︎ Screw-less plates https://amzn.to/3KdjSzT ▪︎ LED Strip https://amzn.to/4p7Evge ▪︎ 12V Power Supply https://amzn.to/44jKnug ▪︎ Light Switch https://amzn.to/3KnY0So Drywall ▪︎ Drywall https://ift.tt/t8DsRxi ▪︎ Metal Corner https://ift.tt/4bG5tFY ▪︎ Drywall screws https://ift.tt/2yidobl ▪︎ Drywall mud https://ift.tt/kUwAjTq ▪︎ 2x4 PT lumber https://ift.tt/QPb2SiM ▪︎ Liquid nail https://ift.tt/lTjxmoR Lumber used ▪︎ Baseboard https://ift.tt/8cyn5XD ▪︎ Door casement https://ift.tt/oEeRAuU ▪︎ 2x4 Lumber https://ift.tt/DHeWUX5 ▪︎ 1x2 Lumber https://ift.tt/kFj2xwq Plumbing parts ▪︎ Connectors https://ift.tt/yANlWLI ▪︎ Extension tube https://amzn.to/4825X91 Finishes (Painting) ▪︎ Wall Paint – Sherwin-Williams snowbound ▪︎ Black wall paint ▪︎ Matte Black Spray paint https://ift.tt/6JQw3gq ▪︎ Stain used: https://ift.tt/thPgx3l DISCLOSURE: Aven APR is 7.49–14.99% for primary residences accurate as of October 16, 2025. Line sizes may vary by state. Cash back applies to valid purchases. See Cash Back Terms & Conditions at https://ift.tt/zRb9BQC Approvals in as fast as 15 minutes; times may vary. Aven Financial, Inc. (dba “Aven” or (“Aven Card” in AR, ID, and PA)) NMLS#2042345. Subject to credit and property approval. The Aven Visa Credit Card is issued by Coastal Community Bank, pursuant to a license from Visa U.S.A., Inc. Aven accounts are made by Coastal Community Bank, Member FDIC. NMLS #462289. Terms & conditions apply. Line sizes may vary per state.Disclosures can be found at https://ift.tt/dQpk94v Visit Aven.com for more details. Equal Housing Lender.
from DIY Creators https://www.youtube.com/watch?v=Y8kEGe_bjEQ
from DIY Creators https://www.youtube.com/watch?v=Y8kEGe_bjEQ
2025年11月18日星期二
Dress Up Center - No Cutting Required! Free Plans

1x Pieced Footed Charcuterie Board
We Built It! Here's How it Turned Out -
Charcuterie boards are a entertaining staple, the perfect base and backdrop for a gorgeous edible collage. But the charcuterie board itself - the wood board - can be hundreds of dollars! You can build your own using scrap wood for free.
I partnered up with Jaime Costiglio to build and test this project for you. This DIY tutorial walks you through how to piece scrap wood together to make a Charcuterie board.

To tie all the boards together, we added a footed base:
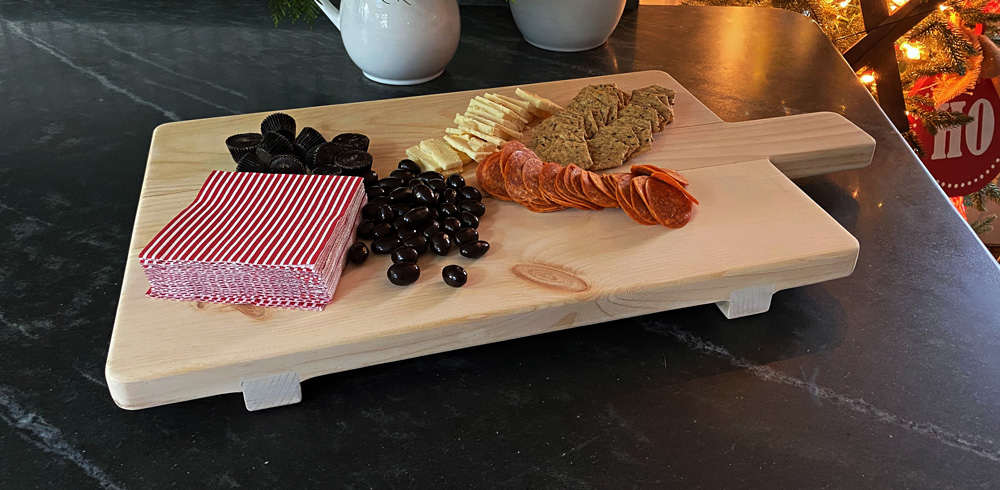
So just cut your boards, lay them out with glue, and attach the boards to the bottom. Super easy!
Build Photos and More Details
More photos and build tips at Jaime Costiglio.com
from Recent Project Plans https://ift.tt/q78xpDw
订阅:
评论 (Atom)